Kick-off
A basic VoIP service configuration is fast, easy and straight-forward. Provided that your network and required DNS records have been preconfigured, the configuration of a VoIP service can be done purely via the administrative web interface. The configuration mainly includes the following steps:
-
Reseller creation (optional)
-
SIP domain configuration
-
Customer creation
-
Subscribers provisioning
Let us assume you are using the 1.2.3.4 IP address with an associated sip.yourdomain.com domain to provision VoIP services. This allows you to provide an easy-to-remember domain name instead of the IP address as the proxy server. Also, your subscribers' URIs will look like 1234567@sip.yourdomain.com.
| Using an IP address instead of an associated FQDN (domain name) for a SIP domain is not suggested as it could add extra administrative work if you decide to relocate your servers to another datacenter or change IP addresses. |
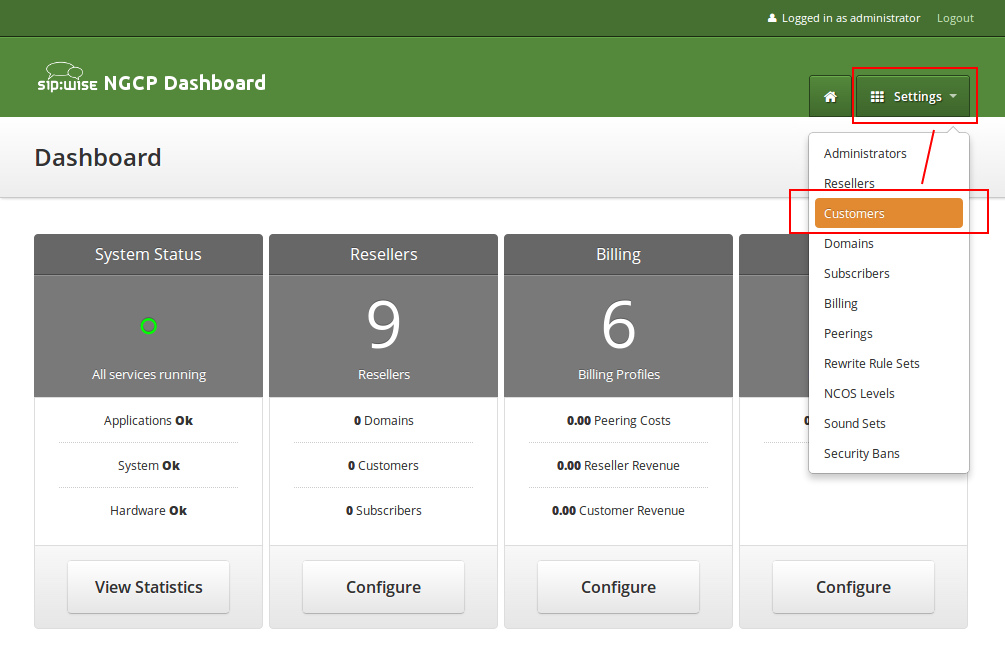
Go to the Administrative Web Panel (Admin Panel) running on https://<ip>:1443/ and follow the steps below. The default web panel user and password are administrator, if you have not already changed it in Changing Administrator Password.
Creating a SIP Domain
A SIP domain is a connection point for your subscribers. The SIP domain also contains specific default configuration for all its subscribers.
| Thoroughly plan your domain names policy in advance and take into account that: 1) the name of a SIP domain cannot be changed after creating it in the administrative web panel; 2) subscribers cannot be moved from one domain to another and must be recreated. |
To create a SIP domain, follow these steps:
-
Firstly, configure an FQDN on your DNS server for it.
The domain name must point to the physical IP address you are going to use for providing the VoIP service. A good approach is to create an SRV record:
SIP via UDP on port 5060 SIP via TCP on port 5060 SIP via TCP/TLS on port 5061 -
Create a new SIP domain in the administrative web panel.
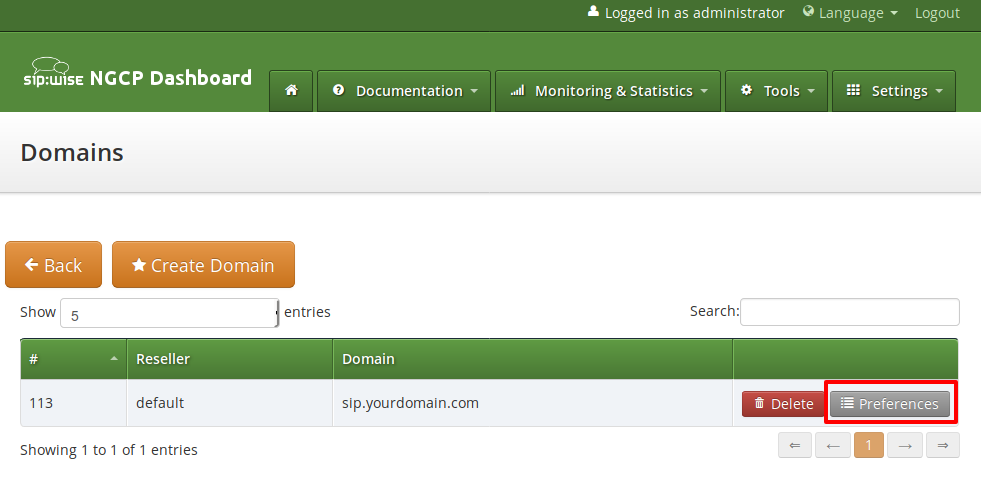
Go to the Domains page and create a new SIP Domain using the FQDN created above.
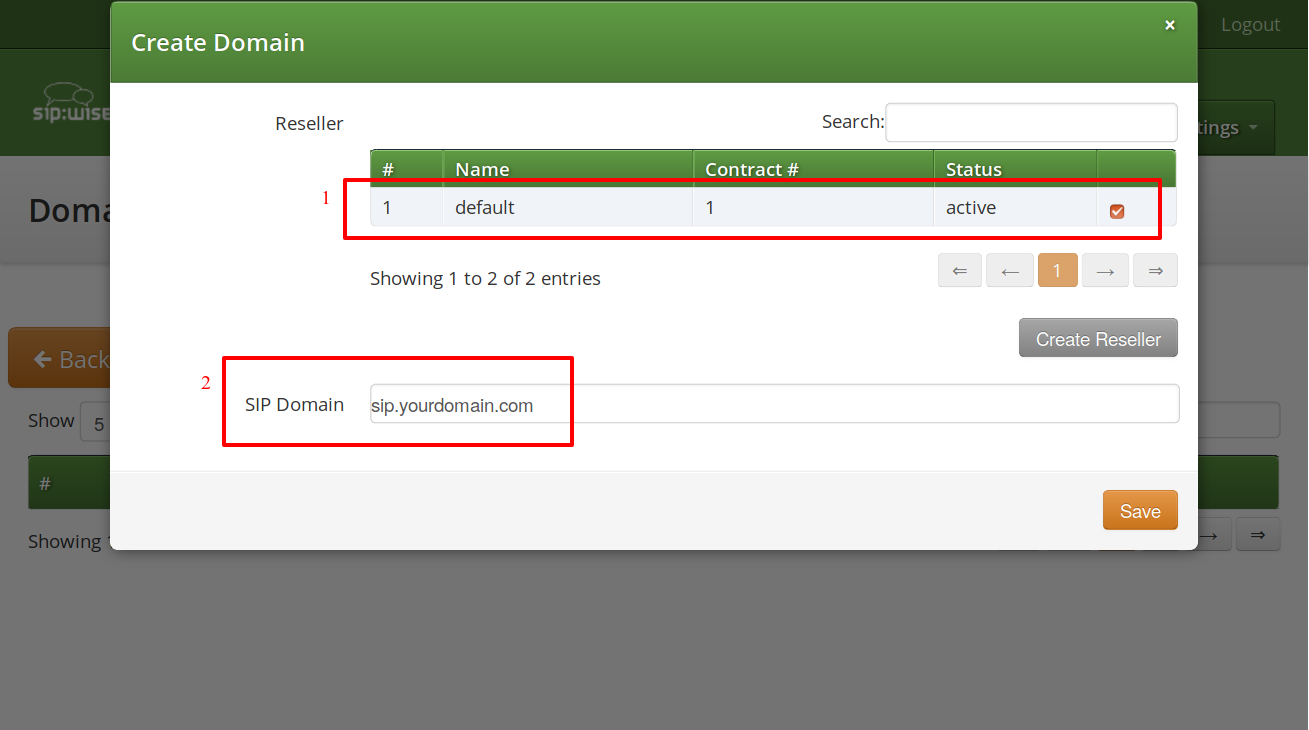
Select a Reseller who will own the subscribers in this SIP domain. Use the default virtual reseller if you provide services directly. Enter your SIP domain name and press Save.
-
Adjust the new SIP domain’s preferences if necessary.
You can create multiple SIP domains reusing the existing IP address or adding a new one. Extra SIP domains are required e.g. if you would like to host a virtual operator on your platform, create separate domains for providing services in different countries or offer a new service.
Creating a Customer
A Customer is a special type of contract acting as legal and billing information container for SIP subscribers. A customer can have one or more SIP subscriber entities that represent SIP lines.
| For correct billing, notification and invoicing, create a customer with a single SIP subscriber for the residential service (as it normally has only one telephone line) and a customer with multiple SIP subscribers to provide a service to a company with many telephone lines. |
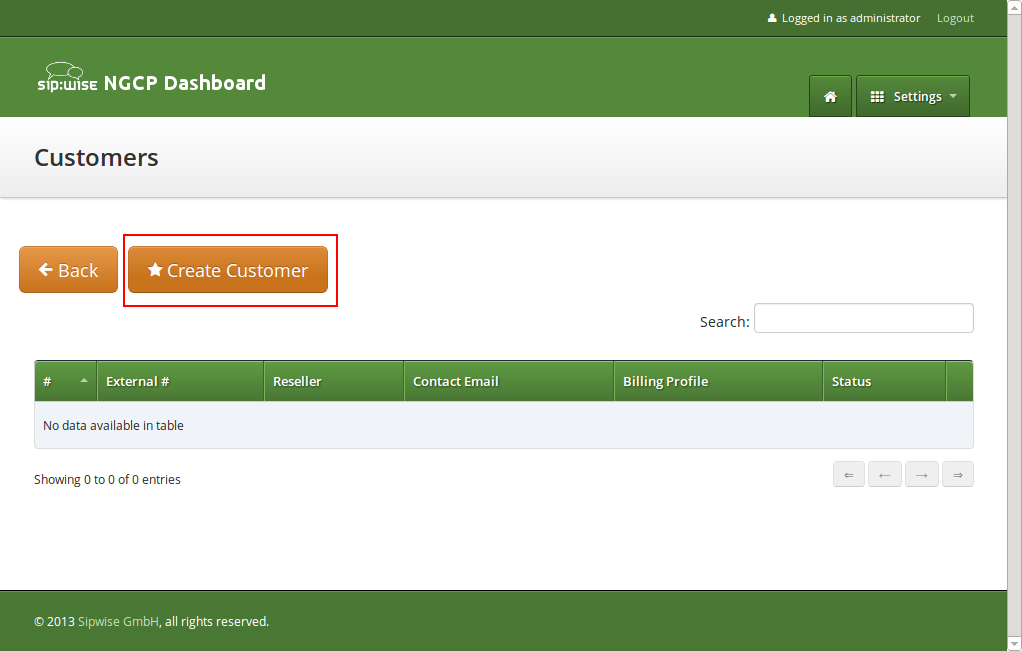
To create a Customer, go to Settings→Customers.
Click on Create Customer.
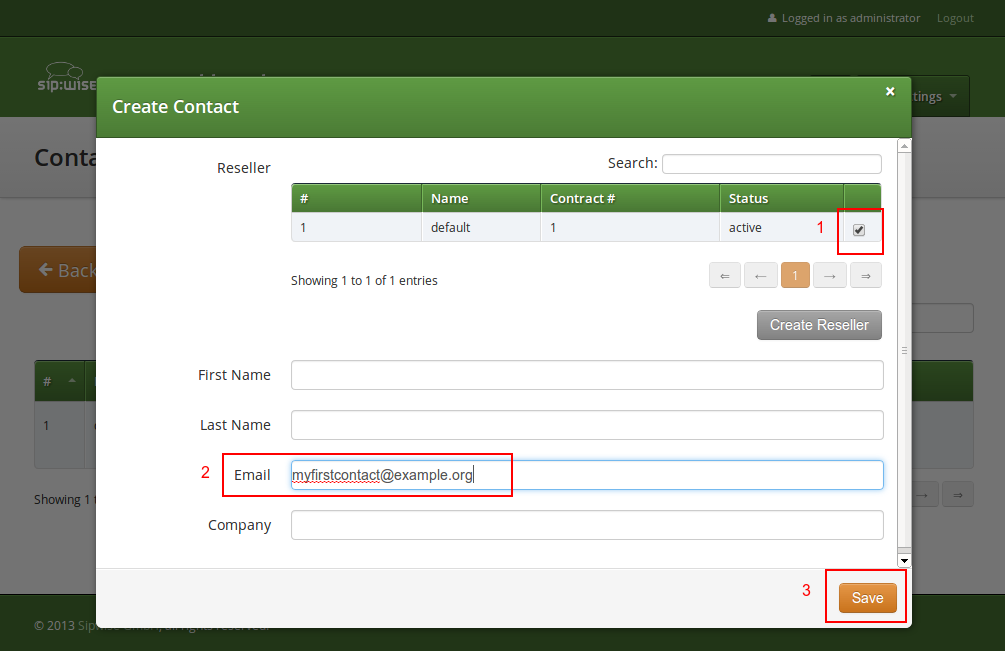
Each Customer has a Contact — a container for the personal and legal information that identifies a private or corporate customer.
| Create a dedicated Contact for every Customer as it contains specific data e.g. name, address and IBAN that identifies this customer. |
Click on Create Contact to create a new Contact.
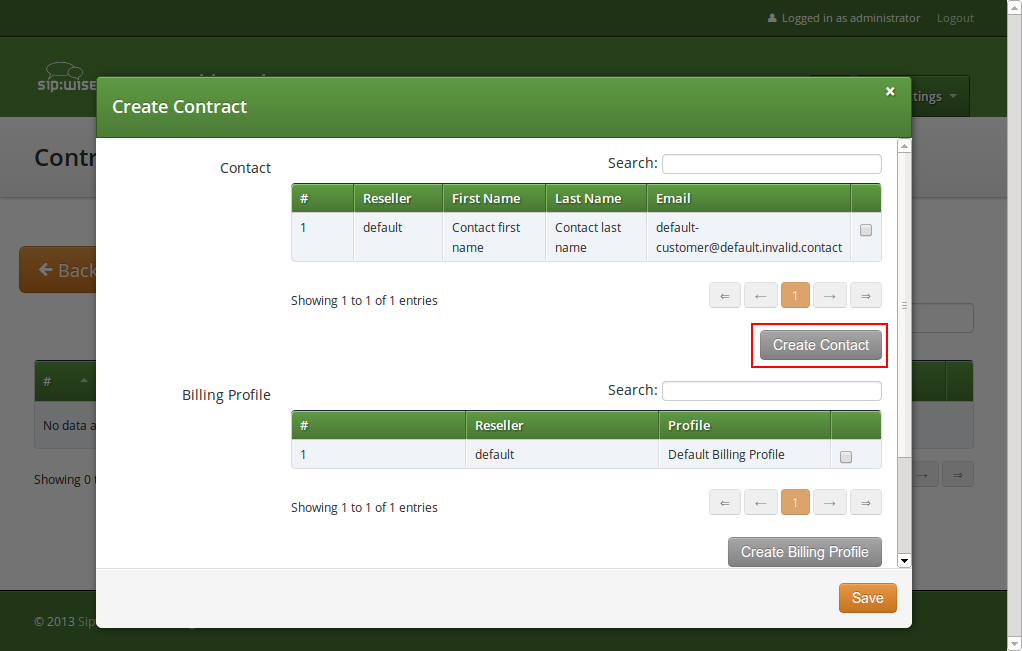
Select the required Reseller and enter the contact details (at least an Email is required), then press Save.
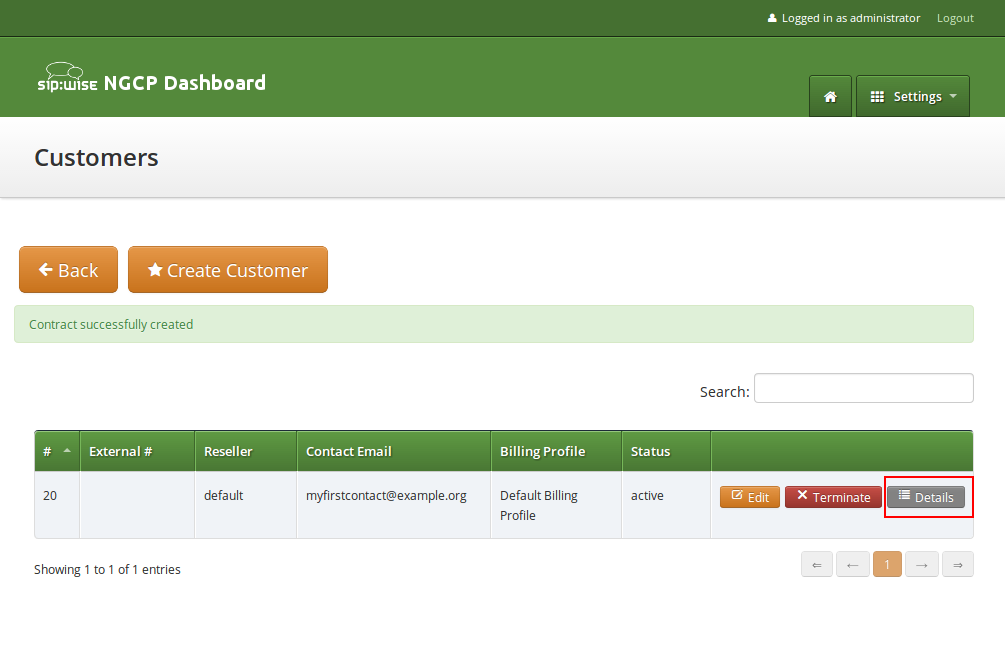
You will be redirected back to the Customer form. The newly created Contact is selected by default now, so only select a Billing Profile and press Save.
You will now see your first Customer in the list. Hover over the customer and click Details to make extra configuration if necessary.
Creating a Subscriber
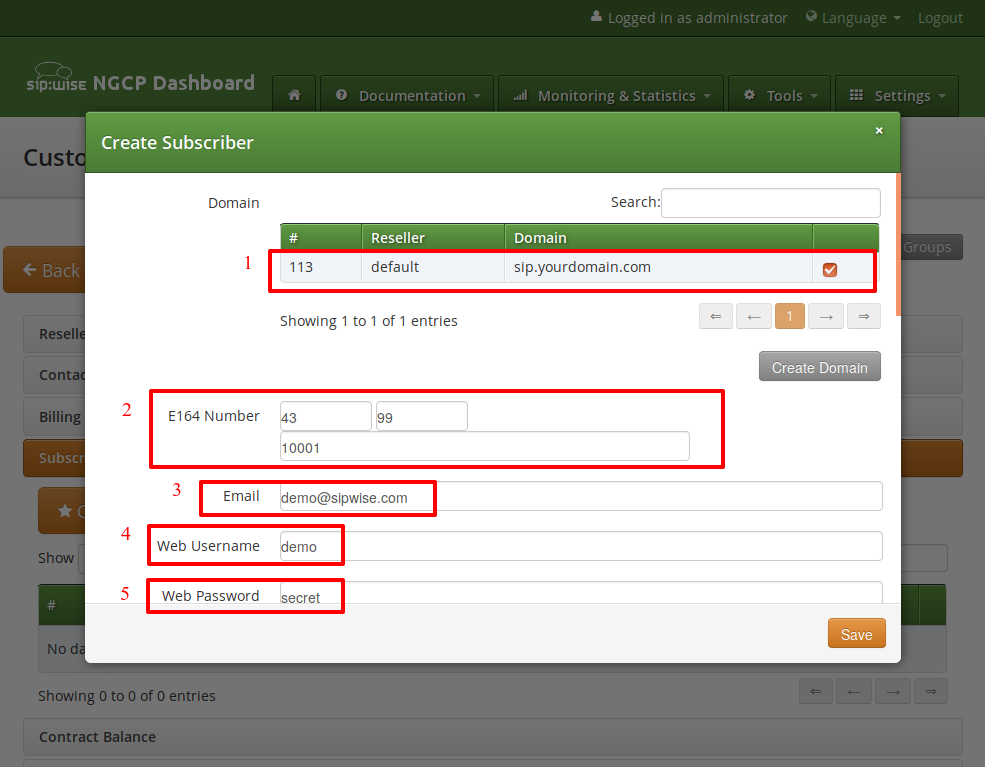
In your Customer details view, click on the Subscribers row, then click Create Subscriber.

Select a SIP Domain created earlier and specify required and optional parameters:
-
Domain: The domain part of the SIP URI for your subscriber.
-
E164 Number: This is the telephone number mapped to the subscriber, separated into Country Code (CC), Area Code (AC) and Subscriber Number (SN). For the first tests, you can set an imaginary number here and change it later when you get number blocks assigned by your PSTN interconnect partner. So in our example, we’ll use 43 as CC, 99 as AC and 1001 as SN to form the imaginary number +43 99 1001.
| This number can actually be used to place calls between local subscribers, even if you don’t have any PSTN interconnection. This comes in handy if you use phones instead of soft-clients for your tests. The format in which this number can be dialled, so the subscriber is reached is defined in Configuring Rewrite Rule Sets. |
| Sipwise C5 allows a single subscriber to have multiple E.164 numbers to be used as aliases for receiving incoming calls. Also, Sipwise C5 supports so-called "implicit" extensions. If a subscriber has phone number 012345, but somebody calls 012345100, then NGCP first tries to send the call to number 012345100 (even though the user is registered as 012345). If Sipwise C5 then receives the 404 - Not Found response, it falls back to 012345 (the user-part with which the callee is registered). |
-
Email: An email address for sending service-related notifications to.
-
Web Username: This is the user part of the username the subscriber may use to log into her Customer Self Care Interface. The user part will be automatically suffixed by the SIP domain you choose for the SIP URI. Usually, the web username is identical to the SIP URI, but you may choose a different naming schema.
| The web username needs to be unique. The system will return a fault if you try to use the same web username twice. |
-
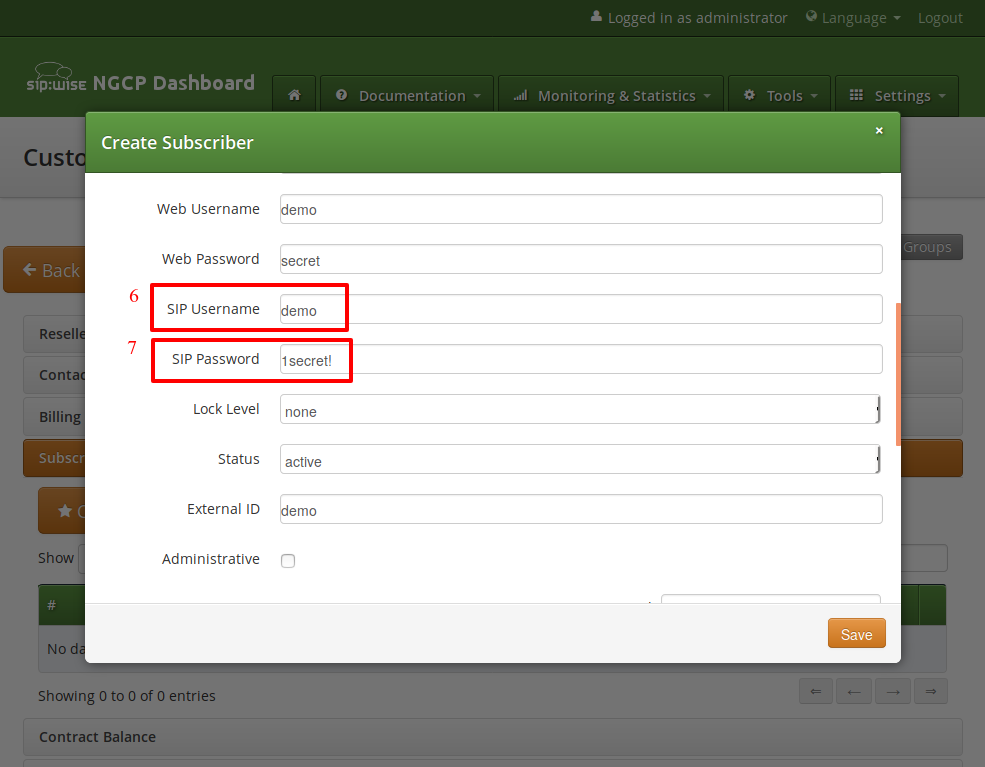
Web Password: This is the password for the subscriber to log into her Customer Self Care Interface. It must be at least 6 characters long.
-
SIP Username: The user part of the SIP URI for your subscriber.
-
SIP Password: The password of your subscriber to authenticate on the SIP proxy. It must be at least 6 characters long.
-
Status: You can lock a subscriber here, but for creating one, you will most certainly want to use the active status.
-
External ID: You can provision an arbitrary string here (e.g. an ID of a 3rd party provisioning/billing system).
-
Administrative: If you have multiple subscribers in one account and set this option for one of them, this subscriber can administrate other subscribers via the Customer Self Care Interface.
Repeat the creation of Customers and Subscribers for all your test accounts. You should have at least 3 subscribers to test the functionality of the NGCP.
| At this point, you’re able to register your subscribers to Sipwise C5 and place calls between these subscribers. |
You should now revise the Domain and Subscriber Preferences.
Domain Preferences
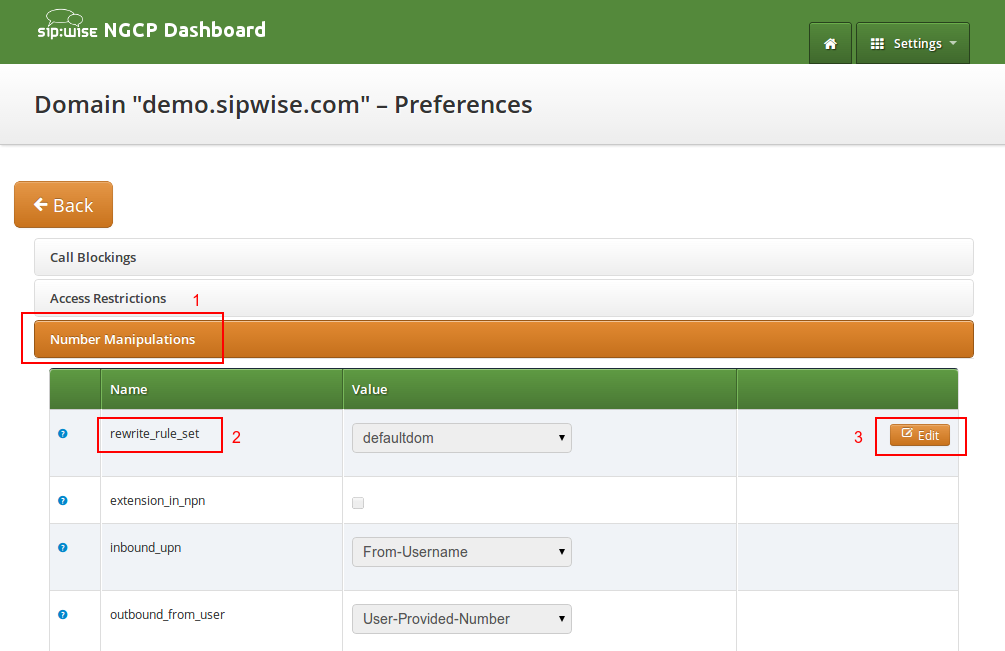
The Domain Preferences are the default settings for Subscriber Preferences, so you should set proper values there if you don’t want to configure each subscriber separately. You can later override these settings in the Subscriber Preferences if particular subscribers need special settings. To configure your Domain Preferences, go to Settings→Domains and click on the Preferences button of the domain you want to configure.
The most important settings are in the Number Manipulations group.
Here you can configure the following:
-
for incoming calls - which SIP message headers to take numbers from
-
for outgoing calls - where in the SIP messages to put certain numbers to
-
for both - how these numbers are normalized to E164 format and vice versa
To assign a Rewrite Rule Set to a Domain, create a set first as described in Configuring Rewrite Rule Sets, then assign it to the domain by editing the rewrite_rule_set preference.
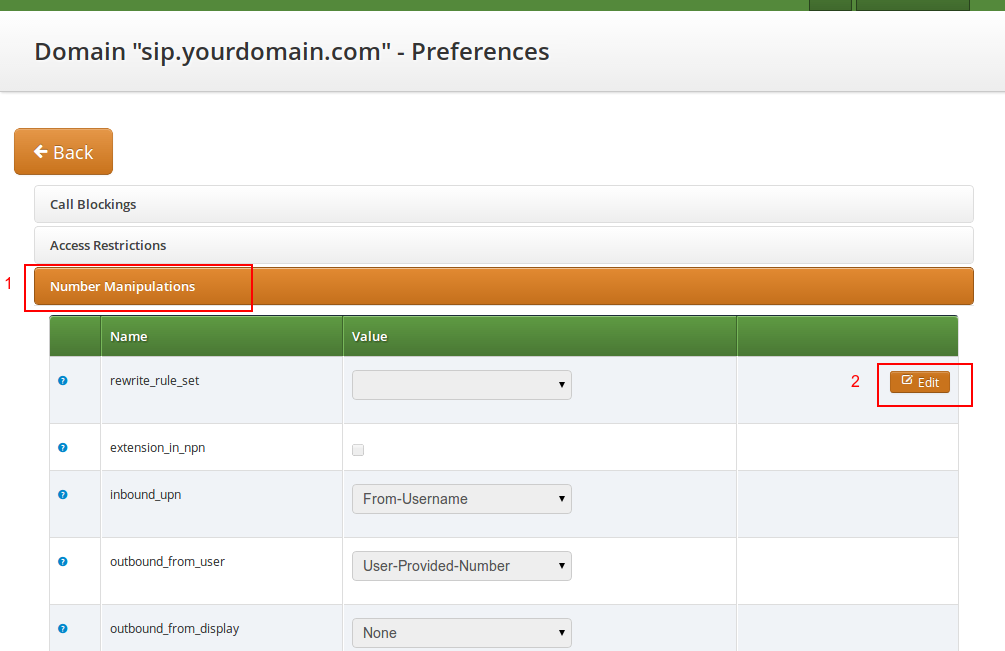
Select the Rewrite Rule Set and press Save.

Then, select the field you want the User Provided Number to be taken from for inbound INVITE messages. Usually the From-Username should be fine, but you can also take it from the Display-Name of the From-Header, and other options are available as well.
Subscriber Preferences
You can override the Domain Preferences on a subscriber basis as well. Also, there are Subscriber Preferences which don’t have a default value in the Domain Preferences.
To configure your Subscriber, go to Settings→Subscribers and click Details on the row of your subscriber. There, click on the Preferences button on top.
You want to look into the Number Manipulations and Access Restrictions options in particular, which control what is used as user-provided and network-provided calling numbers.
-
For outgoing calls, you may define multiple numbers or patterns to control what a subscriber is allowed to send as user-provided calling numbers using the allowed_clis preference.
-
If allowed_clis does not match the number sent by the subscriber, then the number configured in cli (the network-provided number) preference will be used as user-provided calling number instead.
-
You can override any user-provided number coming from the subscriber using the user_cli preference.
| Subscribers preference allowed_clis will be synchronized with subscribers primary number and aliases if ossbss→provisioning→auto_allow_cli is set to 1 in /etc/ngcp-config/config.yml. |
| Subscribers preference cli will be synchronized with subscribers primary number if ossbss→provisioning→auto_sync_cli is set to yes in /etc/ngcp-config/config.yml. |
Subscriber authentication for outbound calls
There are cases when Sipwise C5 should pass the authentication process for a subscriber. In other words to pass the authentication process of an outbound call from behalf of the subscriber entity (configuration object).
Suppose there is Sipwise C5 and some other Class 5 system (can be just another Sipwise C5). You have recently migrated part of subscribers from another Class 5 system to Sipwise C5. But, you still have SIP peerings (with ITSPs) at that system, and you would like that recently migrated subscribers are still able to terminate calls via that another Class 5 system.
This is when the 'Remote Authentication' parameters start helping you. The call flow in this scenario will be: Sipwise C5→another Class 5 system→SIP peering
And that system (another Class 5 system) will of course treat a call coming to it from Sipwise C5, as if that would be a direct call from the subscriber (indeed it’s not).
This is when you need to be capable of the authentication and Sipwise C5 gives you this possibility.
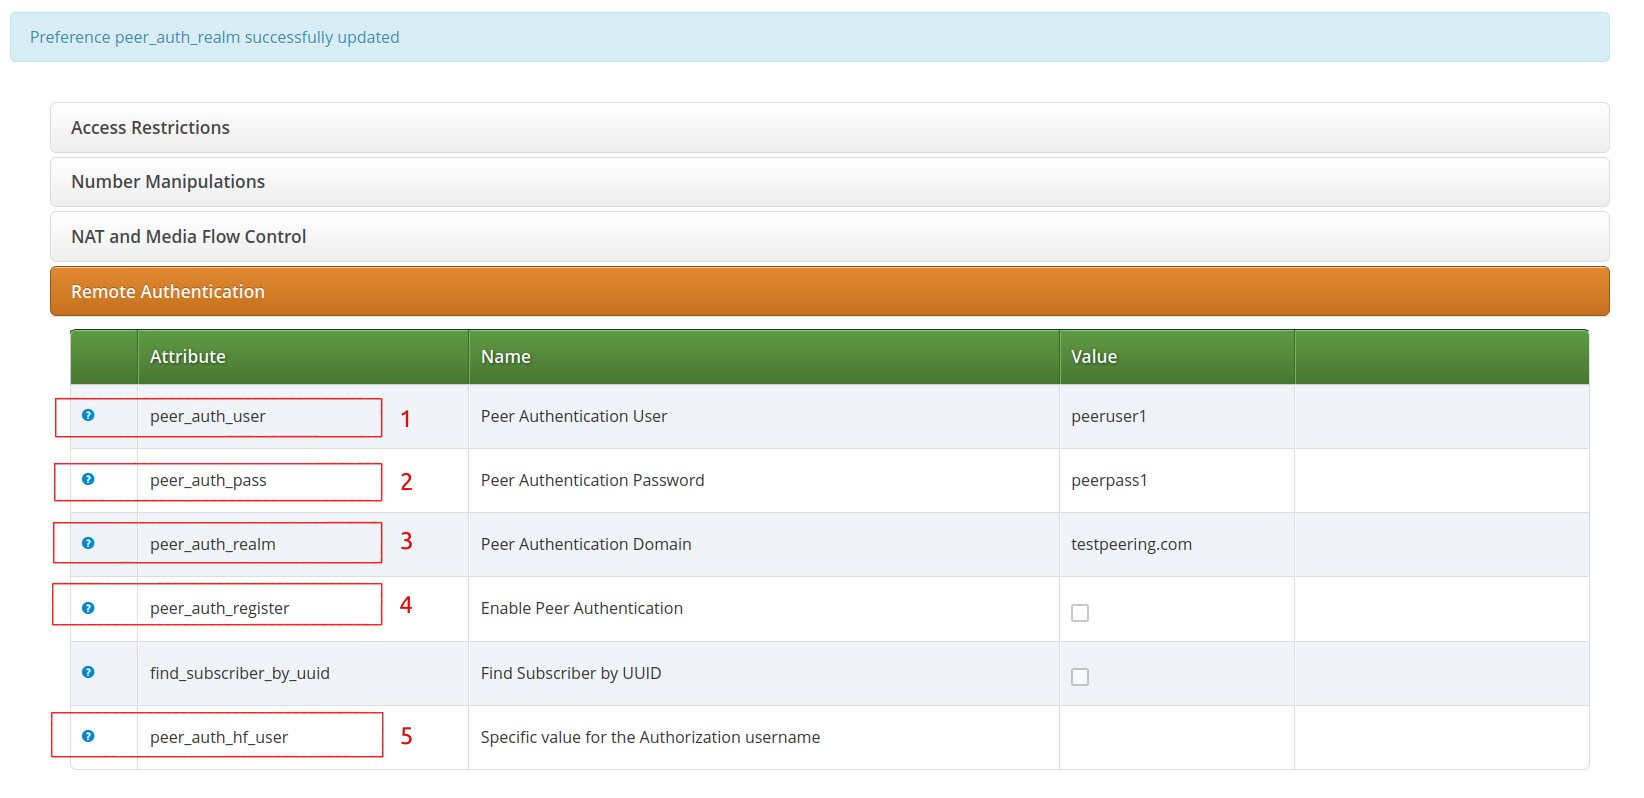
You will need to go to subscriber’s preferences and to know specific credentials to be used for that, in order to pass the authorization. To configure this setting, open the Remote Authentication tab and edit the following four preferences:
-
peer_auth_user: <username for peer auth>
-
peer_auth_pass: <password for peer auth>
-
peer_auth_realm: <domain for peer auth>
-
peer_auth_hf_user: <username parameter for Authorization hf>
| 'peer_auth_hf_user' preference is optional and can be skipped. It allows you to set a specific username for the Proxy-Authorization header. |
As soon as you define those parameters, a call from behalf of the subscriber, which will be terminated at another system, can be successfully authenticated.
Subscriber authentication for an outbound registration
This is approximately the same use case as for the 'Subscriber authentication for outbound calls' section, but this time for the registration process. Sipwise C5 can register at remote system, hence placing the location record on behalf of the subscriber.
| Location record which will be saved at a remote system, will contain the contact of Sipwise C5 Load-Balancer, not the contact of the end subscriber. |
The reason why you might need Sipwise C5 to register at remote system from behalf of the subscriber:
-
you want to receive calls from remote system to your subscriber, as if your subscriber would receive this directly;
-
that remote system doesn’t accept a call sent from Sipwise C5 from behalf of the subscriber, without a registration beforehand;
| This registration process will be completely independent from the end subscriber, and will be only triggered and controlled by Sipwise C5. |
This is when the 'Remote Authentication' parameters help you again. You need to go to susbcriber’s preferences, open the Remote Authentication tab and now additionally enable outbound registration:
-
peer_auth_register: True
Now in common with the preferences you defined previously in the 'Subscriber authentication for outbound calls' section, the registration process will start using given credentials.
| Remember, the subscriber’s preference 'peer_auth_hf_user' affects invitation scenarios, as well as registration scenarios. Hence in case you set it, the username during digest, will be swapped. |
Subscriber’s preference for media in terms of IP Family (IPv4/IPv6)
It is possible to define which IP Family is preferred by a particular subscriber for sending media (RTP/RTCP), using the following preference:
NAT and Media Flow Control→ipv46_for_rtpproxy, which can be set to:
-
Force IPv4 - the subscriber prefers to send the media flow via IPv4
-
Force IPv6 - the subscriber prefers to send the media flow via IPv6
-
Auto-detect - auto detection is enabled and depending on the IP Family used during the registration, the preference for media will be picked out accordingly
-
use domain default - preference is inherited from the domain values
Both the domain and subscriber preferences contain the NAT and Media Flow Control section, which gives an access to the ipv46_for_rtpproxy preference.
| It is not necessarily, but is however recommended to set ipv46_for_rtpproxy→Force IPv6 for those subscribers which use IPv6 to send media (RTP/RTCP). |
Creating Peerings
If you want to terminate calls at or allow calls from 3rd party systems (e.g. PSTN gateways, SIP trunks), you need to create SIP peerings for that. To do so, go to Settings→Peerings. There you can add peering groups, and for each peering group add peering servers and rules controlling which calls are routed over these groups. Every peering group needs a peering contract for correct interconnection billing.
Creating Peering Groups
Click on Create Peering Group to create a new group.
In order to create a group, you must select a peering contract. You will most likely want to create one contract per peering group.
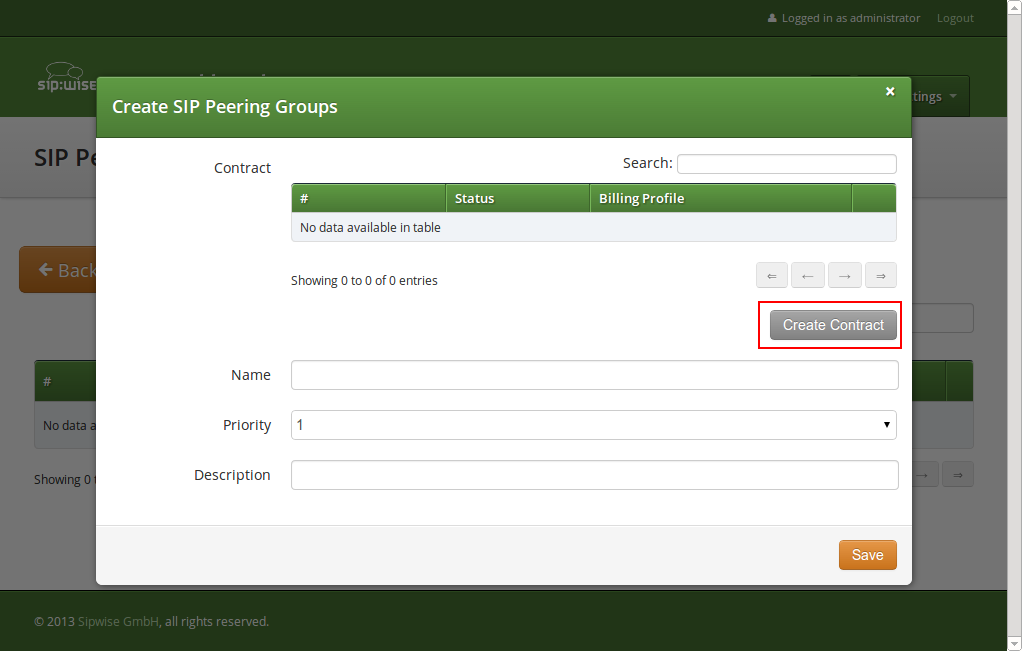
Click on Create Contract create a Contact, then select a Billing Profile.
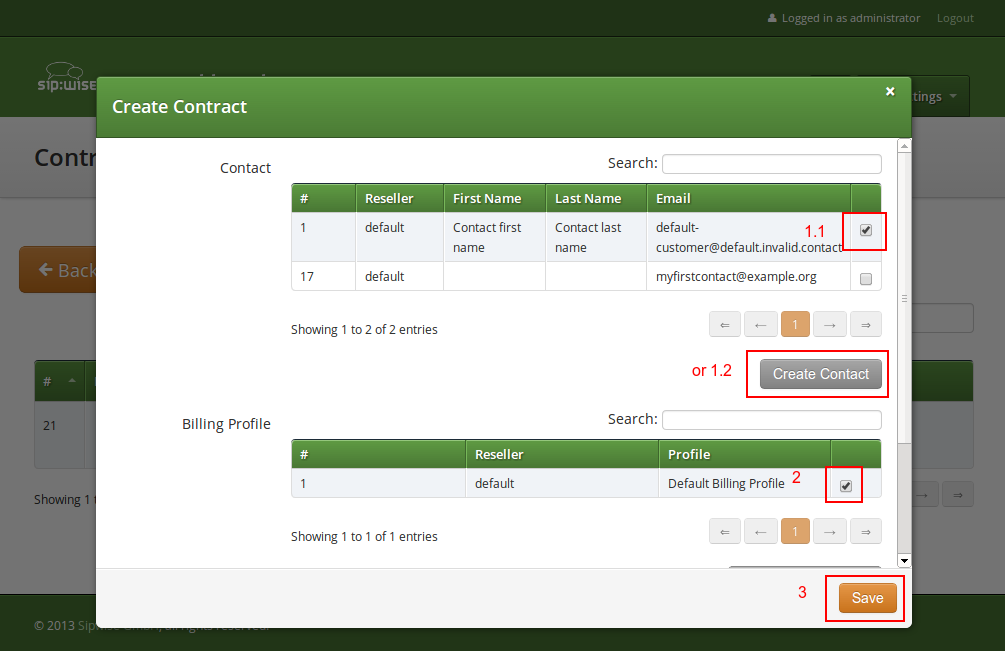
Click Save on the Contacts form, and you will get redirected back to the form for creating the actual Peering Group. Put a name, priority and description there, for example:
-
Peering Contract: select the id of the contract created before
-
Name: test group
-
Priority: 1
-
Description: peering to a test carrier

The Priority option defines which Peering Group to favor (Priority 1 gives the highest precedence) if two peering groups have peering rules matching an outbound call. Peering Rules are described below.
Then click Save to create the group.
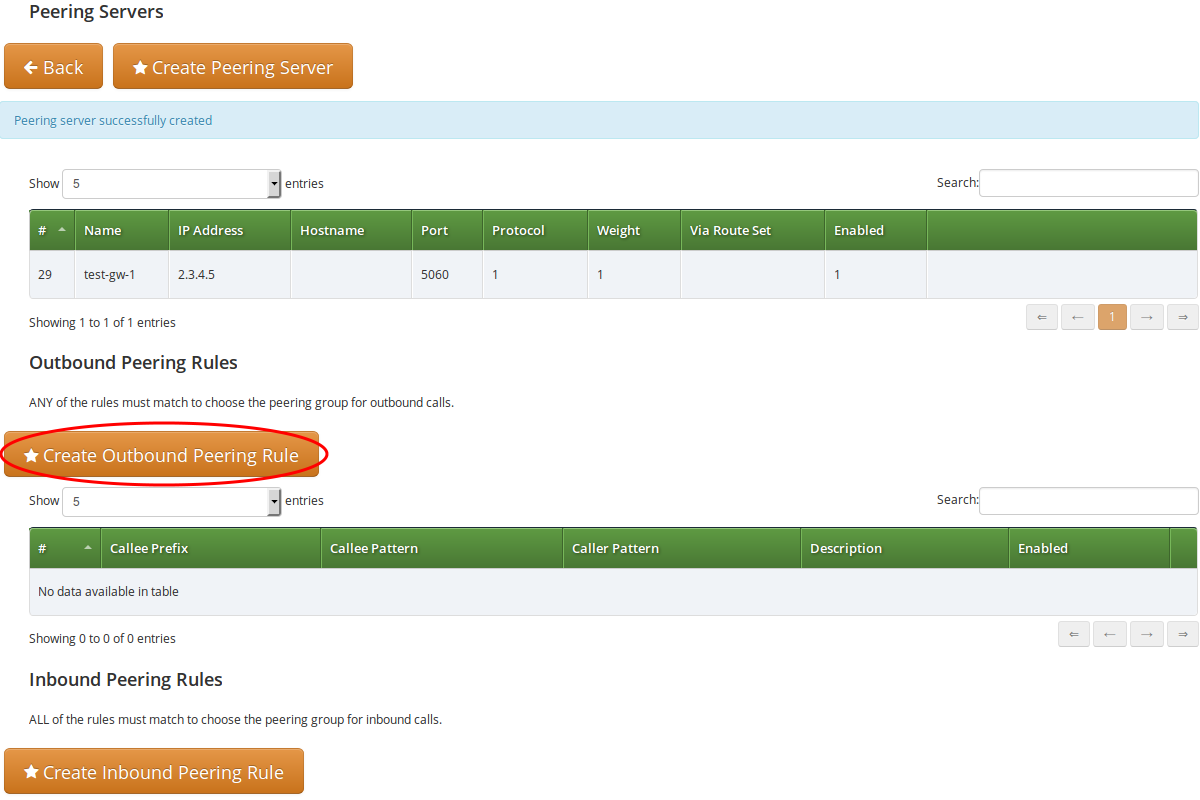
Creating Peering Servers
In the group created before, you need to add peering servers to route calls to and receive calls from. To do so, click on Details on the row of your new group in your peering group list.
To add your first Peering Server, click on the Create Peering Server button.
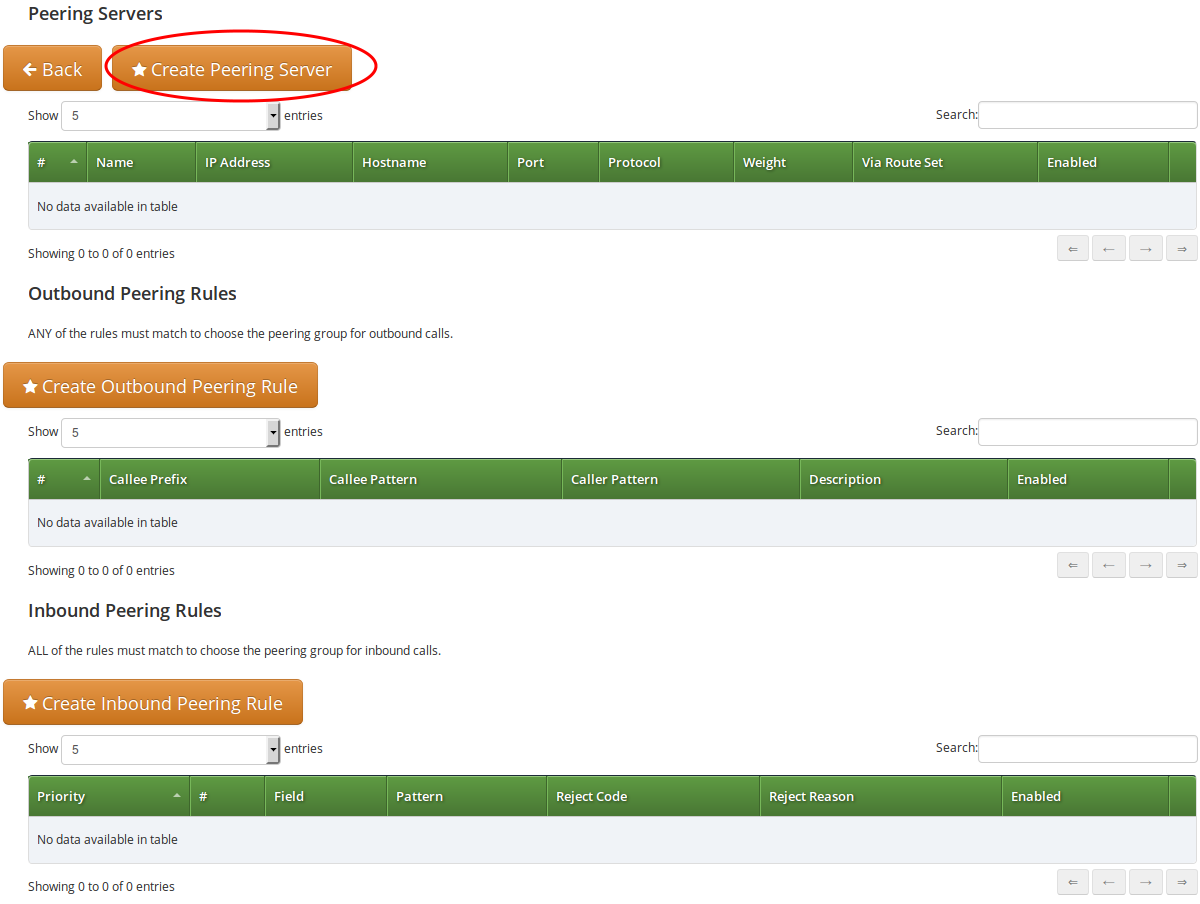
In this example, we will create a peering server with IP 2.3.4.5 and port 5060:
-
Name: test-gw-1
-
IP Address: 2.3.4.5
-
Hostname: leave empty
-
Port: 5060
-
Protocol: UDP
-
Weight: 1
-
Via Route: None
-
Enable Probing: enable it, if remote side supports SIP OPTIONS ping
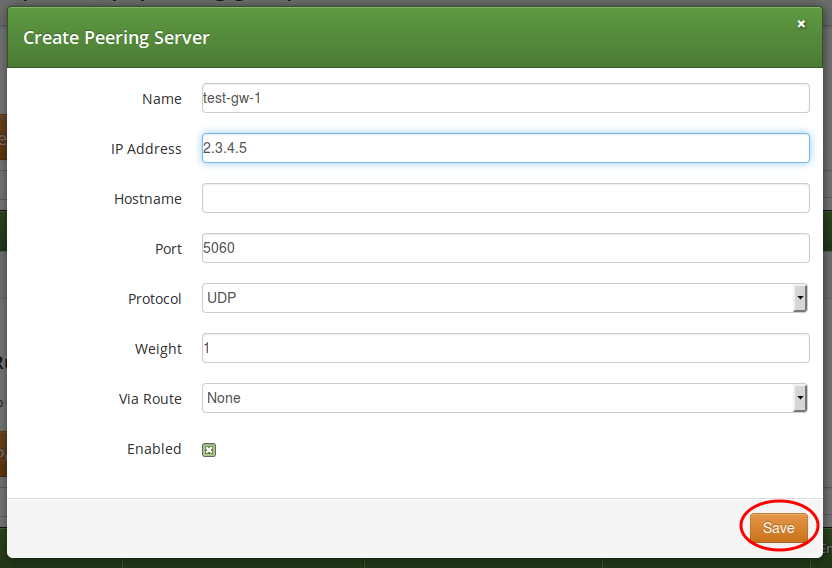
Click Save to create the peering server.
| The hostname field for a peering server is optional. Usually, the IP address of the peer is used as the domain part of the Request URI. Fill in this field if a peer requires a particular hostname instead of the IP address. The IP address must always be given though as it is used for the selection of the inbound peer. By default outbound requests will always be sent to the specified IP address, no matter what you put into the hostname field. If you want to send the request using the DNS resolution of the configured hostname, disregarding in that way the IP, you have to enable outbound_hostname_resolution option in peer preferences. |
| If you want to add a peering server with an IPv6 address, enter the address without surrounding square brackets into the IP Address column, e.g. ::1. |
You can force an additional hop (e.g. via an external SBC) towards the peering server by using the Via Route option. The available options you can select there are defined in /etc/ngcp-config/config.yml, where you can add an array of SIP URIs in kamailio→lb→external_sbc like this:
kamailio:
  lb:
    external_sbc:
      - sip:192.168.0.1:5060
      - sip:192.168.0.2:5060
Execute ngcpcfg apply "added external sbc gateways", then edit your peering server and select the hop from the Via Route selection.
Once a peering server has been created, this server can already send calls to the system.
| Requests coming from a SIP peering are matched not only by the IP address and a transport protocol, but also using the source port of a message. This means, if your SIP peering server created at Sipwise C5 has the 'Port' value set to '5060', then it’s expected that messages (requests) coming from this SIP peering, will have the source port '5060'. This however applies only to the UDP transport based connections (TCP and TLS are matched only using an IP address and a transport protocol). |
Outbound Peering Rules
| To be able to send outbound calls towards the servers in the Peering Group, you also need to define Outbound Peering Rules. They specify which source and destination numbers are going to be terminated over this group. To create a rule, click the Create Outbound Peering Rule button. |
Since the previously created peering group will be the only one in our example, we have to add a default rule to route all calls via this group. To do so, create a new peering rule with the following values:
-
Callee Prefix: leave empty
-
Callee Pattern: leave empty
-
Caller Pattern: leave empty
-
Description: Default Rule
-
Stopper: leave empty
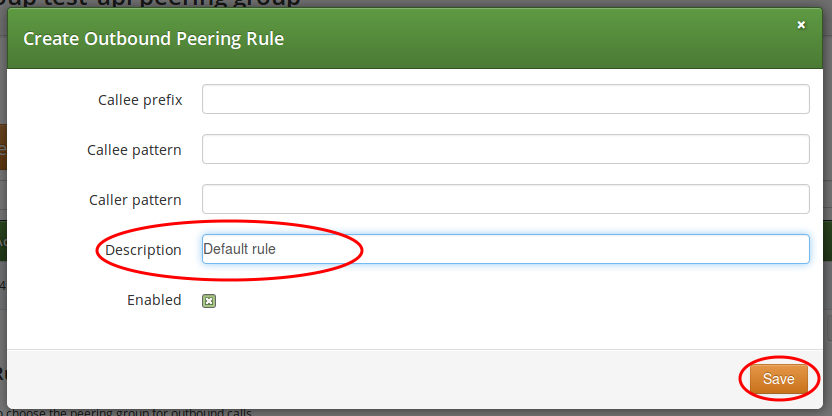
Then click Save to add the rule to your group.
| In contrast to the callee/caller pattern, the callee prefix has a regular alphanumeric string and can not contain any regular expression. |
| If you set the caller or callee rules to refine what is routed via this peer, enter all phone numbers in full E.164 format, that is <cc><ac><sn>. |
| The Caller Pattern field covers the whole URI including the subscriber domain, so you can only allow certain domains over this peer by putting for example @example\.com into this field. |
Inbound Peering Rules
Starting from mr5.0 release, Sipwise C5 supports filtering SIP INVITE requests sent by SIP peers. The system administrator may define one or more matching rules for SIP URIs that are present in the headers of SIP INVITE requests, and select which SIP header (or part of the header) must match the pattern declared in the rule.
If the incoming SIP INVITE message has the proper headers, Sipwise C5 will accept and further process the request. If the message does not match the rule it will be rejected.
| An incoming SIP INVITE message must match all the inbound peering rules so that Sipwise C5 does not reject the request. |
In order to create an inbound peering rule you have to select a peering group, press Details and then press Create Inbound Peering Rule button.

An inbound peering rule has the following properties:
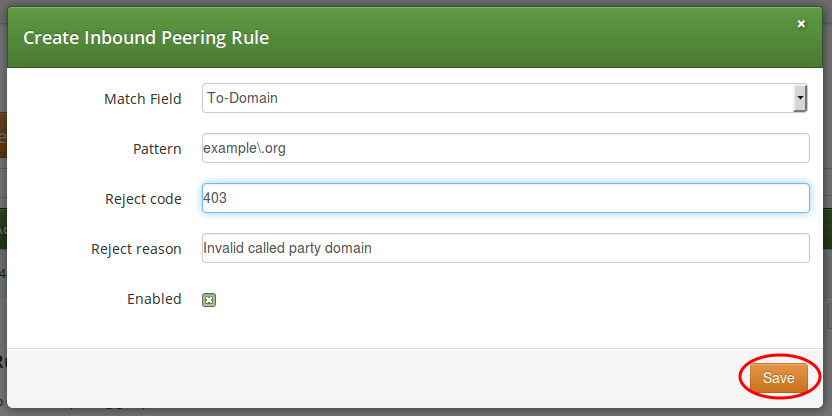
-
Match Field: select which header and which part of that header in a SIP INVITE message will be checked for matching the pattern
-
Pattern: a PCRE that defines the accepted value of a header; example:
^sip:.+@example\.org$— this will match a SIP URI that contains "example.org" in the domain part -
Reject code: optional; a SIP status code that will be sent as a response to an INVITE request that does not match the pattern; example: 403
-
Reject reason: optional; an arbitrary text that will be included in the SIP response sent with the reject code
-
Enabled: a flag to enable / disable the particular inbound peering rule
| Both of the properties Reject code and Reject reason must be left empty if a peering server (i.e. a specific IP address) is part of more peering groups. Such a configuration is useful when an incoming SIP INVITE request needs to be treated differently in the affected peering groups, based on its content, and that’s why if the INVITE message only partly matches an inbound peering rule it should not be rejected. |
When all settings for a peering group are done the details of the group look like:

Routing Order Selection
The selection of peering groups and peering servers for outgoing calls is done in the following way:
-
All peering groups that meet the following criteria configured in the outbound peering rule are added to the list of routes for a particular call:
-
Callee’s username matches callee prefix
-
Callee’s URI matches callee pattern
-
Caller’s URI matches caller pattern
-
-
When all matching peering groups are selected, they are ordered by callee prefix according to the longest match basis (sometimes referred to as the longest pattern match or maximum pattern length match). One or more peering group with longest callee prefix match will be given first positions on the list of routes.
-
Peering groups with the same callee prefix length are further ordered by Priority. Peering group(s) with the higher priorities will occupy higher positions.
Priority 1 gives the highest precedence to the corresponding peering group. Hence, a lower priority value will put the peering group higher in the list of routes (compared to other peering groups with the same callee prefix length). Priority can be selected from 1 (highest) to 9 (lowest).
-
All peering servers in the peering group with the highest priority (e.g. priority 1) are tried one-by-one starting from the highest server weight. Peering groups with lower priorities or with shorter callee prefix will be used only for fail-over.
The weight of the peering servers in the selected peering group will influence the order in which the servers within the group will be tried for routing the outbound call. The weight of a server can be set in the range from 1 to 127.
| Opposite to the peering group priority, a peering server with a higher weight value has a higher precedence, but the server weight rather sets a probability than a strict order. E.g. although a peering server with weight 127 has the highest chance to be the first in the list of routes, another server with a lower weight (e.g. 100) sometimes will be selected first. |
In order to find out this probability knowing the weights of peering servers, use the following script:
#!/usr/bin/perl

#This script can be used to find out actual probabilities
#that correspond to a list of peering weights.

$num_args = $#ARGV + 1;
if ($num_args < 1) {
    print "Usage: lcr_weight_test.pl <list of weights (integers 1-254)>\n";
    exit 0;
}

my $iters = 10000;
my @rands;

for (my $i=1; $i <= $iters; $i++) {
    my %elem;
    for (my $j=0; $j < $num_args; $j++) {
        my $random = int(rand(2000000000));
        $elem{"$j"} = $ARGV[$j] * $random;
    }
    push(@rands, \%elem);
}

my @counts;
for (my $j=0; $j < $num_args; $j++) {
    $counts["$j"] = 0;
}

foreach my $rand (@rands) {
    my $higher = 0;
    my $higher_key = 0;
    foreach $key (keys %{$rand}) {
        if ($rand->{$key} > $higher) {
            $higher = $rand->{$key};
            $higher_key = $key;
        }
    }
    $counts[$higher_key]++;
}

for (my $j=0; $j < $num_args; $j++) {
    my $prob = $counts[$j]/$iters;
    print "Peer with weight $ARGV[$j] has probability $prob \n";
}
Let us say you have 2 peering servers, one with weight 1 and another with weight 2. At the end — running the script as below — you will have the following traffic distribution:
# lcr_weight_test.pl 1 2

 Peer with weight 1 has probability 0.2522
 Peer with weight 2 has probability 0.7478
If a peering server replies with SIP codes 408, 500 or 503, or if a peering server doesn’t respond at all, the next peering server in the current peering group is tried as a fallback. All the servers within the group are tried one after another until the call succeeds. If no more servers are left in the current peering group, the next group which matches the outbound peering rules is used.
| The Sipwise C5 may use a slightly different approach in selecting the appropriate peering server if the peer probing feature is enabled. See the details in advancedconfiguration:advancedconfiguration.adoc#peer_probing_main of the handbook. |
Least Cost Routing (LCR) Configuration
The default call routing uses statically configured peering group priorities to decide where to send the calls. This solution is useful when you have an external SBC that makes all the routing decisions and is described in the Routing Order Selection section. The Sipwise C5 also allows you routing calls to the cheapest SIP peers saving your termination cost.
To enable LCR routing, do the following:
-
Upload the billing fees provided by your peers to the corresponding peering billing profiles
-
Enable the LCR module in config.yml (kamailio.proxy.perform_peer_lcr: yes)
When the LCR routing is enabled, the selection of peering groups would be the following:
-
All peering groups that meet the following criteria configured in the outbound peering rule are added to the list of routes for a particular call (for pure LCR you might want to omit these filters leaving them blank):
-
Callee’s username matches callee prefix
-
Callee’s URI matches callee pattern
-
Caller’s URI matches caller pattern
-
-
When all matching peering groups are selected, the longest matching callee prefix is selected from each of them. And the peering groups are temporary ordered according to the longest matching prefix and priority.
-
Then, the LCR module re-orders the peering groups starting from the lowest termination cost to the highest (ignoring the prefix length and peering group priorities).
-
The platform will first route the call to the servers of the first peering group in this list. If no peering server can terminate the call, the call would fail-over to the second peering group from the list and so on.
The peering servers in every peering group are sorted and tried according to their weight as described in the previous section.
Let us consider a short example. There are two peering groups (PG1 and PG2) that can deliver calls to New York (e.g. 12121234567) and they have the following rates:
| Peering Group | Prefix | Cost | Description |
|---|---|---|---|
PG1 |
1 |
0.02 |
USA & Canada |
PG2 |
1 |
0.05 |
USA & Canada |
1212 |
0.03 |
New York, USA |
PG1 has only one rate that matches the dialed number, so that it will be taken into account, PG2 has two rates and the longest will be selected. The call will be routed to PG1 servers first as it has a cheaper price and can fail-over to PG2 servers.
The Sipwise C5 LCR feature together with the codec filtering, media transcoding, header manipulations, SIP, and RTP encryption and other SBC features make an external SBC unnecessary. This simplifies your VoIP network and cuts deployment and operation costs.
Authenticating and Registering against Peering Servers
Proxy-Authentication for outbound calls
If a peering server requires Sipwise C5 to authenticate for outbound calls (by sending a 407 as response to an INVITE), then you have to configure the authentication details in the Preferences view of your peer host.
To configure this setting, open the Remote Authentication tab and edit the following four preferences:
-
peer_auth_user: <username for peer auth>
-
peer_auth_pass: <password for peer auth>
-
peer_auth_realm: <domain for peer auth>
-
peer_auth_register: <enable or disable an outbound registration for the peering>
-
peer_auth_hf_user: <username parameter for Authorization hf>
| 'peer_auth_hf_user' preference is optional and can be skipped. It allows you to set a specific username for the Proxy-Authorization header. |
| Before the 10.1 version Sipwise C5 used to only have the /etc/ngcp-config/templates/etc/ngcp-sems/etc/reg_agent.conf.tt2 configuration file to provide outbound registrations for SIP peering(s). Beginning from 10.1 you can choose, whether you want to initiate an outbound registration for your SIP peering using the web administration interface or using the /etc/ngcp-config/templates/etc/ngcp-sems/etc/reg_agent.conf.tt2 configuration file. The recommended way however is to create registrations using the web administration interface. Keep in mind, in case you want to use the web administration interface for that, then you have to remove similar configuration entries from the /etc/ngcp-config/templates/etc/ngcp-panel/etc/reg_agent.conf.tt2, so that the web administration interface does not duplicate the same registration information (this can lead to several registration sessions created for the same SIP peering host, which is not desired). |
If you do NOT authenticate against a peer host, then the caller CLI is put into the From and P-Asserted-Identity headers, e.g. "+4312345" <sip:+4312345@your-domain.com>. If you DO authenticate, then the From header is "+4312345" <sip:your_peer_auth_user@your_peer_auth_realm> (the CLI is in the Display field, the peer_auth_user in the From username and the peer_auth_realm in the From domain), and the P-Asserted-Identity header is as usual like <sip:+4312345@your-domain.com>. So for presenting the correct CLI in CLIP no screening scenarios, your peering provider needs to extract the correct user either from the From Display-Name or from the P-Asserted-Identity URI-User.
|
| If peer_auth_realm is set, the system may overwrite the Request-URI with the peer_auth_realm value of the peer when sending the call to that peer or peer_auth_realm value of the subscriber when sending a call to the subscriber. Since this is rarely a desired behavior, it is disabled by default starting with Sipwise C5 release 3.2. If you need the replacement, you should set set_ruri_to_peer_auth_realm: 'yes' in /etc/ngcp-config/config.yml. |
Registering at a Peering Server
A registration process for the SIP peering is quite simple, but since currently this functionality is present both in the web administration interface and in the /etc/ngcp-config/templates/etc/ngcp-sems/etc/reg_agent.conf.tt2 the last one is an inheritance and will be deprecated in the future), it’s worth to dedicate a separate section with an additional description. So that it remains clear for the user of the Sipwise C5 how to properly handle that.
The first and a recommended way to do that - is the web administration interface. It’s simple as that, you need to tick a check-box 'peer_auth_register', and if previously all needed authentication data has been provided (user, password and realm) the registration process will start right away.
The second way is a manual edition of the dedicated configuration file.
Create a new file /etc/ngcp-config/templates/etc/ngcp-sems/etc/reg_agent.conf.customtt.tt2 as a copy of /etc/ngcp-config/templates/etc/ngcp-sems/etc/reg_agent.conf.tt2. Configure your peering servers with the corresponding credentials in the new created file /etc/ngcp-config/templates/etc/ngcp-sems/etc/reg_agent.conf.customtt.tt2, then execute ngcpcfg apply "added upstream credentials".
| Be aware that this will force SEMS to restart, which will drop all calls. |
| Sipwise C5 supports outbound registrations via UDP, TCP and TLS. Please see /etc/ngcp-config/templates/etc/ngcp-sems/etc/reg_agent.conf.tt2 to see examples how to enable it using needed transport. |
| By default TCP/IP stack implementation in linux kernel uses so called ephemeral ports for TCP transport, when it comes to originating a brand new TCP session towards remote side. This is usually in the range of 32768 – 60999. This also applies to TLS. However Sipwise C5 can and will always reuse already existing TCP sessions with subscribers, in order to send them out-of-dialog requests (for e.g. INVITE). It works so, because subscribers which register at Sipwise C5, initiate and constantly support a TCP session with Sipwise C5 (either with TCP keepalive mechanisms, or constantly sending new re-registrations or/and OPTIONS). |
| You can force the Load-Balancer to use a fixed port for sending outbound registrations from your Sipwise C5 platform, by enabling option 'tcp_reuse_port' (config.yml → kamailio.lb.tcp_reuse_port: yes). This will force the Load-Balancer to use the same socket descriptor(s), for establishing outbound sessions, as used for listening (this only relates to TCP and TLS). With UDP you can by default initiate sessions from Sipwise C5 using a constant port (usually 5060). Remember enabling 'tcp_reuse_port' will force all sessions (not only REGISTER) initiated from behalf of Sipwise C5 be established over local port engaged for listening (TCP or TLS). |
| There is a possibility to define a specific value for the "username" parameter of the Authorization header, in case you want to have another username for the Digest process, than the one used in From/To headers. In order to do that, you have to define the option 'auth_user' for a desired registration entity. It’s being defined separately for each registration entity. |
Configuring Rewrite Rule Sets
On the NGCP, every phone number is treated in E.164 format <country code><area code><subscriber number>. Rewrite Rule Sets is a flexible tool to translate the caller and callee numbers to the proper format before the routing lookup and after the routing lookup separately. The created Rewrite Rule Sets can be assigned to the domains, subscribers and peers as a preference. Here below you can see how the Rewrite Rules are used by the system:
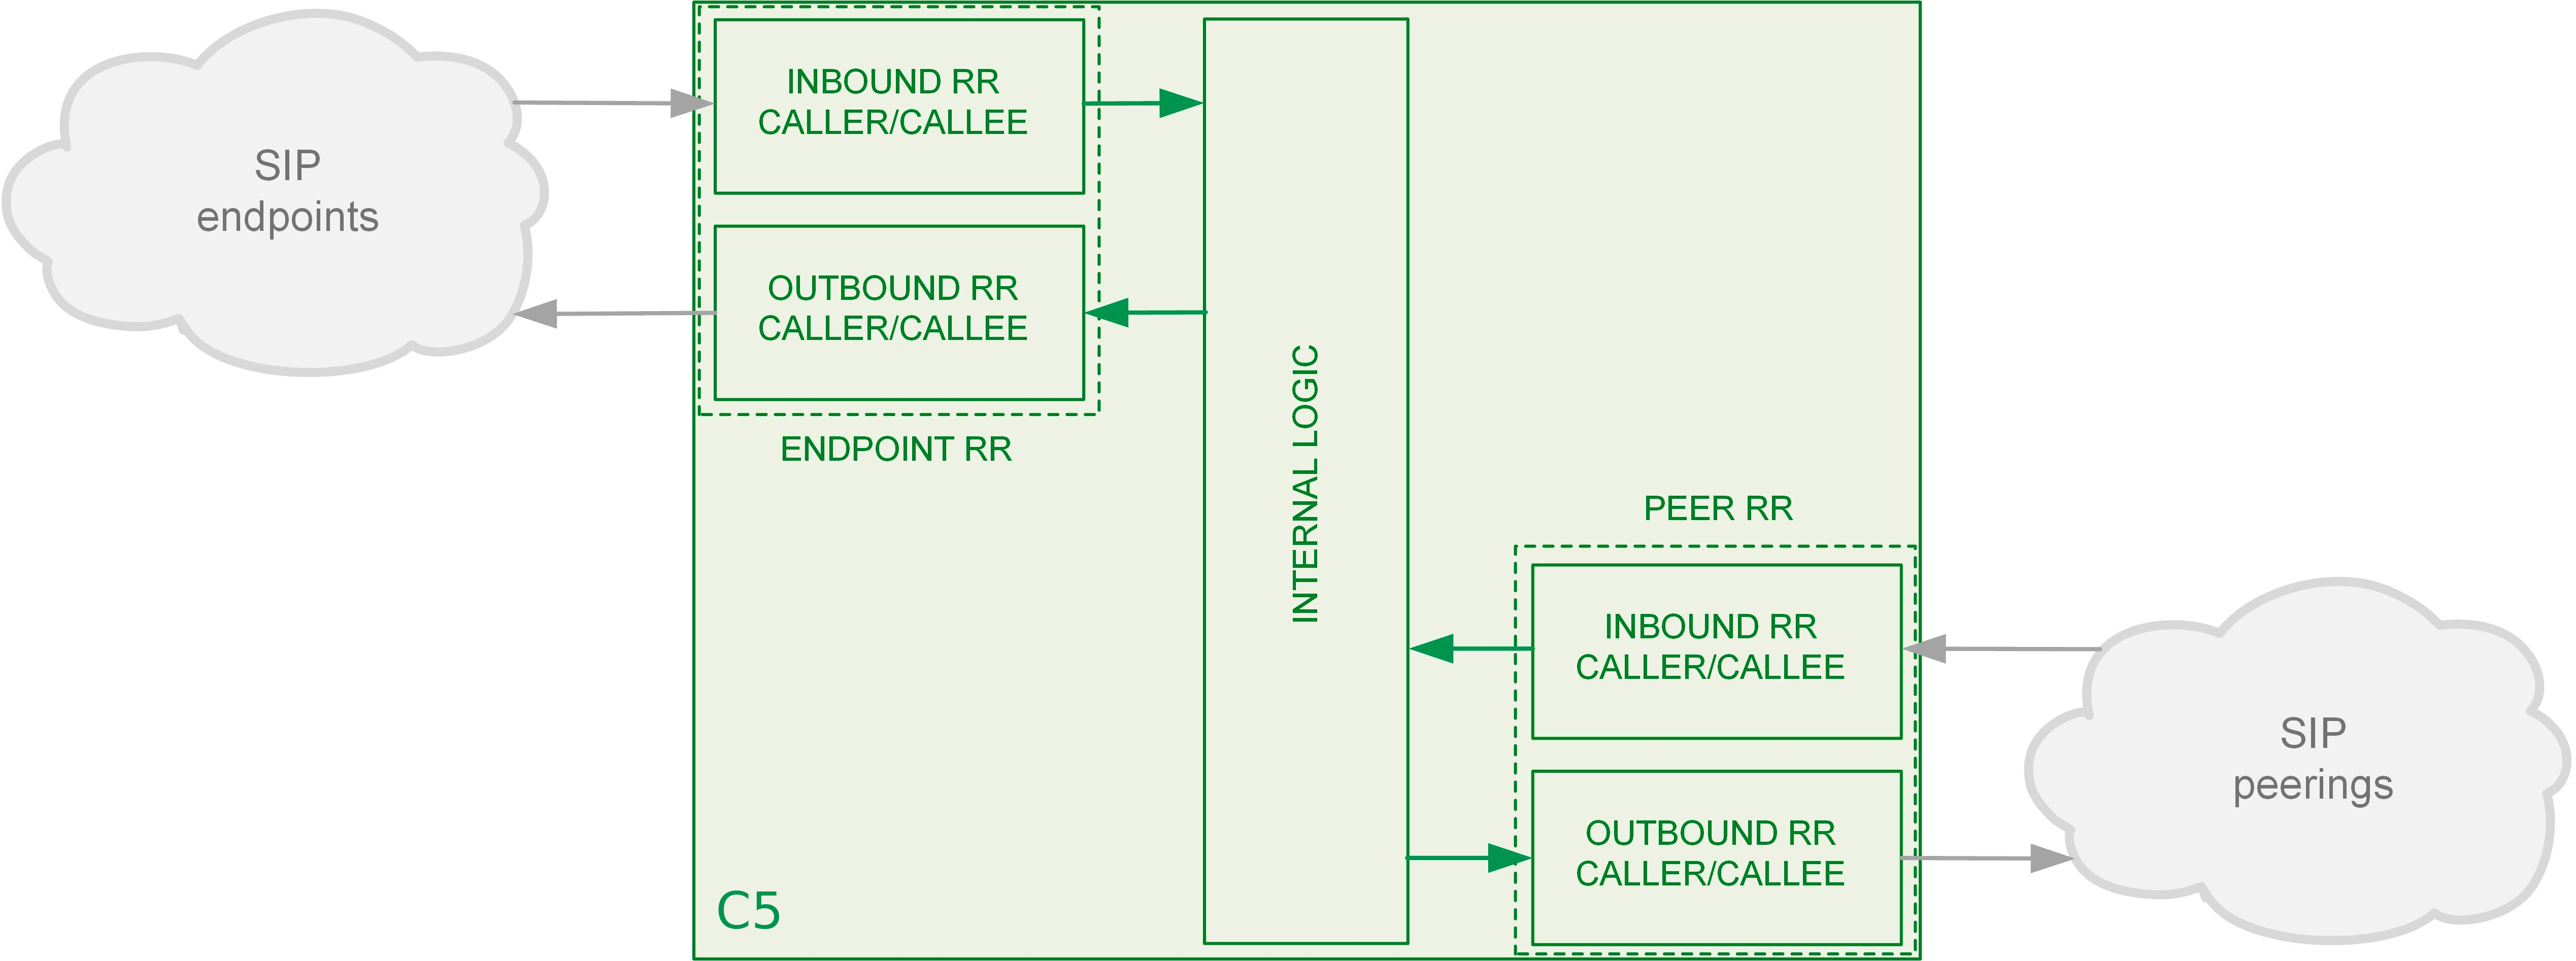
As from the image above, following the arrows, you will have an idea about which type of Rewrite Rules are applied during a call. In general:
-
Call from local subscriber A to local subscriber B: Inbound RR from local Domain/Subscriber A and Outbound Rewrite Rules from local Domain/Subscriber B.
-
Call from local subscriber A to the peer: Inbound RR from local Domain/Subscriber A and Outbound Rewrite Rules from the peer.
-
Call from peer to local subscriber B: Inbound RR from the Peer and Outbound Rewrite Rules from local Domain/Subscriber B.
You would normally begin with creating a Rewrite Rule Set for your SIP domains. This is used to control what an end user can dial for outbound calls, and what is displayed as the calling party on inbound calls. The subscribers within a domain inherit Rewrite Rule Sets of that domain, unless this is overridden by a subscriber Rewrite Rule Set preference.
You can use several special variables in the Rewrite Rules, below you can find a list of them. Some examples of how to use them are also provided in the following sections:
-
${caller_cc}: This is the value taken from the subscriber’s preference CC value under Number Manipulation -
${caller_ac}: This is the value taken from the subscriber’s preference AC value under Number Manipulation -
${caller_emergency_cli}: This is the value taken from the subscriber’s preference emergency_cli value under Number Manipulation -
${caller_emergency_prefix}: This is the value taken from the subscriber’s preference emergency_prefix value under Number Manipulation -
${caller_emergency_suffix}: This is the value taken from the subscriber’s preference emergency_suffix value under Number Manipulation
To create a new Rewrite Rule Set, go to Settings→Rewrite Rule Sets. There you can create a Set identified by a name. This name is later shown in your peer-, domain- and user-preferences where you can select the rule set you want to use.
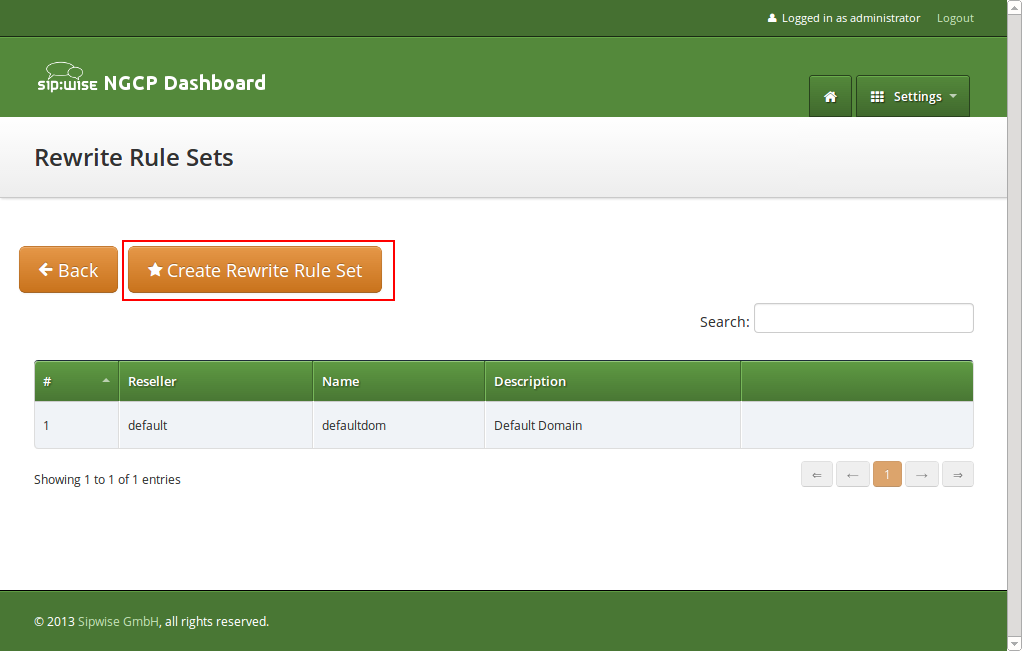
Click Create Rewrite Rule Set and fill in the form accordingly.
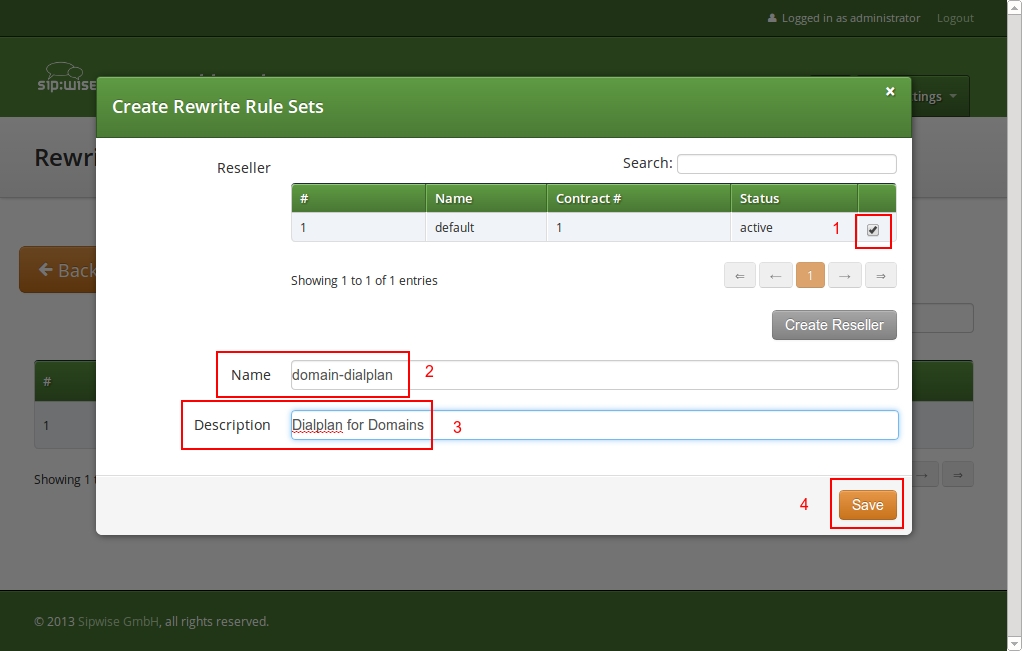
Press the Save button to create the set.
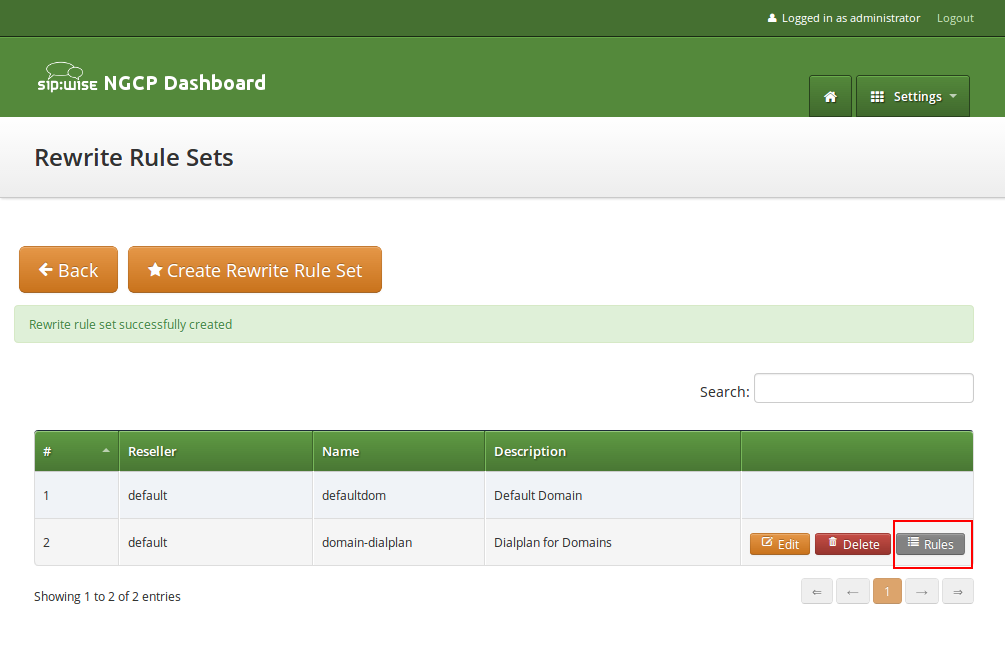
To view the Rewrite Rules within a set, hover over the row and click the Rules button.
The rules are ordered by Caller and Callee as well as direction Inbound and Outbound.
| In Europe, the following formats are widely accepted: +<cc><ac><sn>, 00<cc><ac><sn> and 0<ac><sn>. Also, some countries allow the areacode-internal calls where only subscriber number is dialed to reach another number in the same area. Within this section, we will use these formats to show how to use rewrite rules to normalize and denormalize number formats. |
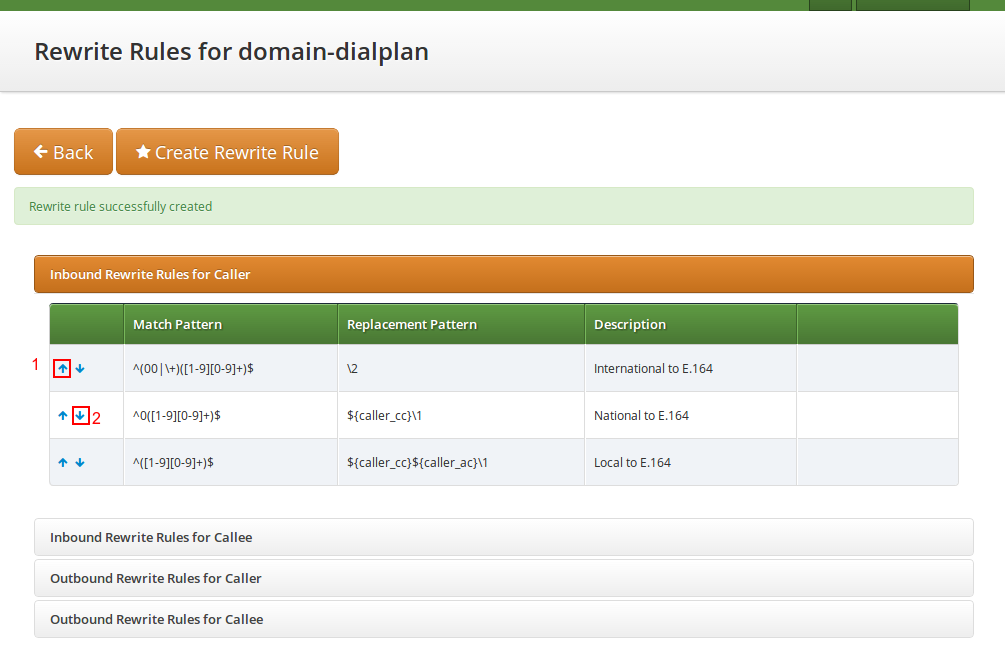
Inbound Rewrite Rules for Caller
These rules are used to normalize user-provided numbers (e.g. passed in From Display Name or P-Preferred-Identity headers) into E.164 format. In our example, we’ll normalize the three different formats mentioned above into E.164 format.
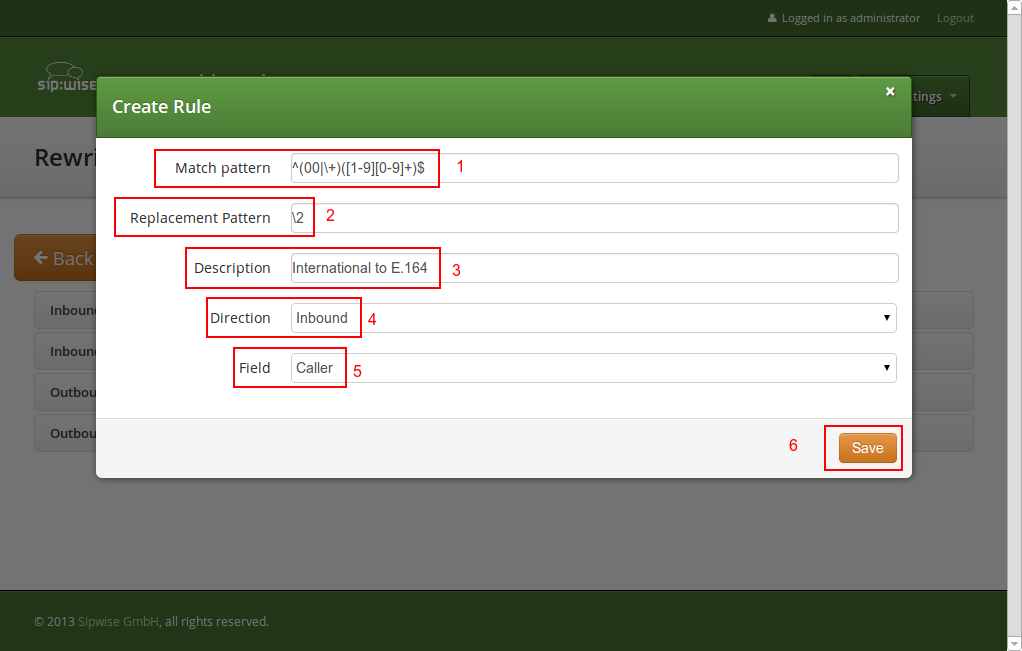
To create the following rules, click on the Create Rewrite Rule for each of them and fill them with the values provided below.
00 or +-
Match Pattern:
^(00|\+)([1-9][0-9]+)$ -
Replacement Pattern:
\2 -
Description:
International to E.164 -
Direction:
Inbound -
Field:
Caller
0 by caller’s country code:-
Match Pattern:
^0([1-9][0-9]+)$ -
Replacement Pattern:
${caller_cc}\1 -
Description:
National to E.164 -
Direction:
Inbound -
Field:
Caller
-
Match Pattern:
^([1-9][0-9]+)$ -
Replacement Pattern:
${caller_cc}${caller_ac}\1 -
Description:
Local to E.164 -
Direction:
Inbound -
Field:
Caller
Normalization for national and local calls is possible with special variables ${caller_cc} and ${caller_ac} that can be used in Replacement Pattern and are substituted by the country and area code accordingly during the call routing.
| These variables are only being filled in when a call originates from a subscriber (because only then the cc/ac information is known by the system), so you can not use them when a calls comes from a SIP peer (the variables will be empty in this case). |
| When routing a call, the rewrite processing is stopped after the first match of a rule, starting from top to bottom. If you have two rules (e.g. a generic one and a more specific one), where both of them would match some numbers, reorder them with the up/down arrows into the appropriate position. |
Inbound Rewrite Rules for Callee
These rules are used to rewrite the number the end user dials to place a call to a standard format for routing lookup. In our example, we again allow the three different formats mentioned above and again normalize them to E.164, so we put in the same rules as for the caller.
00 or +-
Match Pattern:
^(00|\+)([1-9][0-9]+)$ -
Replacement Pattern:
\2 -
Description:
International to E.164 -
Direction:
Inbound -
Field:
Callee
0 by caller’s country code:-
Match Pattern:
^0([1-9][0-9]+)$ -
Replacement Pattern:
${caller_cc}\1 -
Description:
National to E.164 -
Direction:
Inbound -
Field:
Callee
-
Match Pattern:
^([1-9][0-9]+)$ -
Replacement Pattern:
${caller_cc}${caller_ac}\1 -
Description:
Local to E.164 -
Direction:
Inbound -
Field:
Callee
Our provided rules will only match if the caller dials a numeric number. If he dials an alphanumeric SIP URI, none of our rules will match and no rewriting will be done. You can however define rules for that as well. For example, you could allow your end users to dial support and rewrite that to your support hotline using the match pattern ^support$ and the replace pattern 43800999000 or whatever your support hotline number is.
|
Outbound Rewrite Rules for Caller
These rules are used to rewrite the calling party number for a call to an end user. For example, if you want the device of your end user to show 0<ac><sn> if a national number calls this user, and 00<cc><ac><sn> if an international number calls, put the following rules there.
43 by 0-
Match Pattern:
^43([1-9][0-9]+)$ -
Replacement Pattern:
0\1 -
Description:
E.164 to Austria National -
Direction:
Outbound -
Field:
Caller
00 for international caller-
Match Pattern:
^([1-9][0-9]+)$ -
Replacement Pattern:
00\1 -
Description:
E.164 to International -
Direction:
Outbound -
Field:
Caller
Note that both of the rules would match a number starting with 43, so reorder the national rule to be above the international one (if it’s not already the case).
|
Outbound Rewrite Rules for Callee
These rules are used to rewrite the called party number immediately before sending out the call on the network. This gives you an extra flexibility by controlling the way request appears on a wire, when your SBC or other device expects the called party number to have a particular tech-prefix. It can be used on calls to end users too if you want to do some processing in intermediate SIP device, e.g. apply legal intercept selectively to some subscribers.
sipsp# for all calls-
Match Pattern:
^([0-9]+)$ -
Replacement Pattern:
sipsp#\1 -
Description:
Intercept this call -
Direction:
Outbound -
Field:
Callee
Emergency Number Handling
There are 2 ways to handle calls from local subscribers to emergency numbers in NGCP:
-
Simple emergency number handling: inbound rewrite rules append an emergency tag to the called number, this will be recognised by NGCP’s call routing logic and the call is routed directly to a peer. Please read the next section for details of simple emergency number handling.
-
An emergency number mapping is applied: a dedicated emergency number mapping database is consulted in order to obtain the most appropriate routing number of emergency services. This logic ensures that the caller will contact the geographically closest emergency service. Please visit the Emergency Mapping section of the handbook for more details.
Simple Emergency Number Handling Overview
The overview of emergency call processing is as follows:
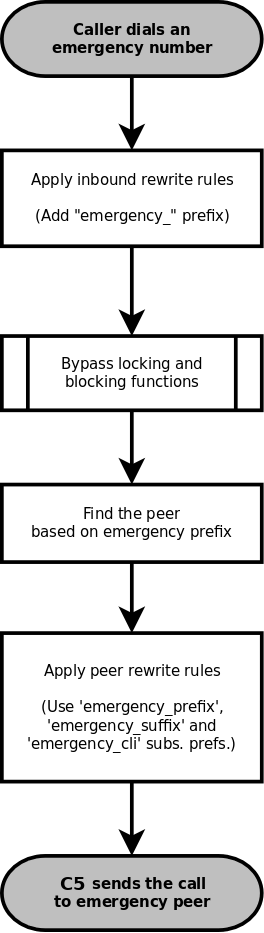
Configuring Emergency Numbers is also done via Rewrite Rules.
Tagging Inbound Emergency Calls
For Emergency Calls from a subscriber to the platform, you need to define an Inbound Rewrite Rule For Callee, which
adds a prefix emergency_ to the number (and can rewrite the number completely as well at the same time). If the proxy
detects a call to a SIP URI starting with emergency_, it will enter a special routing logic bypassing various checks
which might make a normal call fail (e.g. due to locked or blocked numbers, insufficient credits or exceeding the max. amount
of parallel calls).
-
Match Pattern:
^(911|112)$ -
Replacement Pattern:
emergency_\1 -
Description:
Tag Emergency Numbers -
Direction:
Inbound -
Field:
Callee
To route an Emergency Call to a Peer, you can select a specific peering group by adding a peering rule with a
callee prefix set to emergency_ to a peering group.
Normalize Emergency Calls for Peers
In order to normalize the emergency number to a valid format accepted by the peer, you need to assign an Outbound Rewrite
Rule For Callee, which strips off the emergency_ prefix. You can also use the variables ${caller_emergency_cli},
${caller_emergency_prefix} and ${caller_emergency_suffix} as well as ${caller_ac} and ${caller_cc}, which are all configurable per
subscriber to rewrite the number into a valid format.
-
Match Pattern:
^emergency_(.+)$ -
Replacement Pattern:
${caller_emergency_prefix}${caller_ac}\1 -
Description:
Normalize Emergency Numbers -
Direction:
Outbound -
Field:
Callee
Emergency Geo-location Formats
A tagged Emergency Call from a subscriber will have Geo-location information attached to the SDP when emergency_location_object preference is properly
set depending on the format defined at subscriber’s emergency_location_format preference.
These are the emergency_location_format formats that Sipwise C5 currently supports:
-
PIDF-LO(TR Notruf v2) -
cirpack(TR Notruf v1)
PIDF-LO format
emergency_provider_info preference must be defined at domain level with application/xml as content-type and the whole XML with the provider info
described. For instance:
<?xml version="1.0" encoding="UTF-8"?>
<emergencyCall.ProviderInfo xmlns="urn:ietf:params:xml:ns:emergencyCall.ProviderInfo">
 <DataProviderString>Telekom</DataProviderString>
 <ProviderID>D150</ProviderID>
 <contactURI>sip:+492911234567@telekom.de;user=phone</contactURI>
 <ProviderIDSeries>BNetzA</ProviderIDSeries>
</emergencyCall.ProviderInfo>
emergency_location_object preference can be defined at subscriber level with application/pidf+xml as content-type and the whole XML containing the Geo-location as PIDF-LO.
It can use different location encodings but there are two mandatory elements that need a special value in order to be replaced by Sipwise C5 at the moment of initiating the emergency call:
-
timestamp -
retention-expiry
<retention-expiry>$$expiry$$</retention-expiry>
<timestamp>$$ts$$</timestamp>
An example of XML document with the mandatory elements:
<?xml version="1.0" encoding="UTF-8"?>
<presence
 xmlns="urn:ietf:params:xml:ns:pidf"
 xmlns:gp="urn:ietf:params:xml:ns:pidf:geopriv10"
 xmlns:gml="http://www.opengis.net/gml"
 xmlns:gs="http://www.opengis.net/pidflo/1.0"
 xmlns:cl="urn:ietf:params:xml:ns:pidf:geopriv10:civicAddr" entity="pres:123@t-mobile.de">
 <tuple id="arcband">
    <status>
      <gp:geopriv>
        <gp:location-info>
          <gml:location>
            <gs:ArcBand srsName="urn:ogc:def:crs:EPSG:: 4258"
              xmlns:gs="http://www.opengis.net/pidflo/1.0"
              xmlns:gml="http://www.opengis.net/gml">
              <gml:pos>49.8967 8.6228</gml:pos>
              <gs:innerRadius uom="urn:ogc:def:uom:EPSG::9001">0</gs:innerRadius>
              <gs:outerRadius uom="urn:ogc:def:uom:EPSG::9001">2005</gs:outerRadius>
              <gs:startAngle uom="urn:ogc:def:uom:EPSG::9102">328</gs:startAngle>
              <gs:openingAngle uom="urn:ogc:def:uom:EPSG::9102">64</gs:openingAngle>
            </gs:ArcBand>
          </gml:location>
          <con:confidence>100</con:confidence>
          <cl:civicAddress xml:lang="de">
            <cl:LOC>Mobilfunkzelle</cl:LOC>
            <cl:ADDCODE>26201F1080939A</cl:ADDCODE>
          </cl:civicAddress>
        </gp:location-info>
        <gp:usage-rules>
          <gbp:retransmission-allowed>yes</gbp:retransmission-allowed>
          <gbp:retention-expiry>$$expiry$$</gbp:retention-expiry>
        </gp:usage-rules>
      </gp:geopriv>
    </status>
    <timestamp>$$ts$$</timestamp>
  </tuple>
</presence>Assigning Rewrite Rule Sets to Domains and Subscribers
Once you have finished to define your Rewrite Rule Sets, you need to assign them. For sets to be used for subscribers, you can assign them to their corresponding domain, which then acts as default set for all subscribers. To do so, go to Settings→Domains and click Preferences on the domain you want the set to assign to. Click on Edit and select the Rewrite Rule Set created before.
You can do the same in the Preferences of your subscribers to override the rule on a subscriber basis. That way, you can finely control down to an individual user the dial-plan to be used. Go to Settings→Subscribers, click the Details button on the subscriber you want to edit, the click the Preferences button.
Creating Dialplans for Peering Servers
For each peering server, you can use one of the Rewrite Rule Sets that was created previously as explained in Configuring Rewrite Rule Sets (keep in mind that special variables ${caller_ac} and ${caller_cc} can not be used when the call comes from a peer). To do so, click on the name of the peering server, look for the preference called Rewrite Rule Sets.
If your peering servers don’t send numbers in E.164 format <cc><ac><sn>, you need to create Inbound Rewrite Rules for each peering server to normalize the numbers for caller and callee to this format, e.g. by stripping leading + or put them from national into E.164 format.
Likewise, if your peering servers don’t accept this format, you need to create Outbound Rewrite Rules for each of them, for example to append a '+' to the numbers.
Call Routing Verification
The Sipwise C5 provides a utility that helps with the verification of call routing among local subscribers and peers. It is called Call Routing Verification and employs rewrite rules and peer selection rules, in order to process calling and called numbers or SIP users and find the appropriate peer for the destination.
The Call Routing Verification utility performs only basic number processing and does not invoke the full number manipulation logic applied on real calls. The goal is to enable testing of rewrite rules, rather than validate the complete number processing.
-
What is considered during the test:
-
subscriber preferences: cli and allowed_clis
-
domain / subscriber / peer rewrite rules
-
-
What is not taken into account during the test:
-
other subscriber or peer preferences
-
LNP (Local Number Portability) lookup on called numbers; LNP rewrite rules
-
You can access the utility following the path on Admin web interface: Tools → Call Routing Verification.
Expected input data
-
Caller number/uri: 2 formats are accepted in this field:
-
A simple phone number in international (
00431..,+431..) or E.164 (431..) format. -
A SIP URI in
username@domainformat (without adding "sip:" at the beginning).
-
-
Callee number/uri: The same applies as for Caller number/uri.
-
Caller Type: Select
SubscriberorPeer, depending on the source of the call. -
Caller Subscriber or Caller Peer: Optionally, you can select the subscriber or peer explicitly. Without the explicit selection, however, the Call Routing Verification tool is able to find the caller in the database, based on the provided number / URI.
-
Caller RWR Override, Callee RWR Override, Callee Peer Override: The caller / callee rewrite rules and peer selection rules defined in domain, subscriber and peer preferences are used for call processing by default. But you can also override them by explicitly selecting another rewrite or peer selection rule.
Examples
-
Using only phone numbers and explicit subscriber selection
-
Input Data:
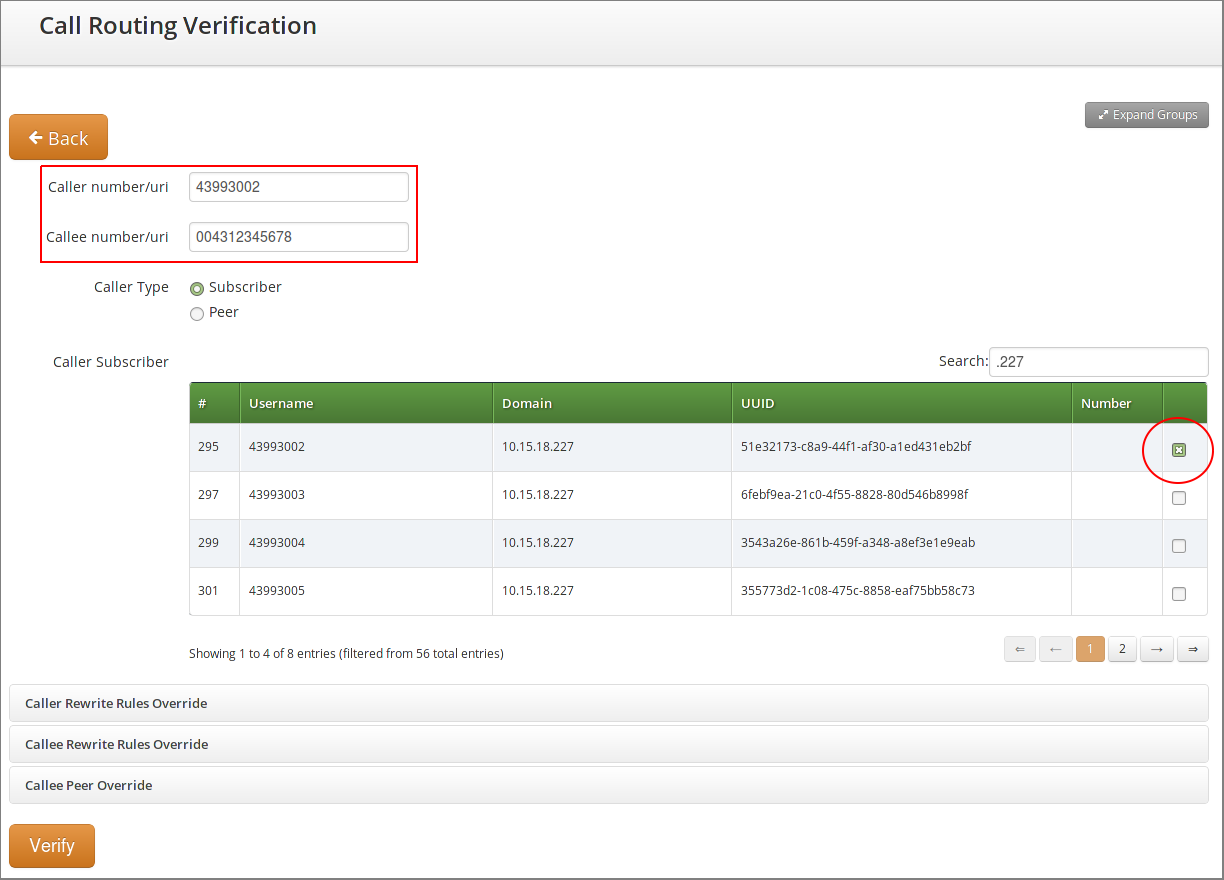 Figure 10. Call Routing Verif. - Only Numbers - Input
 -
Result:
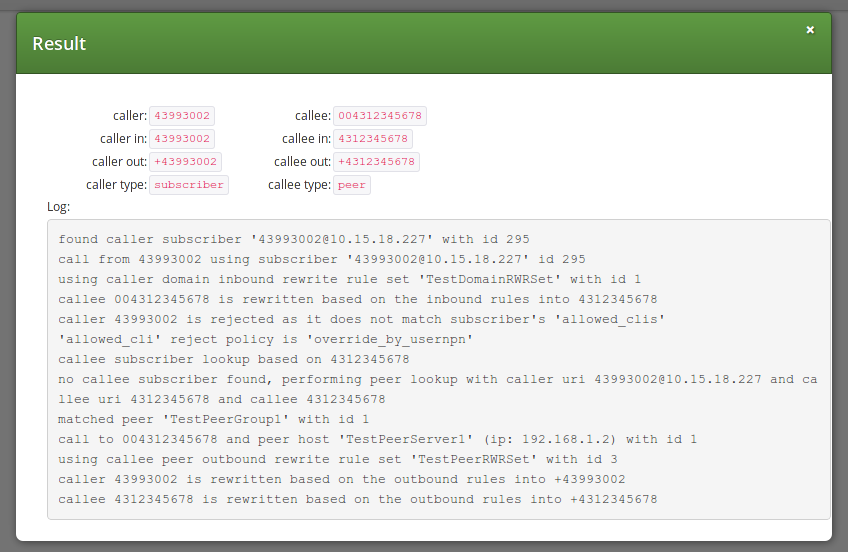 Figure 11. Call Routing Verif. - Only Numbers - Result
-
-
Using phone number and URI, without explicit subscriber selection
-
Input Data:
 Figure 12. Call Routing Verif. - Number and URI - Input
 -
Result:
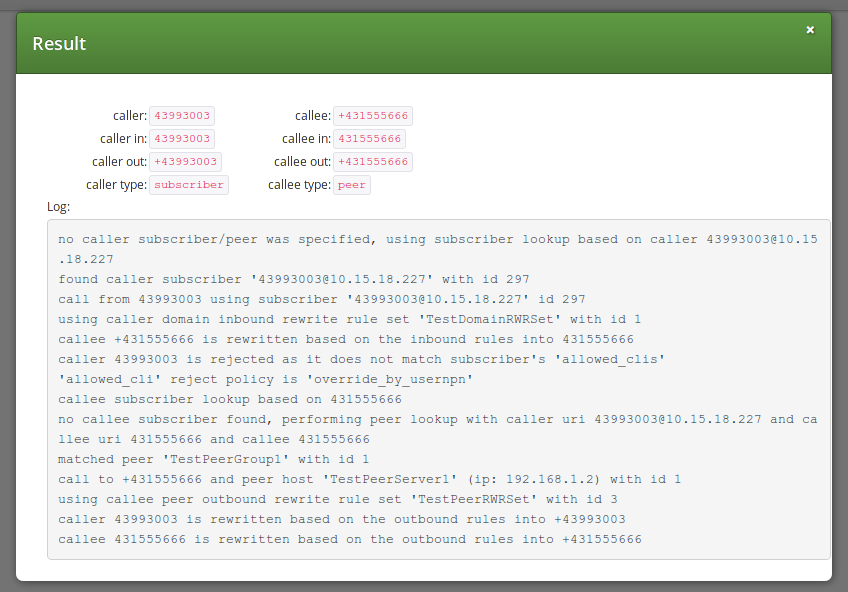 Figure 13. Call Routing Verif. - Number and URI - Result
-