Features
The Sipwise C5 provides plenty of subscriber features to offer compelling VoIP services to end customers, and also to cover as many deployment scenarios as possible. In this chapter, we provide the features overview and describe their function and use cases.
About the Admin Web Interface
This section is going to give some hints to the reader about the Admin web interface of Sipwise C5. The notes here are generic and apply to most of the features that we discuss in the handbook in subsequent chapters.
Filtering the Lists / Datatables
When you look at or want to change various settings on Admin web interface you will see datatables or lists of particular items, e.g. Subscribers, Peering Groups, etc. Sometimes this kind of list can be really long and then it’s difficult to find the desired item there. To help the system administrator, the Sipwise C5 offers search filters for each of the lists / datatables. You have to type a search string (arbitrary text) in the Search textbox and the system will automatically filter the complete datatable for records that match the search string.
The Search String
The previous example shows what happens if you type a search string in the Search textbox. The search string will be applied to all visible columns of the datatable as a filter and all matching records are kept displayed.
The symbol can be used as *wildcard for zero-or-more characters.
The * is prepended and appended implicitly to the string entered in Search
textbox to make filtering easier, for almost all datatables / lists.
|
While the search pattern is typically matched to values of all columns visible in the datatable, in some cases (i.e. unindexed columns) may be excluded from searching.
Call History
Each call appears in the subscriber’s Call History, except globally suppressed ones (if suppressing is configured), and you can apply search filters to the table as in case of other datatables.
The Call History datatable behaves slightly differently when it comes to wildcard
usage. The * wildcard needs to be entered explicitly by the user if needed.
| Be aware that acceptable response times of the administrative web interface rely on utilizing available database indexes, which is impossible with a leading wildcard in the search string. Wildcards at the end of the search pattern do not impact performance. |
Managing System Administrators
The Sipwise C5 offers the platform operator with an easy to use interface to manage users with administrative privileges. Such users are representatives of resellers, and are entitled to manage configuration of services for Customers, Subscribers, Domains, Billing Profiles and other entities on Sipwise C5.
Administrators, as user accounts, are also used for client authentication on the REST API of NGCP.
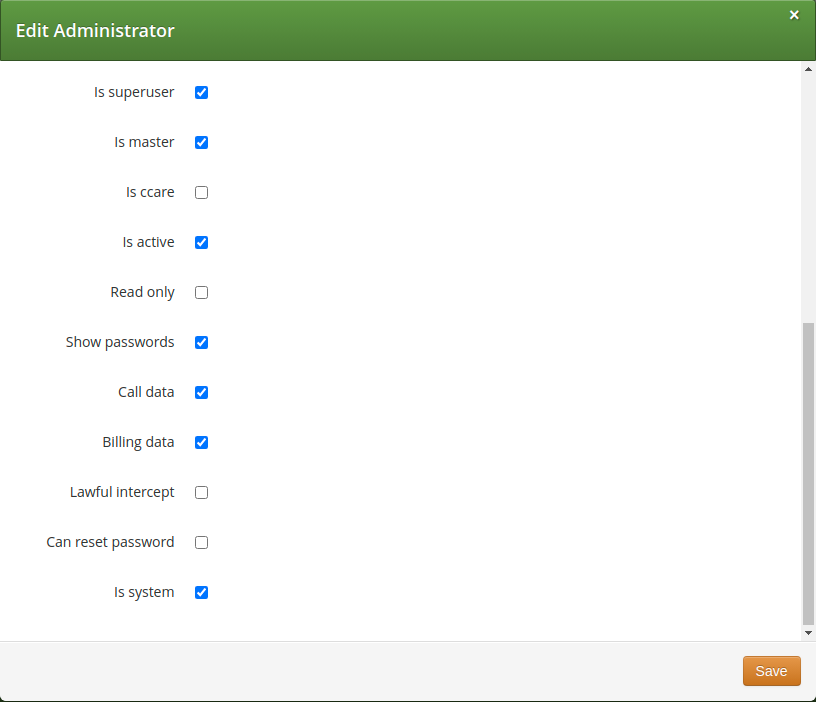
There is a single administrator (username: "administrator"), whose account is enabled by default and who belongs to the default reseller. This user is the superuser of Sipwise C5 administrative web interface (the so-called "admin panel"), and he has the right to modify administrators of other Resellers as well.
Configuring Administrators
Configuration of access rights of system administrators is possible through the admin panel of NGCP. In order to do that, please navigate to Settings → Administrators.
You have 2 options:
-
If you’d like to create a new administrator user press Create Administrator button.
-
If you’d like to update an existing administrator user press Edit button in its row.
There are some generic attributes that have to be set for each administrator:
-
Reseller: each administrator user must belong to a Reseller. There is always a default reseller (ID:
1, Name:default), but the administrator has to be assigned to his real reseller, if such an entity (other thandefault) exists. -
Login: the login name of the administrator user
-
Password: the password of the administrator user for logging in the admin panel, or for authentication on REST API
-
Email: the email of the administrator user, used for resetting password.
| Due to the fact that administrators can request a password reset via email, no administrator is able to change a password or API key other than to himself. Administrators with is_system, is_superuser and is_master flags are the only ones that can change the username and email of other administrators, while the ones without those flags can only change their own email and password. |
The second set of attributes is a list of access rights that are discussed in subsequent section of the handbook.
Access Rights of Administrators
The various access rights of administrators are shown in the figure and summarized in the table below.
| Label in admin list | Access Right | Description |
|---|---|---|
not shown |
|
The user is allowed to modify data on Reseller level and — among others — is able to modify administrators of other resellers. There should be only 1 user on Sipwise C5 with this privilege. |
Master |
|
The user is allowed to create, delete or modify other Admins who belong to the same Reseller. |
Customer Care |
|
The user is allowed to create, delete or modify Customers and Subscribers. If mixed with Is superuser it defines whether the user can modify the data only within a Reseller the user belongs to, or across all Resellers. The user can access to relevant information required to create or modify Customers or Subscribers, such as Domains, Billing Profiles, Email Templates, but the user cannot access the entries (e.g: see the detailed info about a Billing Profile), nor modify them. |
Active |
|
The user account is active, i.e. the admin user can login on the web panel or authenticate himself on REST API; otherwise user authentication will fail. |
Read Only |
|
The user will only be able to list various data but is not allowed to modify anything. * For the web interface this means that Create… and Edit buttons will be hidden or disabled. * For the REST API this means that only GET, HEAD, OPTIONS HTTP request methods are accepted, and Sipwise C5 will reject those targeting data modification: PUT, PATCH, POST, DELETE. |
Show Passwords |
|
The user sees subscriber passwords (in plain text) on the web interface. NOTE: Admin panel user passwords and subscriber web passwords are stored in an unreadable way (cryptographic hash digest) in the database, while subscriber SIP passwords are stored in plain text. The latter happens on purpose, e.g. to make subscriber data migration possible. |
Show CDRs |
|
This privilege has effect on 2 items that will be displayed on admin panel of NGCP, when Subscriber → Details is selected: 1. PBX Groups list 2. Captured Dialogs list |
Show Billing Info |
|
Some REST API resources that are related to billing are disabled: HTTP requests on /api/vouchers, /api/topupcash and /api/topupvoucher resources are rejected. |
Lawful Intercept |
|
Visible only for System administrators. If the privilege is selected then the REST API for interceptions (that is: /api/interceptions) is enabled; if the privilege is not selected then the interceptions API is disabled. Administrators with this flag do not have access to anything but the administrators in UI and API and /api/interceptions in the API NOTE: This means that besides enabling LI in config.yml configuration file one also needs to enable the API via the LI privilege of an administrator user, so that Sipwise C5 can really provide LI service. |
Can Reset Password |
|
The user is allowed to request a password reset. |
System |
|
The user is allowed to create, delete or modify Lawful Intercept Admins which are otherwise invisible to other types of administrators. |
Access Control for SIP Calls
There are two different methods to provide fine-grained call admission control to both subscribers and admins. One is Block Lists, where you can define which numbers or patterns can be called from a subscriber to the outbound direction and which numbers or patterns are allowed to call a subscriber in the inbound direction. The other is NCOS (Network Class of Service) Levels, where the admin predefines rules for outbound calls, which are grouped in certain levels. The subscriber can then choose the level, or the admin can restrict a subscriber to a certain level. Also Sipwise C5 offers some options to restrict the IP addresses that subscriber is allowed to use the service from. The following sections describe these features in detail.
Block Lists
Block Lists provide a way to control which users/numbers can call or be called, based on a subscriber level, and can be found in the Call Blockings section of the subscriber preferences.
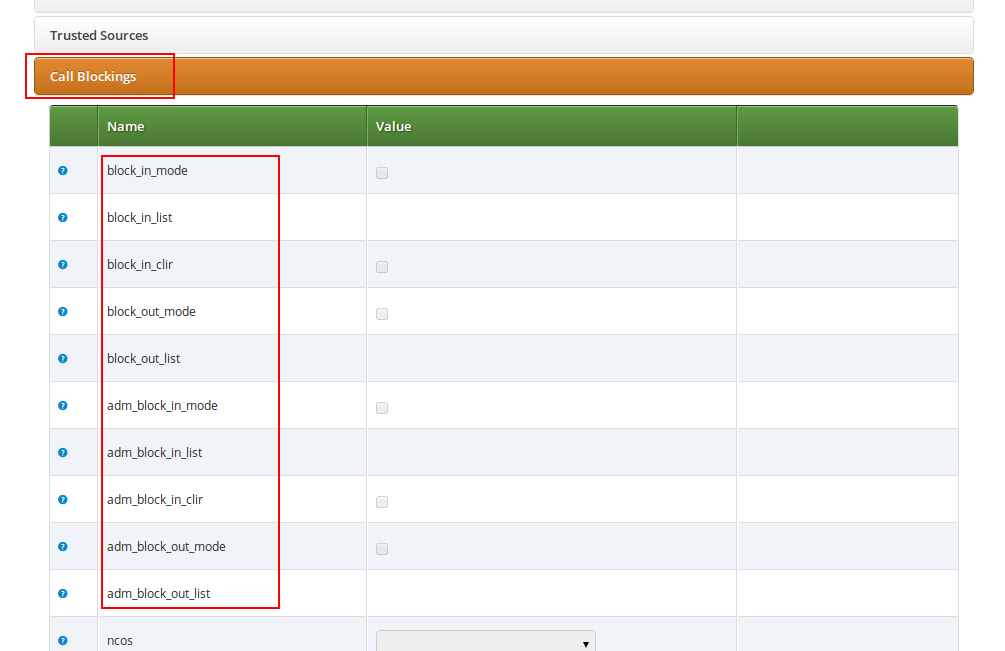
Block Lists are separated into Administrative Block Lists (adm_block_*) and Subscriber Block Lists (block_*). They both have the same behaviour, but Administrative Block Lists take higher precedence. Administrative Block Lists are only accessible by the system administrator and can thus be used to override any Subscriber Block Lists, e.g. to block certain destinations. The following break-down of the various block features apply to both types of lists.
Block Modes
Block lists can either be whitelists or blacklists and are controlled by the User Preferences block_in_mode, block_out_mode and their administrative counterparts.
-
The blacklist mode (option is not checked tells the system to allow anything except the entries in the list. Use this mode if you want to block certain numbers and allow all the rest.
-
The whitelist mode indicates to reject anything except the entries in the list. Use this mode if you want to enforce a strict policy and allow only selected destinations or sources.
You can change a list mode from one to the other at any time.
Block Lists
The list contents are controlled by the User Preferences block_in_list, block_out_list and their administrative counterparts. Click on the Edit button in the Preferences view to define the list entries.
In block list entries, you can provide shell patterns like * and []. The behavior of the list is controlled by the block_xxx_mode feature (so they are either allowed or rejected). In our example above we have block_out_mode set to blacklist, so all calls to US numbers and to the Austrian number +431234567 are going to be rejected.
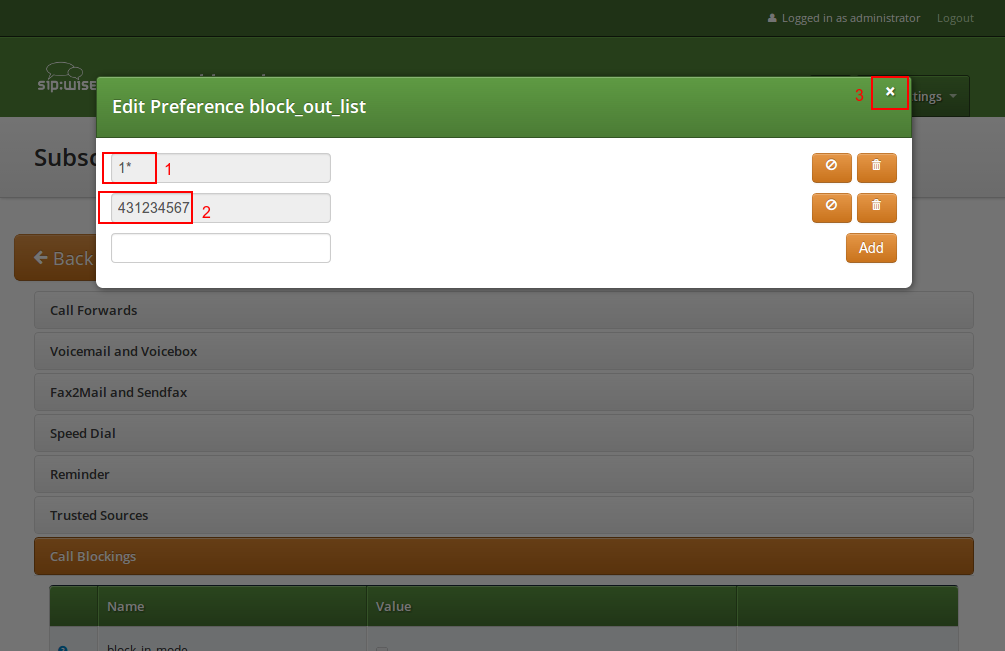
Click the Close icon once you’re done editing your list.
Block Anonymous Numbers
For incoming call, the User Preference block_in_clir and adm_block_in_clir controls whether or not to reject incoming calls with number suppression (either "[Aa]nonymous" in the display- or user-part of the From-URI or a header Privacy: id is set). This flag is independent from the Block Mode.
NCOS (Network Class of Service) Levels
NCOS Levels provide predefined lists of allowed or denied destinations for outbound calls of local subscribers. Compared to Block Lists, they are much easier to manage, because they are defined on a global scope, and the individual levels can then be assigned to each subscriber. Again there is the distinction for the user- and administrative- levels.
In a case of a conflict, when the Block Lists feature allows a number and NCOS Levels rejects the same number or vice versa, the call will be rejected.
NCOS levels can either be whitelists or blacklists.
-
The blacklist mode indicates to allow everything except the entries in this level. Use this mode if you want to block specific destinations and allow all the rest.
-
The whitelist mode indicates to reject anything except the entries in this level. Use this mode if you want to enforce a strict policy and allow only selected destinations.
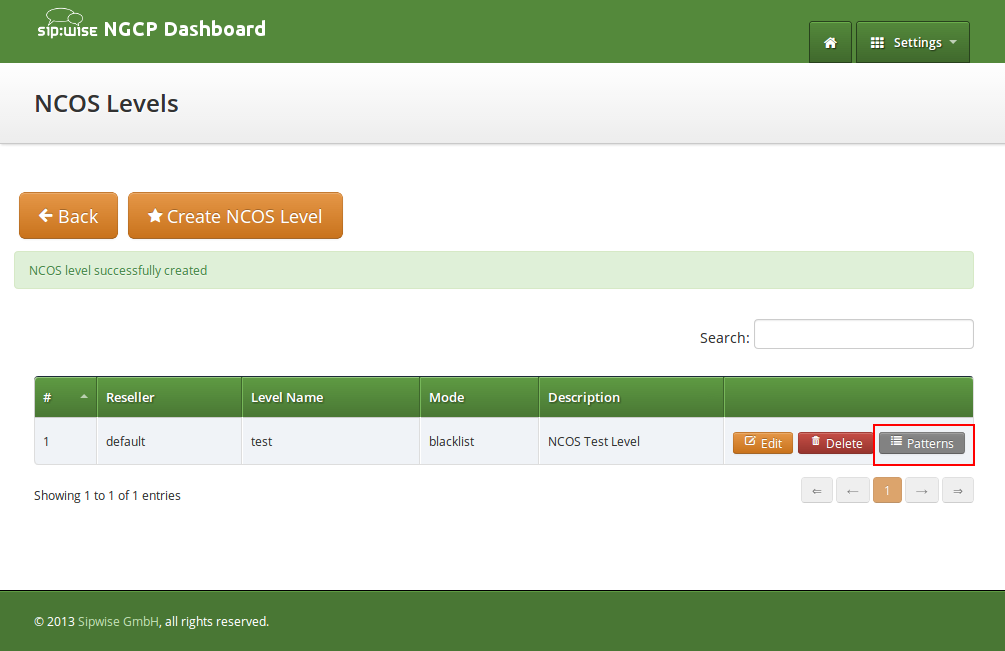
Creating NCOS Levels
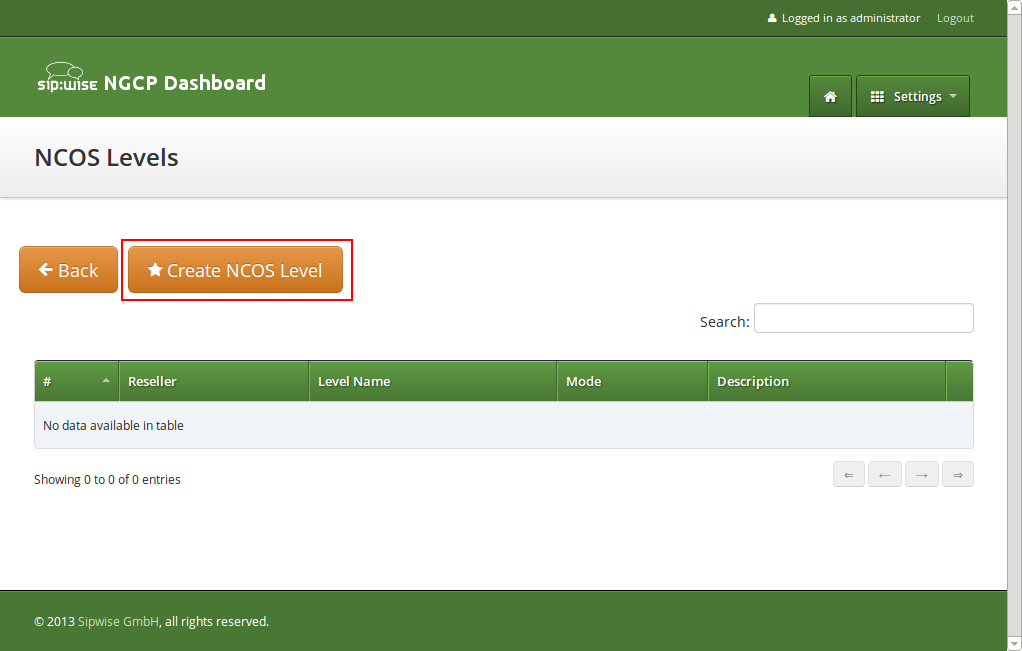
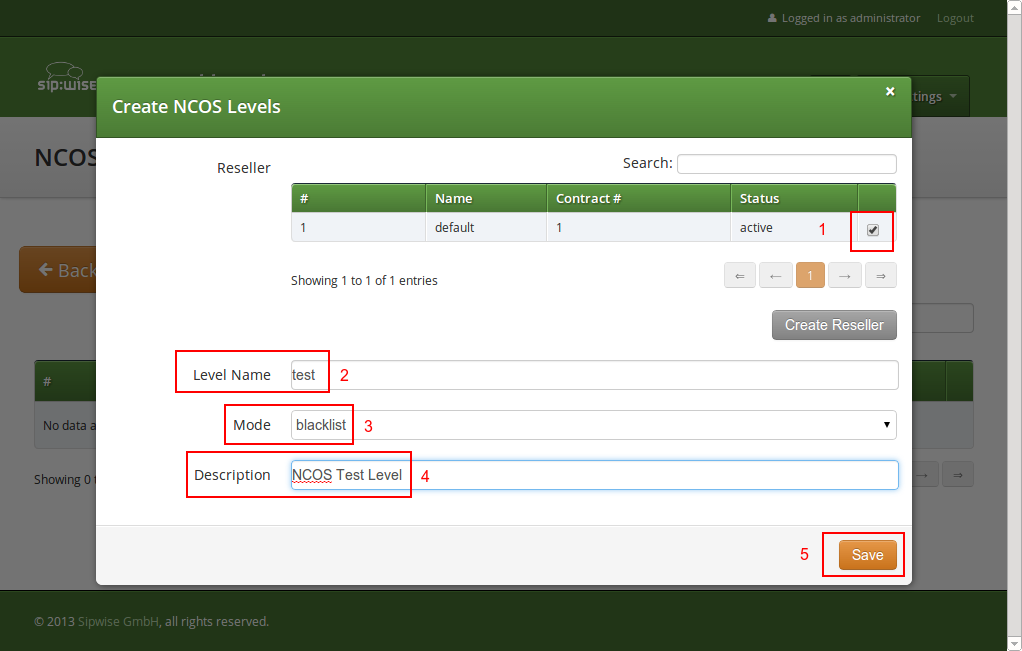
To create an NCOS Level, go to Settings→NCOS Levels and press the Create NCOS Level button.
Select a reseller, enter a name, select the mode and add a description, then click the Save button.
Creating Rules per NCOS Level
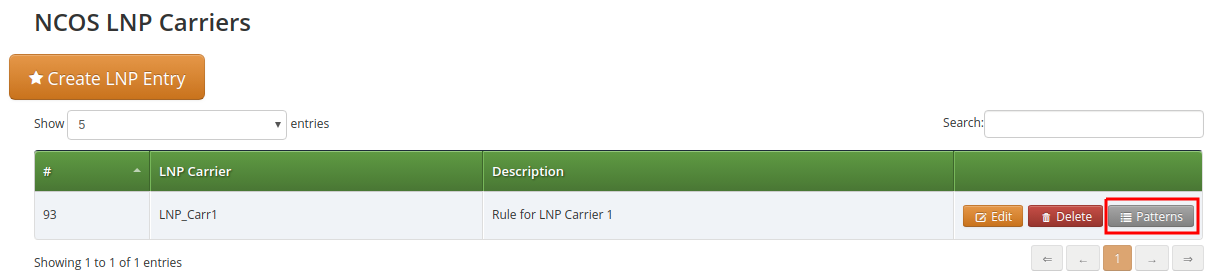
To define the rules within the newly created NCOS Level, click on the Patterns button of the level.
There are 2 groups of patterns where you can define matching rules for the selected NCOS Level:
-
NCOS Number Patterns: here you can define number patterns that will be matched against the called number and allowed or blocked, depending on whitelist / blacklist mode. The patterns are regular expressions.
-
NCOS LNP Carriers: here you can select predefined LNP Carriers that will be allowed (whitelist mode) or prohibited (blacklist mode) to route calls to them. For each of them you can restrict the matching to a predefined number pattern. (See Local LNP Database in the handbook for the description of LNP functionality)
| Sipwise C5 performs number matching always with the dialed number and not with the number generated after LNP lookup that is: either the original dialed number prefixed with an LNP carrier code, or the routing number. |
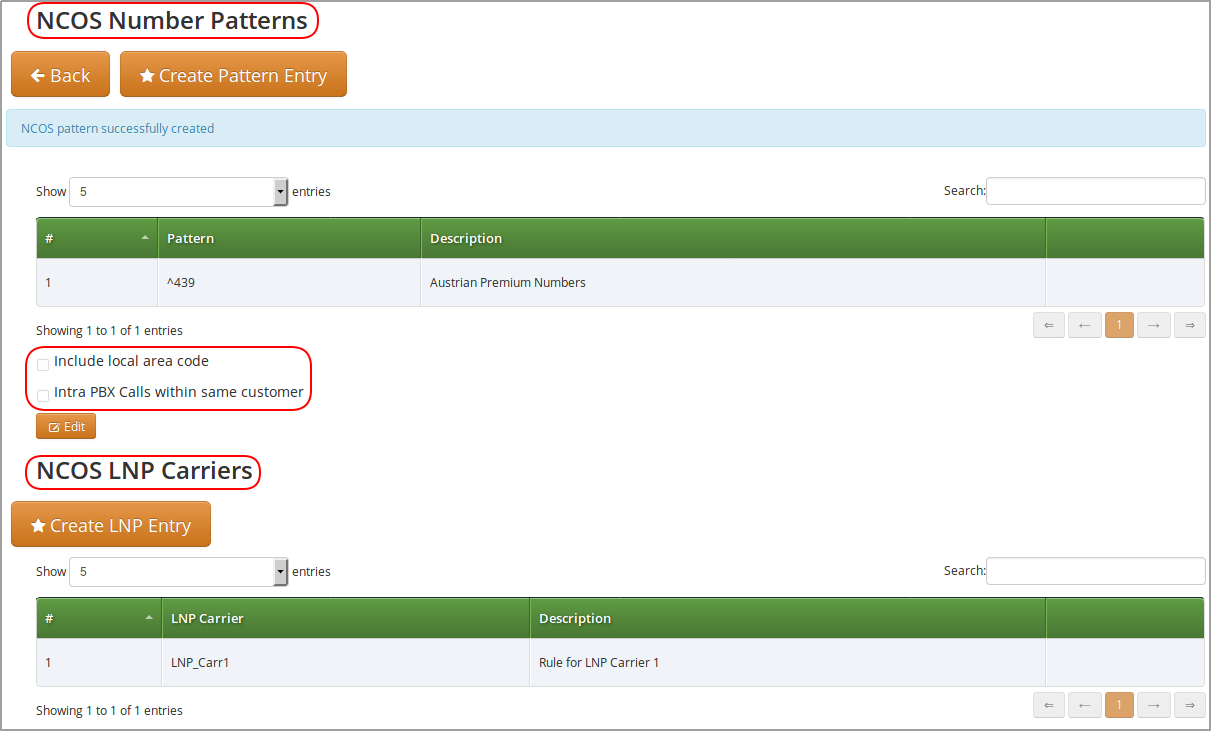
In the NCOS Number Patterns view you can create multiple patterns to define your level, one after the other. Click on the Create Pattern Entry Button on top and fill out the form.
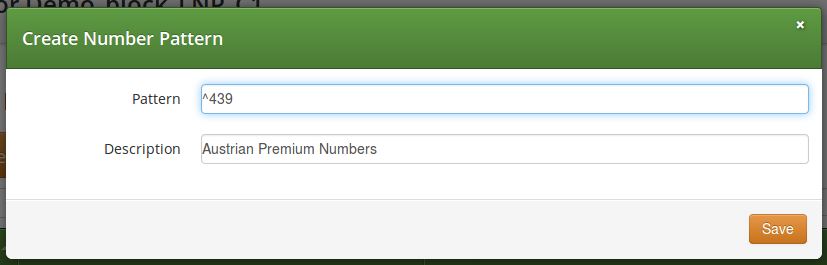
In this example, we block (since the mode of the level is blacklist) all numbers starting with 439. Click the Save button to save the entry in the level.
There are 2 options that help you to easily define specific number ranges that will be allowed or blocked, depending on whitelist / blacklist mode:
-
Include local area code: all subscribers within the caller’s local area, e.g. if a subscriber has country-code 43 and area-code 1, then selecting this checkbox would result in the implicit number pattern: ^431.
-
Intra PBX calls within same customer: all subscribers that belong to the same PBX customer as the caller himself.
In the NCOS LNP Carriers view you can select specific LNP Carriers — i.e. carriers that host the called ported numbers — that will be allowed or blocked for routing calls to them (whitelist / blacklist mode, respectively).
An example of NCOS LNP Carrier definition:
In the above example we created a rule that blocks calls to "LNP_Carr1" carrier, supposing we use blacklist mode of the NCOS Level.
In the LNP NCOS Number Patterns view you can create multiple patterns to restrict NCOS LNP Carrier matching, one after the other. Click on the Create LNP Pattern Entry Button on top and fill out the form.
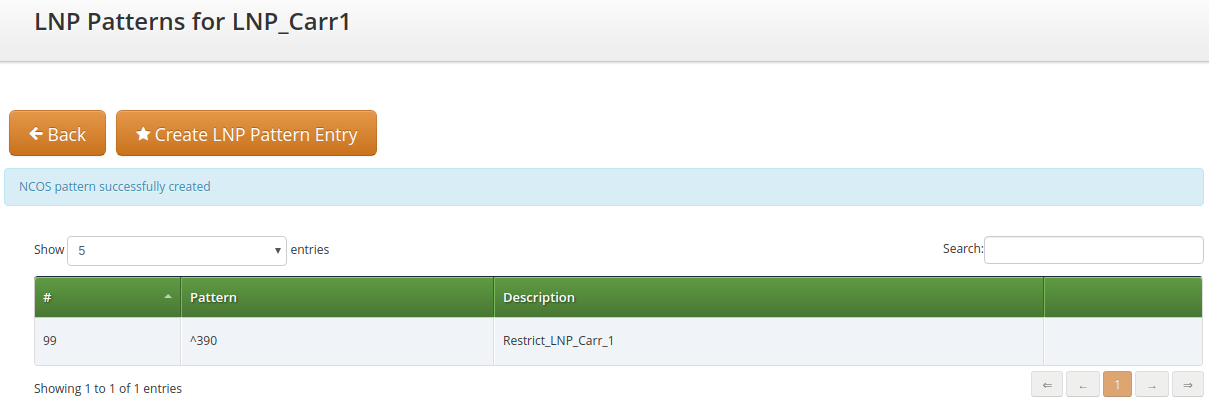
Considering the example before and adding the pattern shown in the picture, the rule now blocks only calls to "LNP_Carr1" carrier that starts with 390.
| There might be situations when phone number patterns may not be strictly aligned with telephony providers, for instance in case of full number portability in a country. In such cases using NCOS LNP Carriers patterns still allows for defining NCOS levels that allow / block calls to mobile numbers, for example. In order to achieve this goal you have to list all LNP carriers in the NCOS patterns that are known to host mobile numbers. |
The below table gives an overview of all the possible combinations of NCOS and NCOS LNP Carrier:
| TYPE | NCOS | NCOS_LNP | RESULT |
|---|---|---|---|
Whitelist |
empty table |
empty table |
Blocked |
Whitelist |
empty table |
no match |
Blocked |
Whitelist |
empty table |
match |
Allowed |
Whitelist |
no match |
empty table |
Blocked |
Whitelist |
no match |
no match |
Blocked |
Whitelist |
no match |
match |
Blocked* |
Whitelist |
match |
empty table |
Allowed |
Whitelist |
match |
no match |
Blocked* |
Whitelist |
match |
match |
Allowed |
Blacklist |
empty table |
empty table |
Allowed |
Blacklist |
empty table |
no match |
Allowed |
Blacklist |
empty table |
match |
Blocked |
Blacklist |
no match |
empty table |
Allowed |
Blacklist |
no match |
no match |
Allowed |
Blacklist |
no match |
match |
Blocked |
Blacklist |
match |
empty table |
Blocked |
Blacklist |
match |
no match |
Blocked |
Blacklist |
match |
match |
Blocked |
-
= different behaviour compared with the previous versions (< mr7.5)
The parameter kamailio.proxy.lnp.strictly_check_ncos contained in /etc/ngcp-config/config.yml specify whether the NCOS LNP should be evaluated even if the LNP lookup was not previously executed (because not required by the inbound/outbound call) or if it didn’t return any occurrence. If set to yes, a whitelist NCOS will fail if the LNP lookup doesn’t return any match. The parameter has no impact on blacklist NCOS.
Assigning NCOS Levels to Subscribers/Domains
Once you’ve defined your NCOS Levels, you can assign them to local subscribers. To do so, navigate to Settings→Subscribers, search for the subscriber you want to edit, press the Details button and go to the Preferences View. There, press the Edit button on either the ncos or adm_ncos setting in the Call Blockings section.
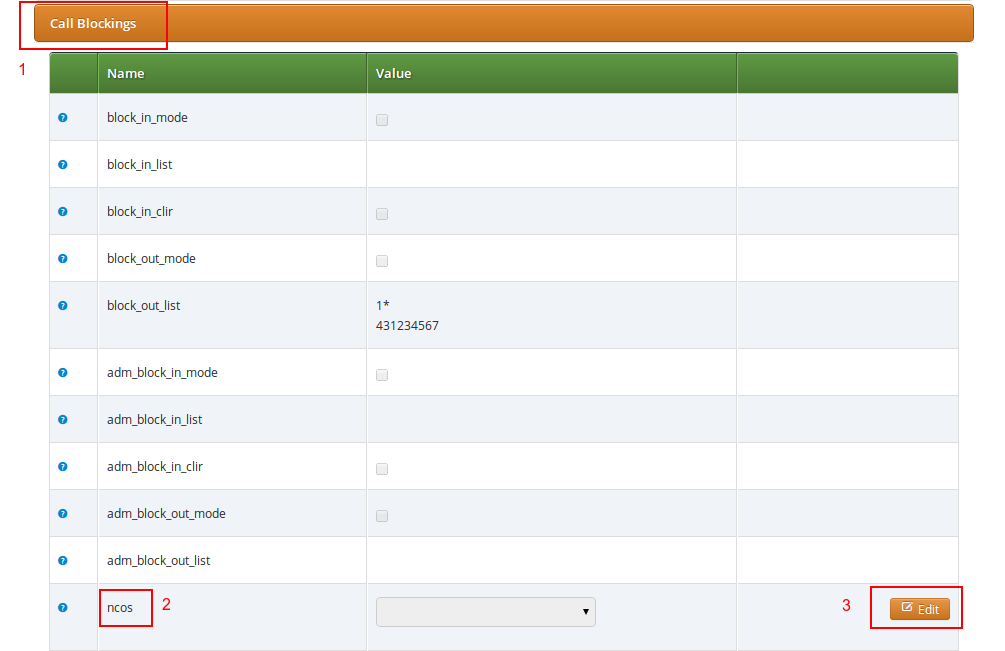
You can assign the NCOS level to all subscribers within a particular domain. To do so, navigate to Settings→Domains, select the domain you want to edit and click Preferences. There, press the Edit button on either ncos or admin_ncos in the Call Blockings section.
Note: if both domain and subscriber have same NCOS preference set (either ncos or adm_ncos, or both) the subscriber’s preference is used. This is done so that you can override the domain-global setting on the subscriber level.
Assigning NCOS Level for Forwarded Calls to Subscribers/Domains
In some countries there are regulatory requirements that prohibit subscribers from forwarding their numbers to special numbers like emergency, police etc. While Sipwise C5 does not deny provisioning Call Forward to these numbers, the administrator can prevent the incoming calls from being actually forwarded to numbers defined in the NCOS list: select the appropriate NCOS level in the domain’s or subscriber’s preference adm_cf_ncos. This NCOS will apply only to the Call Forward from the subscribers and not to the normal outgoing calls from them.
IP Address Restriction
The Sipwise C5 provides subscriber and domain preference allowed_ips to restrict the IP addresses that a particular subscriber or any subscribers within the respective domain is allowed to use the service from. If the REGISTER or INVITE request comes from an IP address that is not in the allowed list, Sipwise C5 will reject it with a 403 message. Also a voice message can be played when the call attempt is rejected (if configured).
By default, allowed_ips is an empty list which means that subscriber is not restricted. If you want to configure a restriction, navigate to Settings→Subscribers→Preferences or Settings→Domains→Preferences, and search for the allowed_ips preference in the Access Restrictions section.
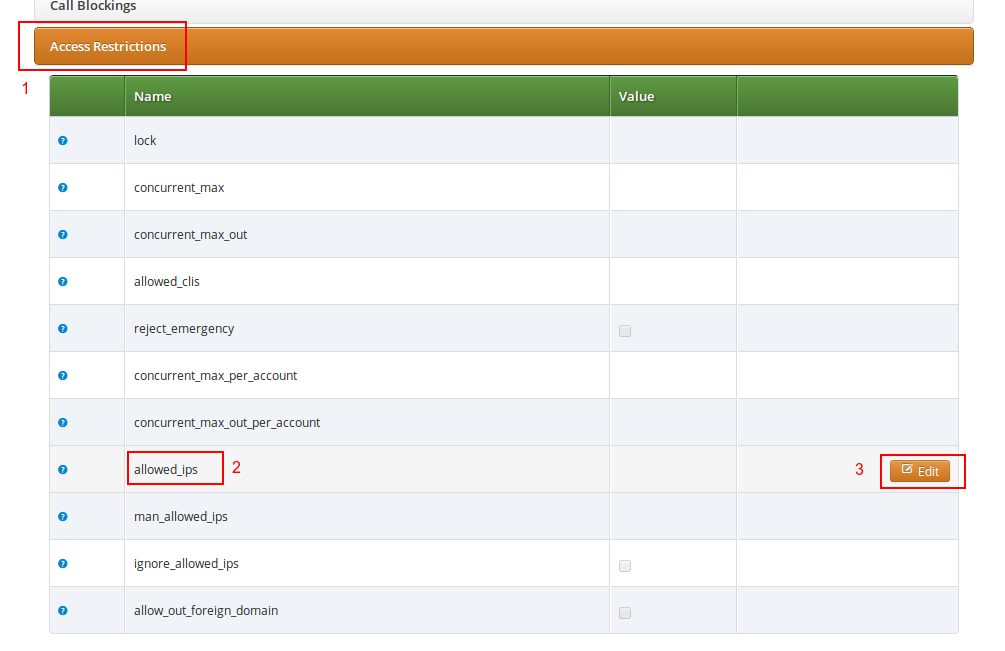
Press the Edit button to the right of empty drop-down list.
You can enter multiple allowed IP addresses or IP address ranges one after another. Click the Add button to save each entry in the list. Click the Delete button if you want to remove some entry.
CLI-based Access Control
The Sipwise C5 provides subscriber preference upn_block_list to restrict the CLI that subscriber is allowed to use the service from. If the INVITE request comes with a CLI that is not in the allowed list, Sipwise C5 will reject it with a 403 message. Also a voice message can be played when the call attempt is rejected (if configured).
The restriction is applied to User-Provided Number (UPN) which is obtained from the configurable source based on the setting of inbound_upn preference in the Number Manipulation section in the Domain and/or User preferences, after it has been rewritten with Inbound Rewrite Rules for Caller.
In case the inbound_upn preference is set to the "From Display-Name" the UPN value can be alphanumeric so the access control supports the alphanumeric (caller name) matching as well. If the incoming message does not have the Display-Name, though, the UPN value will be taken from the From-Username.
The inbound_upn preference has a slightly different meaning if kamailio.proxy.multiple_headers_for_valid_upn is set to yes inside config.yml.
In this particular case the inbound_upn preference only defines which Sip Header must be checked first and, in case of failure, the check is repeated evaluating the username part of the following headers:
-
P-Preferred-Identity
-
P-Asserted-Identity
-
From
In case of positive result, that value will be used as valid UPN and the subsequent headers will be not evaluated, otherwise if all additional checks fail, restrictions are applied as described above.
By default, upn_block_list is an empty list which means that subscriber is not restricted. If you want to configure a restriction, navigate to Settings→Subscribers, search for the subscriber you want to edit, press Details and then Preferences and press Edit for the upn_block_list preference in the Call Blockings section to define the list entries.
In block list entries, you can provide shell patterns like * and []. The CLI-based block list can either be whitelist or blacklist.
-
The blacklist mode indicates to allow everything except the entries in this list. This is the default mode of operation and is effective when the preference upn_block_mode is unset.
-
The whitelist mode indicates to reject anything except the entries in this list. In order to switch to this mode, set the preference upn_block_mode (it is a toggle between whitelist/blacklist).
If separate preference upn_block_clir is enabled, outgoing anonymous calls from this user will be dropped.
If the caller’s UPN is allowed it is also checked according to allowed_clis preference as usual and can be rewritten according to allowed_clis_reject_policy for correct calling number presentation on outgoing calls. This step happens after Access Control.
Call Limit Control
There’s a set of preferences that limits calls to and from subscribers. The option concurrent_max_total defines the maximum number of concurrent calls (incoming and outgoing) for a subscriber, while the option concurrent_max_out_total limits only subscriber’s outbound concurrent calls and the option concurrent_max_in_total only subscriber’s inbound concurrent calls.
Preferences concurrent_max, concurrent_max_out, and concurrent_max_in have the same effect, excluding calls to voicemail, application server and intra-PBX calls.
It’s also possible to limit the number of concurrent calls of a subscriber compared to the number of calls made or received by all subscribers within the same customer (account). The options concurrent_max_per_account, concurrent_max_out_per_account, concurrent_max_in_per_account permit to apply this limit. To better understand how they work, suppose we have two subscribers A and B, owned by the same customer. If we set concurrent_max_per_account=2 on B preferences and A is placing two calls, then B can not receive or place new calls at the same time. For instance, an administrator may define this restriction to some non-manager subscribers, in which concurrent_max_per_account=2. Hence, they will be able to make a maximum of two calls if there are no other calls in place within the customer. On manager subscribers, the limit can be defined differently, or even not set at all. In the last case, calls will be always allowed. Setting the value to 0 (zero) or having the preference unset means, in both cases, to do not apply any limit.
When concurrent_max_total limit is reached, announcement set on max_calls_in is played to those who try to call that subscriber. The same announcement is played for concurrent_max, concurrent_max_per_account, concurrent_max_in_total, concurrent_max_in, concurrent_max_in_per_account. When concurrent_max_out_total limit is reached, announcement set on max_calls_out is played. The same announcement is played for concurrent_max_out or concurrent_max_out_per_account.
Options concurrent_max, concurrent_max_out and concurrent_max_in are configurable on peers as well.
Furthermore, options concurrent_max, concurrent_max_out, concurrent_max_in and their _total version (concurrent_max_total and so on), are configurable on customer as well. In this case the limits are applied considering the number of calls of all the subscribers belonging to that account.
Call Forwarding and Call Hunting
The Sipwise C5 provides the capabilities for normal call forwarding (deflecting a call for a local subscriber to another party immediately or based on events like the called party being busy or doesn’t answer the phone for a certain number of seconds) and serial call hunting (sequentially executing a group of deflection targets until one of them succeeds). Targets can be stacked, which means if a target is also a local subscriber, it can have another call forward or hunt group which is executed accordingly.
Call Forward Types
Currently 7 different types of Call Forward are available in Sipwise C5:
-
Call Forward Unconditional (CFU): The call forward is always executed, completely disregarding the subscriber state.
-
Call Forward Busy (CFB): The call forward is executed when the subscriber returns a busy state.
-
Call Forward Timeout (CFT): The call forward is executed when no answer is received from the subscriber before the timeout expiration. Timeout is configurable in ringtimeout subscriber preference.
-
Call Forward Unavailable (CFNA): The call forward is executed when the subscriber has no endpoint registered.
| The Call Forward Unavailable is also executed if the callee responds with 480 Temporarily Unavailable, which may be the case when a subscriber’s endpoint (e.g. an IP-PBX) is registered but the callee user is not available. |
-
Call Forward SMS (CFS): The SMS forward is always executed, completely disregarding the subscriber state. SMS service has to be enabled, see the SMS (Short Message Service) subchapter for a detailed description on how to activate it.
-
Call Forward on Response (CFR): The call forward is executed only for particular reply codes received back from the destination endpoint. The list of the reply codes and the activation mode can be configured in rerouting_codes and rerouting_mode subscriber’s preferences. Example: suppose that rerouting_codes is set to 503, rerouting_mode to whitelist and the CFR is configured. If that subscriber receives a call and it replies back a with code 503, then the call will be re-routed to the destination configured in the CFR. For all the other reply codes the CFR will be NOT executed.
-
Call Forward on Overflow (CFO): The call forward is executed when the new incoming call for the subscriber exceeds the limit configured in concurrent_max_in_total, concurrent_max_in or concurrent_max_in_per_account subscriber’s preferences. If none of the preferences is set then the CFO will be NOT executed.
| Starting from mr7.2.1 release, Call Forward on Response (CFR) has to be configured on the callee subscriber (in previous versions the preference was associated to the caller subscriber). When the destination endpoint replies back with an error code, this will be matched with the one listed in the rerouting_codes and rerouting_mode callee’s preferences. |
Setting a simple Call Forward
Go to your Subscriber Preferences and click Edit on the Call Forward Type you want to set (e.g. Call Forward Unconditional).
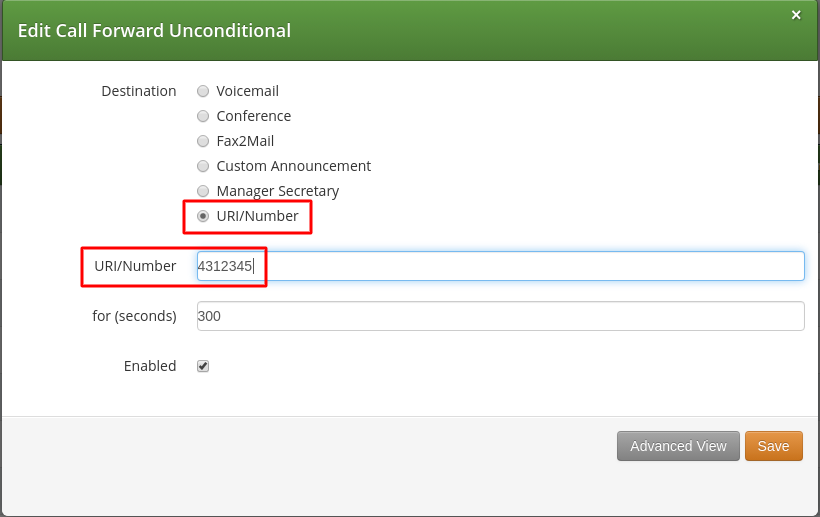
If you select URI/Number in the Destination field, you also have to set a URI/Number. The timeout defines for how long this destination should be tried to ring.
Call Forward Destinations
-
Voicemail: Calls are forwarded to the Voicemail Application Server where the caller can leave a message.
-
Conference: Calls are forwarded to the conference room. The subscriber is the host of the conference.
-
Fax2Mail: Calls are forwarded to the Fax Server and the caller is supposed to leave a fax message. Note: The Fax2Mail feature must be enabled in the subscriber’s preferences.
-
Custom Announcement: A custom announcement is played back to the caller. Select an announcement from the Custom announcement list.
-
Manager Secretary: Calls are forwarded to numbers defined in the "manager_secretary_numbers" subscriber preference. The "manager_secretary" feature must be enabled.
-
URI/Number: The call is forwarded to the provided SIP-URI string or a number (See the Call Forward Destination Extra Parameters section below).
Call Forward Destination Options
-
URI/Number: A destination to forward calls to. This option is only valid for the URI/Number destination type. Specify a valid SIP-URI string or a plain number.
-
for (seconds): Sets the ringing time, after which the call is forwarded to the next number on the list (if configured).
-
Custom Announcement: Custom Announcements are created in Sound Sets and must have the name like 'custom_announcement_0', where the trailing symbol is a digit from 0 to 9.
-
Enabled: Defines whether the Call Forward rule is being used or not.
Advanced Call Hunting
Beside call forwarding to a single destination, Sipwise C5 offers the possibility to activate call forwarding in a more sophisticated way:
-
to multiple destinations (→ Destination Set)
-
only during a pre-defined time set (→ Time Set)
-
only for specific callers (→ Source Set)
-
only for specific callee (→ B-Number Set)
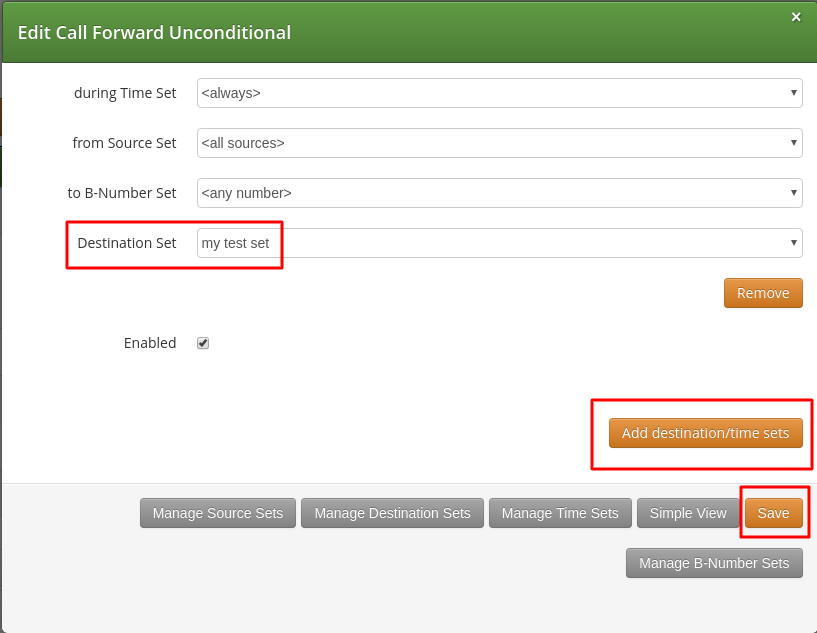
If you want to define such more detailed call forwarding rules, you need to change into the Advanced View when editing your call forward. There, you can select multiple Destination Set - Time Set - Source Set - B-Number Set groups that determine all conditions under which the call will be forwarded.
Explanation of call forward parameters
-
A Destination Set is a list of destinations where the call will be routed to, one after another, according to the order of their assigned priorities. See the Destination Sets subchapter for a detailed description.
-
A Time Set is a time period definition, i.e. when the call forwarding has to be active. See the Time Sets subchapter for a detailed description.
-
A Source Set is a list of number patterns that will be matched against the calling party number; if the calling number matches the call forwarding will be executed. See the Source Sets subchapter for a detailed description.
-
A B-Number Set is a list of number patterns that will be matched against the called party number; if the callee number matches the call forwarding will be executed. See the B-Number Sets subchapter for a detailed description.
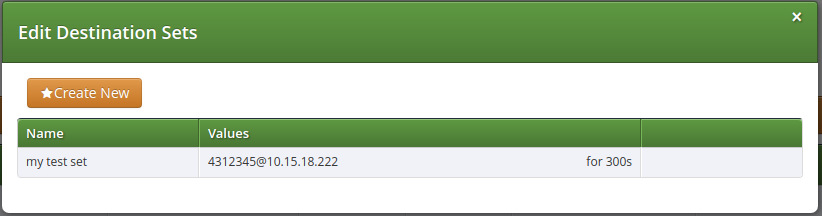
Configuring Destination Sets
Click on Manage Destination Sets to see a list of available sets. The quickset_cfu has been implicitly created during our creation of a simple call forward. You can edit it to add more destinations, or you can create a new destination set.
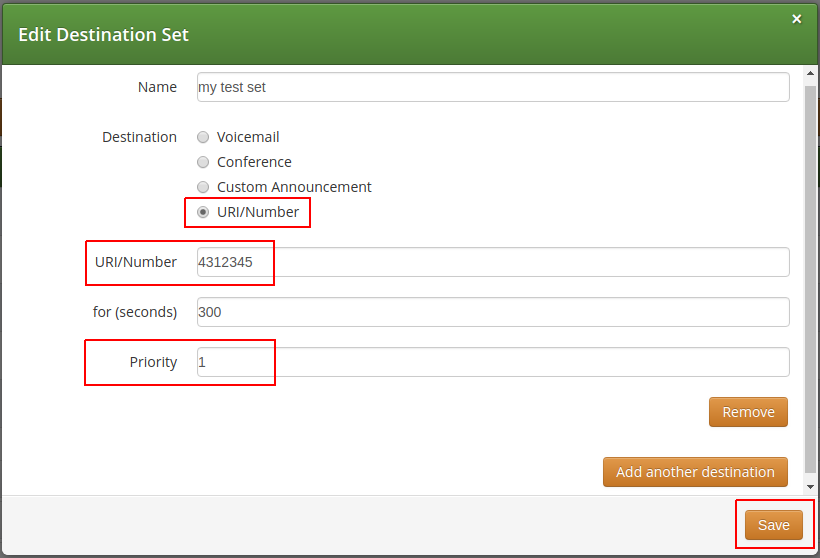
When you close the Destination Set Overview, you can now assign your new set in addition or instead of the quickset_cfu set.
Press Save to store your settings.
Configuring Time Sets
Click on Manage Time Sets in the advanced call-forward menu to see a list of available time sets. By default there are none, so you have to create one.

You need to provide a Name, and a list of Periods where this set is active. If you only set the top setting of a date field (like the Year setting in our example above), then it’s valid for only this setting (like the full year of 2013 in our case). If you provide the bottom setting as well, it defines a period (like our Month setting, which means from beginning of April to end of September). For example, if a CF is set with the following timeset: "hour { 10-12 } minute { 20-30 }", the CF will be matched within the following time ranges:
-
from 10.20am to 10:30am
-
from 11.20am to 11:30am
-
from 12.20am to 12:30am
| the period is a through definition, so it covers the full range. If you define an Hour definition 8-16, then this means from 08:00 to 16:59:59 (unless you filter the Minutes down to something else). |
If you close the Time Sets management, you can assign your new time set to the call forwards you’re configuring.
Configuring Source Sets
Once the Advanced View of the call forward definition has been opened, you will need to press the Manage Source Sets button to start defining new Source Sets or managing an existing one. The following image shows the Source Set definition dialog:
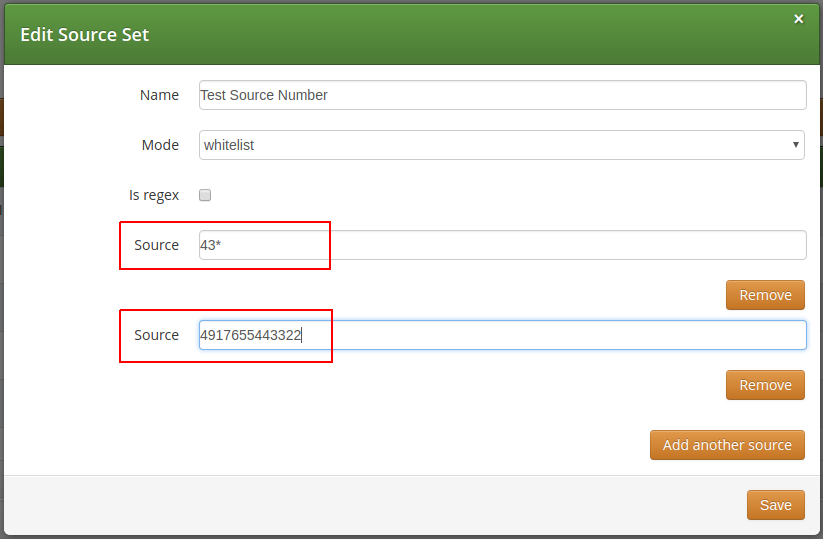
You will need to fill in the Name field first, the Mode: whitelist or blacklist, the is_regex flag and finally in the Source field you can enter:
-
A simple phone number in E.164 format
-
A pattern, in order to define a range of numbers. You can use "*" (matches a string of 0 to any number of characters), "?" (matches any single character), "[abc]" (matches a single character that is part of the explicitly listed set: a, b or c) and "[0-9]" (matches a single character that falls in the range 0 to 9) as wildcards, as usual in shell patterns. Examples:
-
"431*" (all numbers from Vienna / Austria)
-
"49176[0-5]77*" (German numbers containing fixed digits and a variable digit in 0-5 range in position 6)
-
"43130120??" (numbers from Vienna with fixed prefix and 2 digits variable at the end)
-
-
A perl compatible regular expressions (only if is_regex if set). Capturing groups can be formed using parentheses and referenced in the Destination Set via \\1, \\2,…
-
The constant string "anonymous" that indicates a suppressed calling number (CLIR)
You can add more patterns to the Source Set by pressing the Add another source button. When you finished adding all patterns, press the Save button. You will then see the below depicted list of Source Sets:

Configuring B-Number Sets
Once the Advanced View of the call forward definition has been opened, you will need to press the Manage B-Number Sets button to start defining new B-Number Sets or managing an existing one. The following image shows the B-Number Set definition dialog:
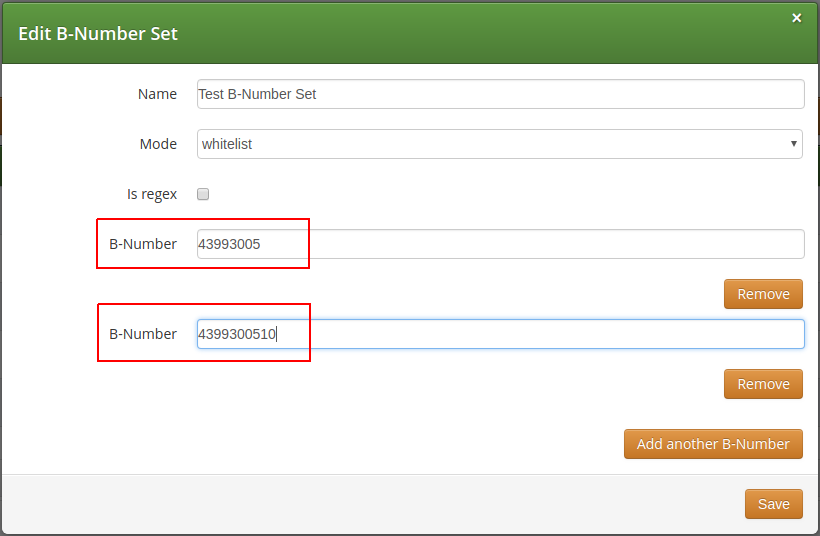
You will need to fill in the Name field first, the Mode: whitelist or blacklist, the is_regex flag and finally in the B-Number field you can enter:
-
A simple phone number in E.164 format
-
A pattern, in order to define a range of numbers. You can use "*" (matches a string of 0 to any number of characters), "?" (matches any single character), "[abc]" (matches a single character that is part of the explicitly listed set: a, b or c) and "[0-9]" (matches a single character that falls in the range 0 to 9) as wildcards, as usual in shell patterns. Examples:
-
"431*" (all numbers from Vienna / Austria)
-
"49176[0-5]77*" (German numbers containing fixed digits and a variable digit in 0-5 range in position 6)
-
"43130120??" (numbers from Vienna with fixed prefix and 2 digits variable at the end)
-
-
A perl compatible regular expressions (only if is_regex if set). Capturing groups can be formed using parentheses and referenced in the Destination Set via \\1, \\2,…
You can add more patterns to the B-Number Set by pressing the Add another B-Number button. When you finished adding all patterns, press the Save button. You will then see the below depicted list of B-Number Sets:

Finalizing the call forward definition
As additional step you can define a Destination Set as described in Destination Sets subchapter. For our example, we have defined the following Destination Set:
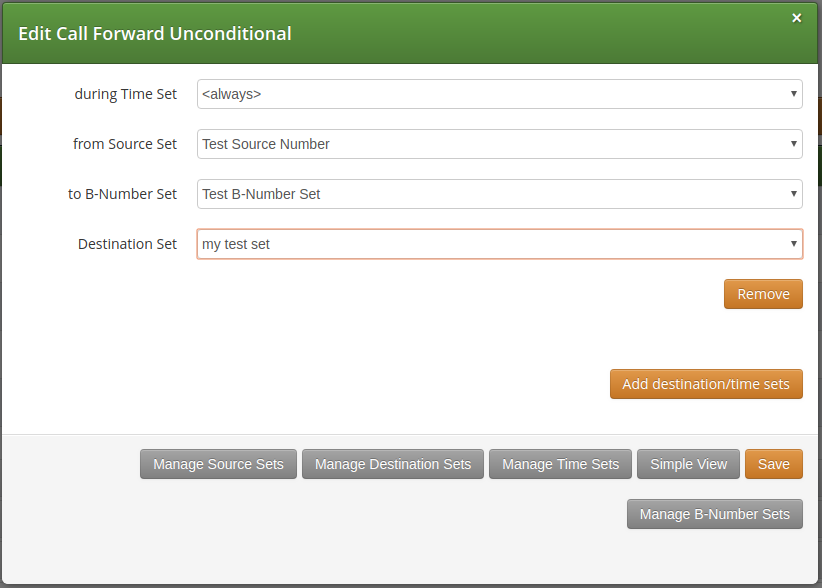
A final step of defining the call forward settings is selecting a Destination, a Time Set, a Source Set and a B-Number Set, as shown in the image below. Please note that there is no specific Time Set selected in our example, that means the call forward rule is valid (as shown) <always>.
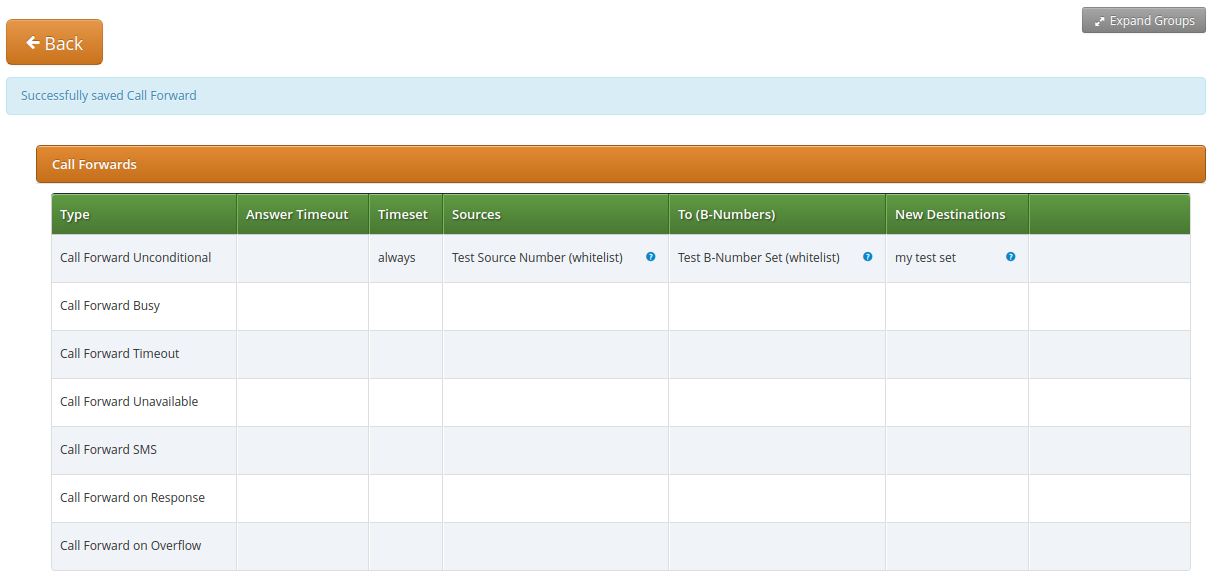
Once all the settings have been defined and the changes are saved, you will see the call forward entry (in our example: Call Forward Unconditional), with the names of the selected Destination, Time Set, Source Sets and B-Number Set provided, at SubscriberPreferences → Call Forwards location on the web interface:
Call Forking by Q value
The Sipwise C5 platform allows you to register multiple devices under the same subscriber. By the default, the maximum number of the device you can register is 5. This value is configurable via kamailio→proxy→max_registrations_per_subscriber preference in config.yml.
If a customer registers multiple devices, Sipwise C5 – once receives a call for that user – send the call to all the registered devices, in parallel. All the devices will ring at the same time. This is called Parallel Forking, and this is the default behavior. The Sipwise C5 can also do the so-called Serial Forking, which means let ring one device first, then after a timeout let ring the next device, and so on and so forth. The Serial Forking feature can be activated setting subscriber/domain preference serial_forking_by_q_value.
The Q value
Serial Forking is based on SIP Contact’s parameter called 'Q value', which is a priority number, set by the clients during their Registration. The q value is a floating point number in a range 0 to 1.0 specified as a parameter in the Contact header field.
In case the client doesn’t set the q value, Sipwise C5 set a default value of 'q=-1' in the database.
Q value can be also specified during the creation of a subscriber’s permanent registration (Details→Registered Devices→Create Permanent Registration).
The Sipwise C5 can apply two different type of algorithm to the q values in order to achieve two different types of serial forking called standard and probability.
The Standard Method
This method uses the q values as a pure priority index. The higher the q value number, the more priority that device has. Contacts with q value 1.0 have maximum priority, so such contacts will be always tried first in serial forking. Contacts with q value 0 have the lowest priority and they will be tried after all other contacts with higher priority.
| In case two or more contacts have the same q value, then they are tried in parallel. This allow to create a very flexible mix of Serial and Parallel forking. |
This method can be activated setting Standard in subscriber/domain preference serial_forking_by_q_value.
The Probability Method
This method uses the q values as the weight of the contact. The higher the q value number, the more probability that the device has to ring first. Equals q values means equals probability to be tried. Contacts with q values equals to 0 or lower are not considered by the ordering algorithm, but added at the end of the list as backup option if all other contacts fail.
| Differently from the standard method there is no possibility to have parallel forking. This algorithm can be useful to load-balance the calls in case of endpoints in ACTIVE-ACTIVE configuration. |
This method can be activated setting Probability in subscriber/domain preference serial_forking_by_q_value.
Advanced Configurations
If a subscriber with Serial Forking enabled receives a call, Sipwise C5 calls the registered devices one after the another. The forking is stopped only in the following cases:
-
there are no more devices to try to contact
-
one of the ringing devices answers the call
-
one of the ringing devices replies with the SIP code 600, 603, 604, 606 or one of the response codes defined in stop_forking_code_lists subscriber/domain preference.
-
a Call Forward on Timeout is set and the ringtimeout is reached.
Sipwise C5 allows you also to define how long each single device has to ring during a Serial Forking call. To do that, set the subscriber/domain preference contact_ringtimeout to the desired value.
| In case both contact_ringtimeout and Call Forward on Timeout are configured, CFT timeout has higher priority. To clarify this concept, please take a look at the following examples: Case 1: CFT timeout lower than the total ringtimeout of the contacts. For example: CFT timeout = 100, contact_ringtimeout = 40 and 3 devices registered: 1st device will ring for 40 seconds, 2nd device will ring for other 40 seconds, 3rd device will ring only for 20 seconds because of the CFT. Case 2: CFT timeout higher than the total ringtimeout of the contacts. For example: CFT timeout = 100, contact_ringtimeout = 40 and 2 devices registered: 1st device will ring for 40 seconds, 2nd device will ring till reaching the CFT timeout (60 seconds in this case). |
Local Number Porting
The Sipwise C5 platform comes with two ways of accomplishing local number porting (LNP):
-
one is populating the integrated LNP database with porting data,
-
the other is accessing external LNP databases via the Sipwise LNP daemon using the LNP API.
| Accessing external LNP databases is available for PRO and CARRIER products only. |
Local LNP Database
The local LNP database provides the possibility to define LNP Carriers (the owners of certain ported numbers or number blocks) and their corresponding LNP Numbers belonging to those carriers. It can be configured on the admin panel in Settings→Number Porting or via the API. The LNP configuration can be populated individually or via CSV import/export both on the panel and the API.
LNP Carriers
LNP Carriers are defined by an arbitrary Name for proper identification (e.g. British Telecom) and contain a Prefix which can be used as routing prefix in LNP Rewrite Rules and subsequently in Peering Rules to route calls to the proper carriers. The LNP prefix is written to CDRs to identify the selected carrier for post processing and analytics purposes of CDRs. LNP Carrier entries also have an Authoritative flag indicating that the numbers in this block belong to the carrier operating Sipwise C5 . This is useful to define your own number blocks, and in case of calls to those numbers reject the calls if the numbers are not assigned to local subscribers (otherwise they would be routed to a peer, which might cause call loops). Finally the Skip Rewrite flag skips executing of LNP Rewrite Rules if no number manipulation is desired for an LNP carrier.
LNP Numbers
LNP Carriers contain one or more LNP Numbers. Those LNP Numbers are defined by a Number entry in E164 format (<cc><ac><sn>) used to match a number against the LNP database. Number matching is performed on a longest match, so you can define number blocks without specifying the full subscriber number (e.g. a called party number 431999123 is going to match an entry 431999 in the LNP Numbers).
For an LNP Numbers entry, an optional Routing Number can be defined. This is useful to translate e.g. premium 900 or toll-free 800 numbers to actual routing numbers. If a Routing Number is defined, the called party number is implicitly replaced by the Routing Number and the call processing is continued with the latter. For external billing purposes, the optional Type tag of a matched LNP number is recorded in CDRs.
An optional Start Date and End Date makes it possible to schedule porting work-flows up-front by populating the LNP database with certain dates, and the entries are only going to become active with those dates. Empty values for start indicate a start date in the past, while empty values for end indicate an end time in the future during processing of a call, allowing to define infinite date ranges. As intervals can overlap, the LNP number record with a start time closest to the current time is selected.
Enabling local LNP support
In order to activate Local LNP during routing, the feature must be activated in config.yml. Set kamailio→proxy→lnp→enable to yes and kamailio→proxy→lnp→type to local.
LNP Routing Procedure
When a call arrives at the system, the calling and called party numbers are first normalized using the Inbound Rewrite Rules for Caller and Inbound Rewrite Rules for Callee within the rewrite rule set assigned to the calling party (a local subscriber or a peer).
If the called party number is not assigned to a local subscriber, or if the called party is a local subscriber and has the subscriber/domain preference lnp_for_local_sub set, the LNP lookup logic is engaged, otherwise the call proceeds without LNP lookup. The further steps assume that LNP is engaged.
If the call originated from a peer, and the peer preference caller_lnp_lookup is set for this peer, then an LNP lookup is performed using the normalized calling party number. The purpose for that is to find the LNP prefix of the calling peer, which is then stored as source_lnp_prefix in the CDR, together with the selected LNP number’s type tag (source_lnp_type). If the LNP lookup does not return a result (e.g. the calling party number is not populated in the local LNP database), but the peer preference default_lnp_prefix is set for the originating peer, then the value of this preference is stored in source_lnp_prefix of the CDR.
Next, an LNP lookup is performed using the normalized called party number. If no number is found (using a longest match), no further manipulation is performed.
If an LNP number entry is found, and the Routing Number is set, the called party number is replaced by the routing number. Also, if the Authoritative flag is set in the corresponding LNP Carrier, and the called party number is not assigned to a local subscriber, the call is rejected. This ensures that numbers allocated to the system but not assigned to subscribers are dropped instead of routed to a peer.
| If the system is serving a local subscriber with only the routing number assigned (but not e.g. the premium number mapping to this routing number), the subscriber will not be found and the call will either be rejected if the called party premium number is within an authoritative carrier, or the call will be routed to a peer. This is due to the fact that the subscriber lookup is performed with the dialled number, but not the routing number fetched during LNP. So make sure to assign e.g. the premium number to the local subscriber (optionally in addition to the routing number if necessary using alias numbers) and do not use the LNP routing number mechanism for number mapping to local subscribers. |
Next, if the LNP carrier does not have the Skip Rewriting option set, the LNP Rewrite Rules for Callee are engaged. The rewrite rule set used is the one assigned to the originating peer or subscriber/domain via the rewrite_rule_set preference. The variables available in the match and replace part are, beside the standard variables for rewrite rules:
-
${callee_lnp_prefix}: The prefix stored in the LNP Carrier -
${callee_lnp_basenumber}: The actual number entry causing the match (may be shorter than the called party number due to longest match)
Typically, you would create a rewrite rule to prefix the called party number with the callee_lnp_prefix by matching ^([0-9]+)$
and replacing it by ${callee_lnp_prefix}\1.
Once the LNP processing is completed, the system checks for further preferences to finalize the number manipulation. If the terminating
local subscriber or peer has the preference lnp_add_npdi set, the Request URI user-part is suffixed with ;npdi. Next,
if the preference lnp_to_rn is set, the Request URI user-part is suffixed with ;rn=LNP_ROUTING_NUMBER, where
LNP_ROUTING_NUMBER is the Routing Number stored for the number entry in the LNP database, and the originally called number is
kept in place. For example, if lnp_to_rn is set and the number 1800123 is called, and this number has a routing number
1555123 in the LNP database, the resulting Request-URI is sip:1800123;rn=1555123@example.org.
Finally, the destination_lnp_prefix in the CDR table is populated either by the prefix defined in the Carrier of the LNP database if a match was found, or by the default_lnp_prefix preference of the destination peer or subscriber/domain.
Blocking Calls Using LNP Data
The Sipwise C5 provides means to allow or block calls towards ported numbers that are hosted by particular LNP carriers. Please visit Creating Rules per NCOS Level in the handbook to learn how this can be achieved.
Transit Calls using LNP
If a call originated from a peer and the peer preference force_outbound_calls_to_peer is set to force_nonlocal_lnp (the if callee is not local and is ported selection in the panel), the call is routed back to a peer selected via the peering rules.
This ensures that if a number once belonged to your system and is ported out, but other carriers are still sending calls to you (e.g. selecting you as an anchor network), the affected calls can be routed to the carrier the number got ported to.
CSV Format
The LNP database can be exported to CSV, and in the same format imported back to the system. On import, you can decide whether to drop existing data prior to applying the data from the CSV.
The CSV file format contains the fields in the following order:
| Name | Description |
|---|---|
Carrier Name |
The Name in the LNP Carriers table (string, e.g. My Carrier) |
Carrier Prefix |
The Prefix in the LNP Carriers table (string, e.g. DD55) |
Number |
The Number in the LNP Numbers table (E164 number, e.g. 1800666) |
Routing Number |
The Routing Number in the LNP Numbers table (E164 number or empty, e.g. 1555666) |
Start |
The Start in the LNP Numbers table (YYYY-MM-DD or empty, e.g. 2016-01-01) |
End |
The End in the LNP Numbers table (YYYY-MM-DD or empty, e.g. 2016-12-30) |
Authoritative |
The Authoritative flag in the LNP Carriers table (0 or 1) |
Skip Rewrite |
The Skip Rewrite flag in the LNP Carriers table (0 or 1) |
Type |
The Type tag in the LNP Numbers table (alphanumeric string, e.g. mobile) |
Local LNP returned values
If a match in the local LNP table is found corresponding LNP Carrier code will be stored in CDR data.
Additionally two dedicated headers can be added to the outgoing SIP message:
-
P-NGCP-LNP-Number: The returned LNP number, if any
-
P-NGCP-LNP-Status: The LNP query return code (200 if successful, 404 if no entry found)
This feature is not enabled by default, but can be activated with the following parameters:
-
kamailio->proxy->lnp->add_reply_headers->enable : no
-
kamailio->proxy->lnp->add_reply_headers->number : P-NGCP-LNP-Number
-
kamailio->proxy->lnp->add_reply_headers->status : P-NGCP-LNP-Status
P-Early-Media
The Sipwise C5 platform supports P-Early-Media Sip Header according to RFC5009.
Implementation
The Sipwise C5 platform tries to find a P-Early-Media SIP header on every INVITE message coming from peers or subscribers. If the header is found, it tries to parse the content, in particular it looks for the following parameters:
-
sendonly
-
recvonly
-
inactive
-
sendrecv
-
supported
-
gated
Any other parameter found will be silently discarded.
The first four parameters are also known as directional parameters and they will influence how the Sipwise C5 platform will behave when a service, potentially producing early media, is involved during the call. The P-Early-media header will be also transparently sent to the b leg of the call and to the callee which must honour the contents of the header before playing early media.
A typical example is when a subscriber with an announce preference activated is called, under normal conditions the early media with the announce is played before connecting to the callee. The early media however wont be played if the caller is not willing to receive the early audio stream (inactive and sendonly directional parameters set in P-Early-Media).
There are cases when Sipwise C5 produces an early media to alert the user of an error (typical examples are when the callee is offline or pstn termination is not available). In this situations, if the caller is not willing to receive the early audio stream, Sipwise C5 will just return a SIP error without playing the early media announce.
The presence of the supported parameter forces the Sipwise C5 platform to send back P-Early-Media in 18X replies even if the callee user agent does not include it. This will help the caller user agent to understand that we are going to send early media and an audio channel must be allocated and opened. The Sipwise C5 platform will add the missing P-Early-Media back from the callee towards the caller, according to the following schema:
-
if caller sends P-Early-Media: sendonly Sipwise C5 will reply with P-Early-Media: recvonly
-
if caller sends P-Early-Media: recvonly Sipwise C5 will reply with P-Early-Media: sendonly
-
if caller sends P-Early-Media: sendrecv Sipwise C5 will reply with P-Early-Media: sendrecv
-
if caller sends P-Early-Media: inactive Sipwise C5 will reply with P-Early-Media: inactive
The gated parameter is recognized by Sipwise C5 but it doesn’t affect its mode of operation. This parameter, if present, is just passed transparently to the callee.
Configuration
It’s possible to alter how Sipwise C5 manages P-Early-Media just changing the following parameters inside the config.yml file:
-
kamailio.proxy.p_early_media.default_auth: this parameter will instruct how Sipwise C5 behaves when a P-Early-Media without directional parameters is received. The default behaviour will permit early media streams on both directions (sendrecv).
-
kamailio.proxy.p_early_media.play_on_missing: this parameter will drive the Sipwise C5 behaviour when the caller sends an INVITE message without P-Early-Media header. If set to yes (default), Sipwise C5 will be allowed to play early media for its own services. If set to no Sipwise C5 will skip early media since it’s assuming the caller is not willing to receive early media.
Emergency Mapping
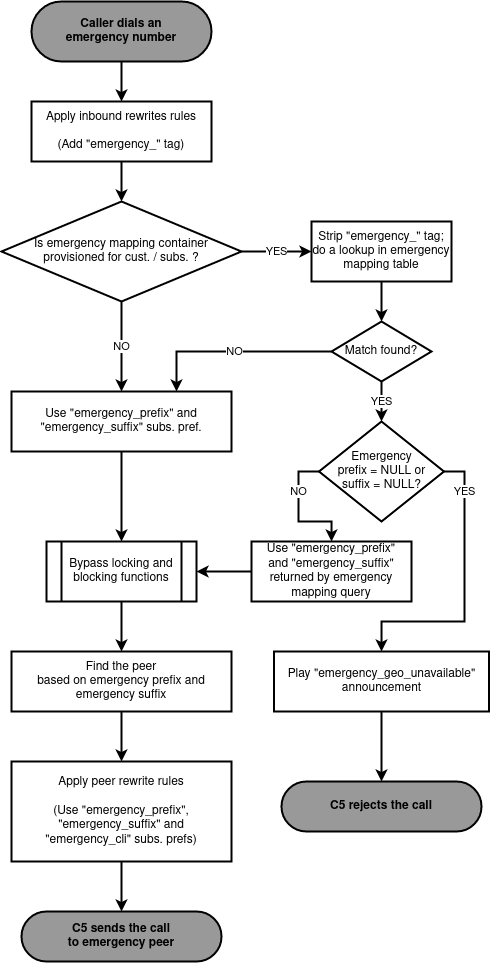
As opposed to the Simple Emergency Number Handling solution, Sipwise C5 supports an advanced emergency call handling method, called emergency mapping. The main idea is: instead of obtaining a statically assigned emergency prefix / suffix from subscriber preferences, Sipwise C5 retrieves an emergency routing prefix and suffix from a central emergency call routing table, according to the current location of the calling subscriber.
The following figure shows the overview of emergency call processing when using emergency mapping feature:
Emergency Mapping Description
Emergency numbers per geographic location are mapped to different routing prefixes not derivable from an area code or the emergency number itself. In some cases the suffix is also needed to be added to the emergency number. This is why a global emergency mapping table related to resellers is introduced, allowing to map emergency numbers to their geographically dependent routing numbers.
The geographic location is referenced by a location ID, which has to be populated by a north-bound provisioning system. No towns, areas or similar location data is stored on Sipwise C5 platform. The locations are called Emergency Containers on NGCP.
The actual emergency number mapping is done per location (per Emergency Container), using the so-called Emergency Mapping entries. An Emergency Mapping entry assigns a routing prefix, valid only in a geographic area, to a generic emergency number (for example '112' in Europe, '911' in the U.S.A.) or a country specific one (for example '133').
| As of mr4.5 version, Sipwise C5 performs an exact match on the emergency number in the emergency routing table. |
Emergency Containers may be assigned to various levels of the client hierarchy within NGCP. The following list shows such levels with each level overriding the settings of the previous one:
-
Customer or Domain
-
Customer Location, which is a territory representing a subset of the customer’s subscribers, defined as one or more IP subnets.
-
Subscriber
| Please be aware that Customer Location is not necessarily identical to the "location" identified through an Emergency Container. |
Once the emergency routing prefix or suffix has been retrieved from the emergency mapping table, call processing continues in the same way as in case of simple emergency call handling.
Emergency Mapping Configuration
The administrative web panel of Sipwise C5 provides the configuration interface for emergency mapping. Please navigate to Settings → Emergency Mapping menu item first, in order to start configuring the mapping.
An Emergency Container must be created, before the mapping entries can be defined. Press Create Emergency Container to start this. An example of a container is shown here:
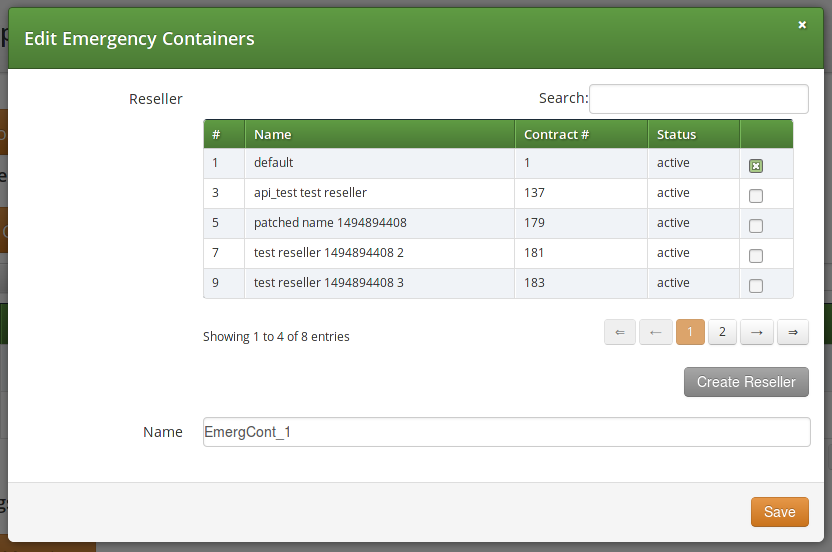
You have to select a Reseller that this container belongs to, and enter a Name for the container, which is an arbitrary text.
| The platform administrator has to create as many containers as the number of different geographic areas (locations) the subscribers are expected to be in. |
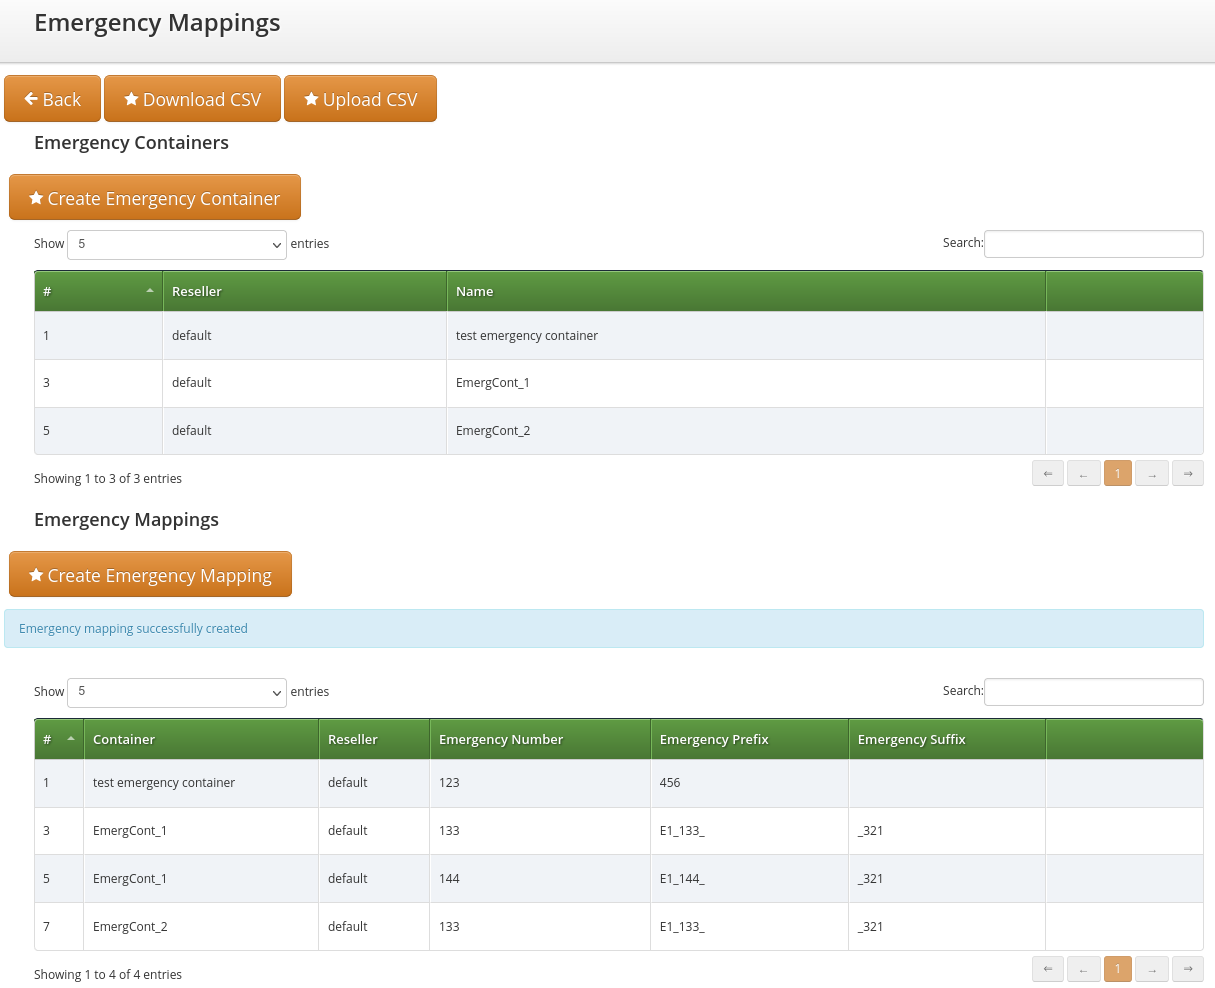
As the second step of emergency mapping provisioning, the Emergency Mapping entries must be created. Press Create Emergency Mapping to start this step. An example is shown here:

The following parameters must be set:
-
Container: select an emergency mapping container (i.e. a location ID)
-
Code: the emergency number that subscribers will dial
-
Prefix: the routing prefix that belongs to the particular emergency service within the selected location
-
Suffix: the routing suffix that belongs to the particular emergency service within the selected location
Once all the necessary emergency mappings have been defined, the platform administrator will see a list of containers and mapping entries:
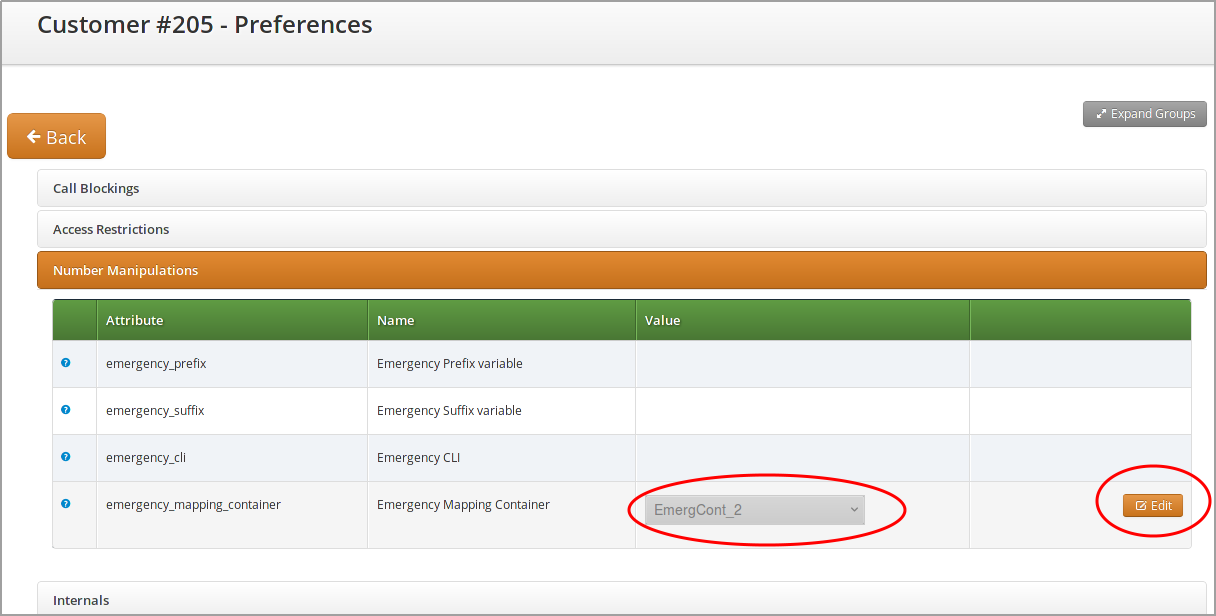
The emergency number mapping is now defined. As the next step, the platform administrator has to assign the emergency containers to Customers / Domains / Customer Locations or Subscribers. We’ll take an example with a Customer: select the customer, then navigate to Details → Preferences → Number Manipulations. In order to assign a container, press the Edit button and then select one container from the drop-down list:
Rewrite Rules for Emergency Mapping
Once emergency containers and emergency mapping entries are defined, Sipwise C5 administrator has to ensure that the proper number manipulation takes place, before initiating any emergency call towards peers.
| Please don’t forget to define the rewrite rules for peers — particularly: Outbound Rewrite Rules for Callee — as described in Normalize Emergency Calls for Peers section of the handbook. |
Emergency Calls Not Allowed
There is a special case when the dialed number is recognized as an emergency number, but the emergency number is not available for the geographic area the calling party is located in.
In such a case the emergency mapping lookup will return an emergency prefix, but the value of this will be NULL. Therefore the call is rejected and an announcement is played. The announcement is a newly defined sound file referred as emergency_geo_unavailable.
It is possible to configure the rejection code and reason in /etc/ngcp-config/config.yml file, the parameters are: kamailio.proxy.early_rejects.emergency_invalid.announce_code and kamailio.proxy.early_rejects.emergency_invalid.announce_reason.
Bulk Upload or Download of Emergency Mapping Entries
The Sipwise C5 offers the possibility to upload / download emergency mapping entries in form of CSV files. This operation is available for each reseller, and is very useful if a reseller has many mapping entries.
Downloading Emergency Mapping List
One has to navigate to Settings → Emergency Mapping menu and then press the Download CSV button to get the list of mapping entries in a CSV file. First the reseller must be selected, then the Download button must be pressed. As an example, the entries shown in "Emergency Mapping List" picture above would be written in the file like here below:
EmergCont_1,133,E1_133_, _321
EmergCont_1,144,E1_144_, _321
EmergCont_2,133,E2_133_, _321
The CSV file has a plain text format, each line representing a mapping entry, and contains the following fields:
-
Container name, as defined in Emergency Containers
-
Emergency Number
-
Emergency Prefix
-
Emergency Suffix
Uploading Emergency Mapping List
Uploading a CSV file with emergency mapping entries may be started after pressing the Upload CSV button. The following data must be provided:
-
Reseller: selected from the list
-
Upload mapping: the CSV file must be selected after pressing the Choose File button
-
Purge existing: an option to purge existing emergency mapping entries that belong to the selected reseller, before populating the new mapping data from the file

The CSV file for the upload has the same format as the one used for download.
Emergency Priorization
The Sipwise C5 can potentially host privileged subscribers that offer emergency or at least prioritized services (civil defence, police etc.). In case of an emergency, the platform has to be free’d from any SIP flows (calls, registrations, presence events etc.) which do not involve those privileged subscribers.
Such an exceptional condition is called emergency mode and it can be activated for all domains on the system, or only for selected domains.
Once emergency mode is activated, Sipwise C5 will immediately apply the following restrictions on new SIP requests or existing calls:
-
Any SIP requests (calls, registrations etc.) from subscribers within the affected domains, who are not marked as privileged, are rejected.
-
Any calls from peers not targeting privileged subscribers are rejected.
-
Any active calls which do not have a privileged subscriber involved are terminated.
Calls from non-privileged subscribers to emergency numbers are still allowed.
Call-Flow with Emergency Mode Enabled
Typical call-flows of emergency mode will be shown in this section of the handbook. We have the following assumptions:
-
Emergency priorization has been enabled on system-level
-
There is a domain for which the emergency mode has been activated
-
There is a privileged subscriber in that domain
-
A generic peering connection has been configured for non-emergency calls
-
A dedicated peering connection has been configured for emergency calls
The examples do not show details of SIP messages, but rather give a high-level overview of the call-flows.
-
A non-privileged subscriber makes a call to another non-privileged subscriber. Result: the call will be rejected.
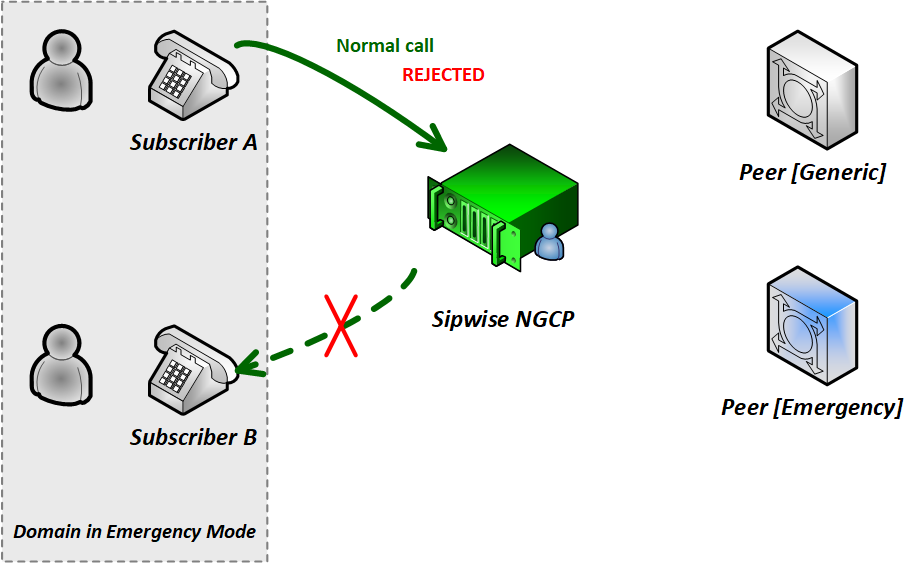 Figure 23. Call-flow in Emergency Mode 1. (Std to Std)
 -
A non-privileged subscriber makes a call to an external subscriber (via peer). Result: the call will be rejected.
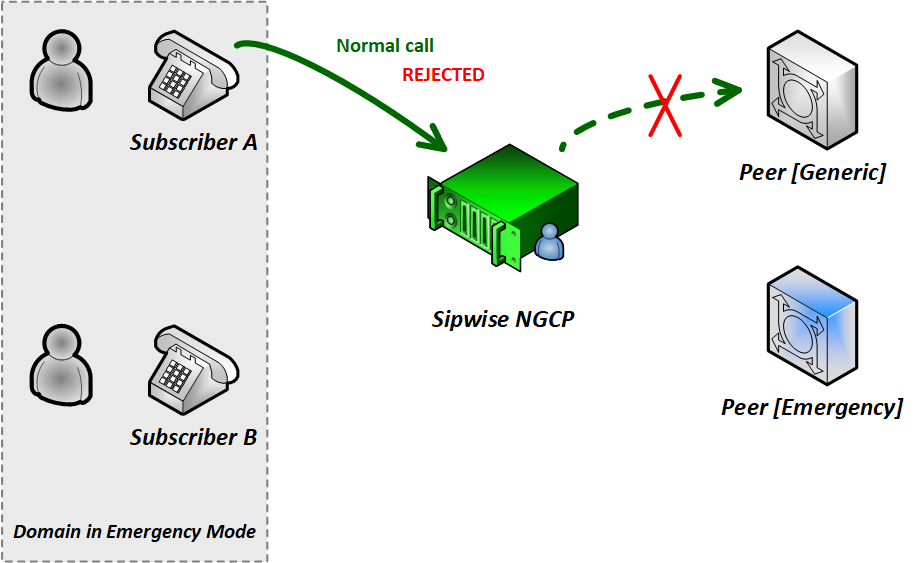 Figure 24. Call-flow in Emergency Mode 2. (Std to Peer)
 -
A non-privileged subscriber makes a call to a privileged subscriber. Result: the call will be accepted.
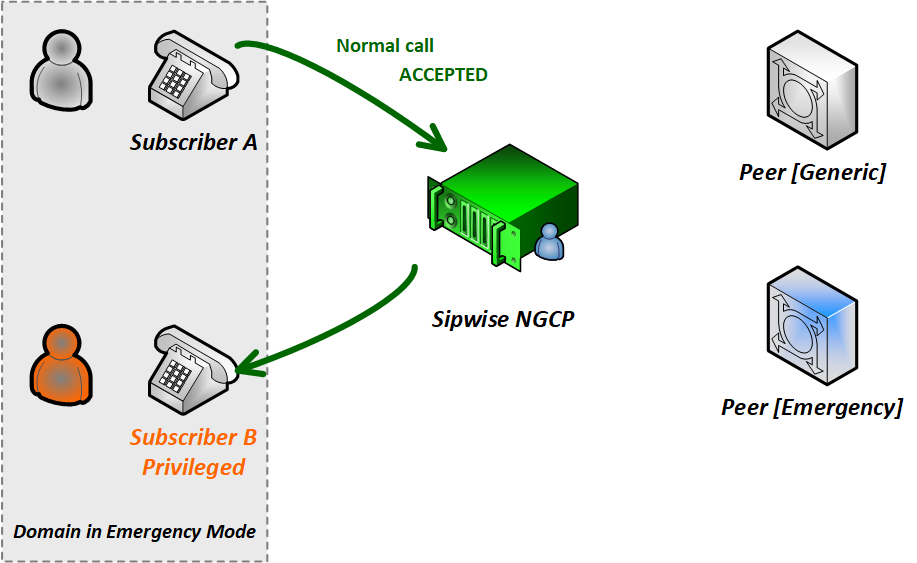 Figure 25. Call-flow in Emergency Mode 3. (Std to Priv)
 -
A non-privileged subscriber makes a call to an emergency number. Result: the call will be accepted.
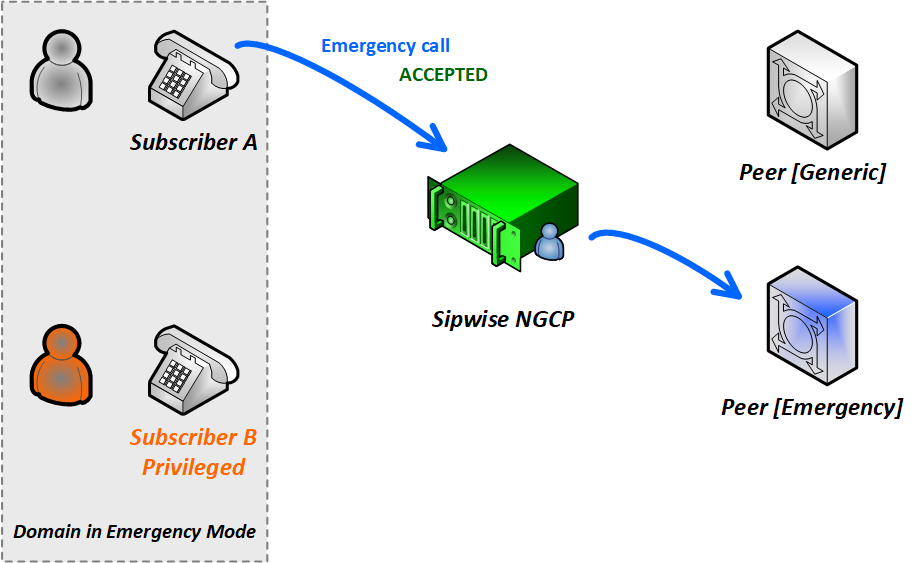 Figure 26. Call-flow in Emergency Mode 4. (Std to Emerg)
 -
A privileged subscriber makes a call to a non-privileged subscriber. Result: the call will be accepted.
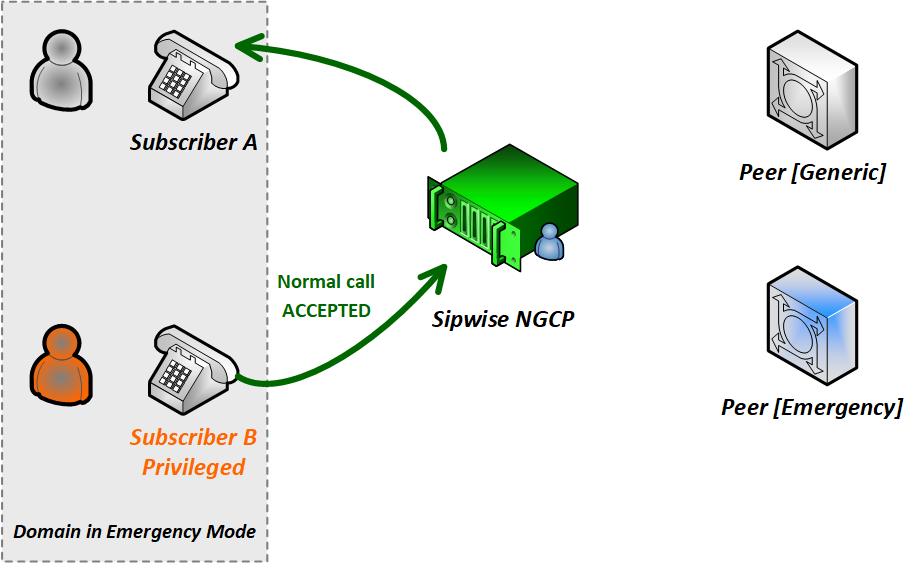 Figure 27. Call-flow in Emergency Mode 5. (Priv to Std)
 -
A privileged subscriber makes a call to an external subscriber (via peer). Result: the call will be accepted.
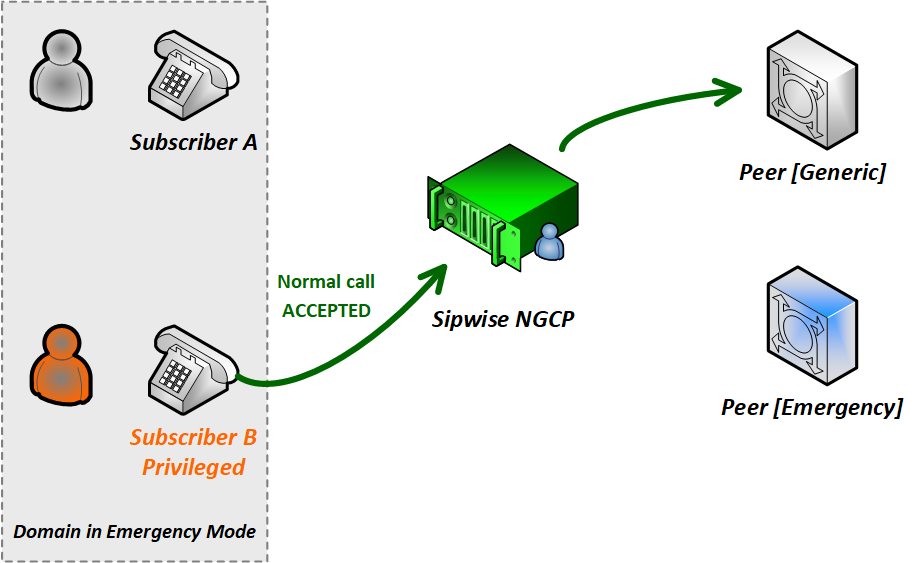 Figure 28. Call-flow in Emergency Mode 6. (Priv To Peer)
Configuration of Emergency Mode
The platform operator has to perform 2 steps of configuration so that the emergency mode can be activated. After the configuration is completed it is necessary to explicitly activate emergency mode, which can be accomplished as described in Activating Emergency Mode later.
1. System-level Configuration
The emergency priorization function must be enabled for the whole system, otherwise
emergency mode can not be activated. The platform operator has to set kamailio.proxy.emergency_priorization.enabled
configuration parameter value to "yes" in the main configuration file /etc/ngcp-config/config.yml.
Afterwards changes have to be applied in the usual way, with the command: ngcpcfg
apply "Enabled emergency priorization"
In order to learn about other parameters related to emergency priorization please refer to appendices-main:appendices-main.adoc#config_yml_kamailio part of the handbook.
2. Subscriber-level Configuration
The platform operator (or any administrator user) has the capability to declare a subscriber privileged, so that the subscriber can initiate and receive calls when emergency mode has been activated on the NGCP. In order to do that the administrator has to navigate to Settings → Subscribers → select the subscriber → Details → Preferences → Internals → emergency_priorization on the administrative web interface, and press the Edit button.
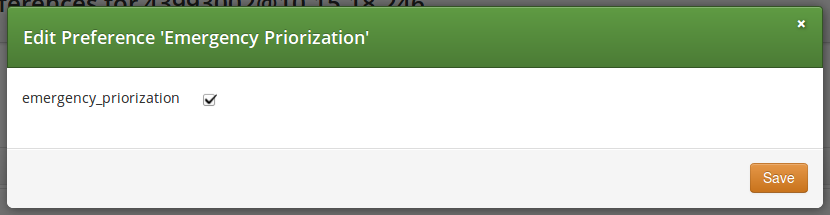
The checkbox emergency_priorization has to be ticked and then press the Save button.
The same privilege can be added via the REST API for a subscriber: a HTTP PUT/PATCH
request must be sent on /api/subscriberpreferences/id resource and the emergency_priorization
property must be set to "true".
Activating Emergency Mode
The platform operator can activate emergency mode for a single or multiple domains in 3 different ways:
-
via the administrative web interface
-
via the REST API
-
via a command-line tool
| The interruption of ongoing calls is only possible with the command-line tool! Activating emergency mode for domains via the web interface or REST API will only affect upcoming calls. |
1. Activate emergency mode via web interface: this way of activation is more appropriate if only a single (or just a few) domain is affected. Please navigate to Settings → Domains → select a domain → Preferences → Internals → emergency_mode_enabled → Edit.
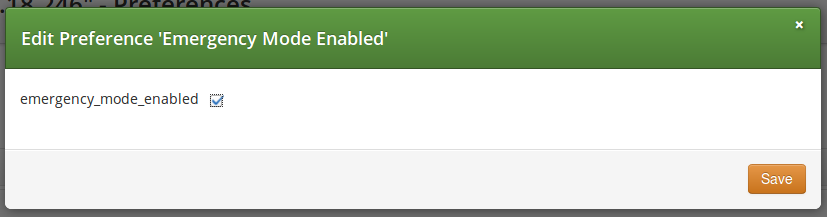
The checkbox emergency_mode_enabled has to be ticked and then press the Save button.
2. Activate emergency mode via REST API: this way of activation is more appropriate if only a single (or just a few) domain is affected.
For that purpose a HTTP PUT/PATCH request must be sent on /api/domainpreferences/id
resource and the emergency_mode_enabled property must be set to "true".
3. Activate emergency mode using a command-line tool: Sipwise C5 provides a built-in script that may be used to enable/disable emergency mode for some particular or all domains.
-
Enable emergency mode:
> ngcp-emergency-mode enable <all|[domain1 domain2 ...]> -
Disable emergency mode:
> ngcp-emergency-mode disable <all|[domain1 domain2 ...]> -
Query the status of emergency mode:
> ngcp-emergency-mode status <all|[domain1 domain2 ...]>
SIP Message Filtering
Header Filtering
Adding additional SIP headers to the initial INVITEs relayed to the callee (second leg) is possible by creating a patchtt file for the following template:
/etc/ngcp-config/templates/etc/ngcp-sems/etc/ngcp.sbcprofile.conf.tt2.
The following section can be changed:
header_filter=whitelist
header_list=[%IF kamailio.proxy.debug == "yes"%]P-NGCP-CFGTEST,[%END%]
P-R-Uri,P-D-Uri,P-Preferred-Identity,P-Asserted-Identity,Diversion,Privacy,
Allow,Supported,Require,RAck,RSeq,Rseq,User-Agent,History-Info,Call-Info
[%IF kamailio.proxy.presence.enable == "yes"%],Event,Expires,
Subscription-State,Accept[%END%][%IF kamailio.proxy.allow_refer_method
== "yes"%],Referred-By,Refer-To,Replaces[%END%]
By default the system will remove from the second leg all the SIP headers which are not in the above list. If you want to keep some additional/custom SIP headers, coming from the first leg, into the second leg you need to add them at the end of the header_list= list. After that, as usual, you need to apply the changes. In this way the system will keep your headers in the INVITE sent to the destination subscriber/peer.
| DO NOT TOUCH the list if you don’t know what you are doing. |
Codec Filtering
Sometimes you may need to filter some audio CODEC from the SDP payload, for example if you want to force your subscribers to do not talk a certain codecs or force them to talk a particular one. To achieve that you need to change the /etc/ngcp-config/config.yml, in the following section:
sdp_filter:
      codecs: PCMA,PCMU,telephone-event
      enable: yes
      mode: whitelist
In the example above, the system is removing all the audio CODECS from the initial INVITE except G711 alaw,ulaw and telephone-event. In this way the callee will be notified that the caller is able to talk only PCMA. Another example is the blacklist mode:
sdp_filter:
      codecs: G729,G722
      enable: yes
      mode: blacklist
In this way the G729 and G722 will be removed from the SDP payload. In order to apply the changes, run
ngcpcfg apply 'Enable CODEC filtering'| Codec filtering feature applies to SDP attributes and it does not remove a whole SDP media session in case all the related attributes match a filter rule. For example, this SDP video media session: |
m=video 9078 RTP/AVPF 96 97
a=rtpmap:96 VP8/90000
a=rtpmap:97 H264/90000
a=fmtp:97 profile-level-id=42801F
in combination with:
sdp_filter:
      codecs: PCMA,PCMU,telephone-event
      enable: yes
      mode: whitelist
will result in no filtering at all because both codecs id 96 97 are not whitelisted and an empty media session is not allowed.
Codec Filtering with user preferences
Codec filtering management is also possible using the following preferences:
-
codecs_list
-
codecs_filter
-
codecs_id_filter
-
codecs_id_list
These preferences offer an alternative way to filter codecs without updating the configuration file and restarting the kamailio-proxy service.
Since they can be applied at domain/peer/subscriber preferences level, they feature a more granular management compared when configuration is set via config.yml file, which is system wide.
The "codecs_list" preference allows you to enter a list of codecs names, valid names are G722, PCMU, PCMA, speex, GSM, G723, DVI4, L16, QCELP, CN, MPA, G728, DVI4, G729, AMR, AMR*WB, opus, telephone*event, CelB, JPEG, H261, H263, H263*1998, MPV, MP2T, nv, vp8, vp9, h264.
The "codecs_id_list" preference allows you to achieve the same result but in this case you will have to enter the corresponding CODEC-ID(s) payload type.
Once the list is filled, you have to specify if the codecs are going to be blacklisted or whitelisted by kamailio-proxy.This is done through the codecs_filter or the codecs_id_filter preferences.
If "codecs_list" and "codecs_id_list" are set (and the corresponding codecs_list/codec_id_list), both filters will be applied sequentially: the list of codecs resulting from "codecs_list" filtering will be used as input for the second "codecs_id_list" filtering.
By default, the codecs filter preferences are cleared (blacklisted) causing all codecs listed inside the codecs lists preferences to be filtered out. Differently, if the codecs filters are set, only the ones inside the codecs list will be retained causing the others to be filtered out.
The codecs_filter preference is tied to codecs_list and only operates on codecs entered inside that list. Likewise for codecs_id_filter and codecs_id_list, respectively. Ensure not mixing them.
|
Examples:
-
Example1
-
codecs_list: "G729"
-
codecs_filter: unset (false)
-
SDP IN:
m=audio 6000 RTP/AVP 8 0 18 101
a=rtpmap:8 PCMA/8000
a=rtpmap:0 PCMU/8000
a=rtpmap:18 G729/8000
a=rtpmap:101 telephone-event/8000
-
SDP OUT:
m=audio 30000 RTP/AVP 8 0 101
a=rtpmap:8 PCMA/8000
a=rtpmap:0 PCMU/8000
a=rtpmap:101 telephone-event/8000
-
Codec G729 has been filtered out because blacklisted in codecs_list.
-
-
Example 2
-
codecs_id_list: "18"
-
codecs_id_filter: set (true)
-
SDP IN:
m=audio 6000 RTP/AVP 8 0 18 101
a=rtpmap:8 PCMA/8000
a=rtpmap:0 PCMU/8000
a=rtpmap:18 G729/8000
a=rtpmap:101 telephone-event/8000
-
SDP OUT:
m=audio 30108 RTP/AVP 18
a=rtpmap:18 G729/8000
-
Codec G729 is retained because whitelisted, PCMA PCMU have been filtered out because they are not whitelisted.
-
Enable History and Diversion Headers
It may be useful and mandatory - specially with NGN interconnection - to enable SIP History header and/or Diversion header for outbound requests to a peer or even for on-net calls. In order to do so, you should enable the following preferences in Domain’s and Peer’s Preferences:
-
Domain’s Prefererences: inbound_uprn = Forwarder’s NPN
-
Peer’s Prefererences: outbound_history_info = UPRN
-
Peer’s Prefererences: outbound_diversion = UPRN
-
Domain’s Prefererences: outbound_history_info = UPRN (if you want to allow History Header for on-net call as well)
-
Domain’s Prefererences: outbound_diversion = UPRN (if you want to allow Diversion Header for on-net call as well)
User Agent Filtering
It could be useful to filter the received REGISTER and INVITE requests based on the User-Agent header’s value. For example, if you want to force your subscribers to use certain type/model of devices. To do that system wide you need to change the /etc/ngcp-config/config.yml, in the following section:
kamailio:
  lb:
    block_useragents:
      action: reject
      block_empty: no
      block_absent: no
      enable: yes
      mode: whitelist
      ua_patterns:
      - Yealink.*
In the example above, the system allows all the requests, which have the User-Agent header beginning with 'Yealink' value. All other UACs will be rejected with the 403 Forbidden message. To silently drop the received message, it is possible to specify the drop action instead of the default reject.
Another example is the blacklist mode:
kamailio:
  lb:
    block_useragents:
      action: drop
      block_empty: no
      block_absent: no
      enable: yes
      mode: blacklist
      ua_patterns:
      - friendly-scanner
In the example above Sipwise C5 drops all requests, which have the User-Agent header equal to 'friendly-scanner'. Because of the drop action these messages will be dropped silently, without providing a response to the sender.
Another example with block_empty: and block_absent: options set to 'yes':
kamailio:
  lb:
    block_useragents:
      action: reject
      block_empty: yes
      block_absent: yes
      enable: yes
      mode: whitelist
      ua_patterns: []
In the example above Sipwise C5 rejects all requests, which have the User-Agent header absent or the User-Agent header with no value. Such requests will be rejected with a 403 Forbidden message. It’s possible to set only one of the options (block_empty: / block_absent:) to 'yes'. As well as it’s possible to keep both of them enabled.
As usually, in order to apply the changes, run:
ngcpcfg apply 'Enable User-Agent filtering'| Please remember that the applying of the changes require a restart of the LB component, which is recommended to be done only during non-working hours. |
Regardless of the system-wide configuration (UA filtering enabled globaly or not), it is possible to define a specific User-Agent filtering for each Domain or Subscriber. In order to do so, you should configure the following fields in Domain’s or Subscriber’s Preferences section:
-
ua_filter_list: Contains wildcard list of allowed or denied SIP User-Agents matched against the User-Agent header.
-
ua_filter_mode: Specifies the operational mode of the SIP User-Agent Filter List: Blacklist or Whitelist.
-
ua_reject_missing: Rejects any request if no User-Agent header is given.
In case of rejection the response with code kamailio.proxy.early_rejects.block_admin.announce_code and reason kamailio.proxy.early_rejects.block_admin.announce_reason will be sent back to the subscriber.
SIP Trunking with SIPconnect
User provisioning
For the purpose of external SIP-PBX interconnect with Sipwise C5 the platform admin should create a subscriber with multiple aliases representing the numbers and number ranges served by the SIP-PBX.
-
Subscriber username - any SIP username that forms an "email-style" SIP URI.
-
Subscriber Aliases - numbers in the global E.164 format without leading plus.
To configure the Subscriber, go to Settings→Subscribers and click Details on the row of your subscriber. There, click on the Preferences button on top.
You should look into the Number Manipulations and Access Restrictions sections in particular, which control the calling and called number presentation.
Inbound calls routing
Enable preference Number Manipulations→e164_to_ruri for routing inbound calls to SIP-PBX. This ensures that the Request-URI will comprise a SIP-URI containing the dialed alias-number as user-part, instead of the user-part of the registered AOR (which is normally a static value).
Fallback behaviours
Sipwise C5 can enhance pbx integration providing three different extended dialing modes:
-
Strict number matching: dialing arbitrary extension behind subscriber number is not allowed
-
Extended matching, send dialed number with extension: the system will locate the subscriber by longest matching prefix, only the whole dialied number (base number + extension) will be written inside the Request uri user part.
-
Extended matching, send base matching number: the system will locate the subscriber by longest matching prefix, only the base number or subscriber username will be written inside the Request uri user part.
-
Extended matching, send primary number with extension: the system will locate the subscriber by longest matching prefix, the new Request uri user part will be equal to the primary number with appended the extension (calculated using the exceeding part of the callee).
Extended dialing modes are editable under Number Manipulations→extended_dialing_mode.
Fallback procedure is on by default and usually applies to extended matching or e164_to_ruri modes. If the callee UAC replies with a 404 not found error, the fallback feature triggers the generation of a new INVITE. In this case the new Request URI will be set accordingly to the extended_dialing_mode and e164_to_ruri values.
The whole 404 fallback procedure can however be disabled activating the no_404_fallback option under subscriber’s or domain’s preferences.
Number manipulations
The following sections describe the recommended configuration for correct call routing and CLI presentation according to the SIPconnect 1.1 recommendation.
Rewrite rules
The SIP PBX by default inherits the domain dialplan which usually has rewrite rules applied to normal Class 5 subscribers with inbound rewrite rules normalizing the dialed number to the E.164 standard. If most users of this domain are Class 5 subscribers the dialplan may supply calling number in national format - see basicconfiguration:basicconfiguration.adoc#dialplans. While the SIP-PBX trunk configuration can be sometimes amended it is a good idea in sense of SIPconnect recommendation to send only the global E.164 numbers.
Moreover, in mixed environments with Sipwise C5 Cloud PBX sharing the same domain with SIP trunking (SIP-PBX) customers the subscribers may have different rewrite rules sets assigned to them. The difference is caused by the fact that the dialplan for Cloud PBX is fundamentally different from the dialplan for SIP trunks due to extension dialing, where the Cloud PBX subscribers use the break-out code to dial numbers outside of this PBX.
The SIPconnect compliant numbering plan can be accommodated by assigning Rewrite Rules Set to the SIP-PBX subscriber. Below is a sample Rewrite Rule Set for using the global E.164 numbers with plus required for the calling and called number format compliant to the recommendation.
-
Match Pattern:
^(00|\+)([1-9][0-9]+)$ -
Replacement Pattern:
\2 -
Description:
International to E.164 -
Direction:
Inbound -
Field:
Caller
-
Match Pattern:
^(00|\+)([1-9][0-9]+)$ -
Replacement Pattern:
\2 -
Description:
International to E.164 -
Direction:
Inbound -
Field:
Callee
-
Match Pattern:
^([1-9][0-9]+)$ -
Replacement Pattern:
+\1 -
Description:
For the calls to SIP-PBX add plus to E.164 -
Direction:
Outbound -
Field:
Caller
-
Match Pattern:
^([1-9][0-9]+)$ -
Replacement Pattern:
+\1 -
Description:
For the calls to SIP-PBX add plus to E.164 -
Direction:
Outbound -
Field:
Callee
Assign the aforementioned Rewrite Rule Set to the SIP-PBX subscribers.
| Outbound Rewrite Rules for Callee shall NOT be applied to the calls to normal SIP UAs like IP phones since the number with plus does not correspond to their SIP username. |
User parameter
The following configuration is needed for your platform to populate the From and To headers and Request-URI of the INVITE request with "user=phone" parameter as per RFC 3261 Section 19.1.1 (if the user part of the URI contains telephone number formatted as a telephone-subscriber).
-
Domain’s Prefererences: outbound_from_user_is_phone = Y
-
Domain’s Prefererences: outbound_to_user_is_phone = Y
Forwarding number
The following is our common configuration that covers the calling number presentation in a variety of use-cases, including the incoming calls, on-net calls and Call Forward by the platform:
-
Domain’s Preferences: inbound_uprn = Forwarder’s NPN
-
Domain’s Preferences: outbound_from_user = UPRN (if set) or User-Provided Number
-
Domain’s Preferences: outbound_pai_user = UPRN (if set) or Network-Provided Number
-
Domain’s Preferences: outbound_history_info = UPRN (if the called user expects History-Info header)
-
Domain’s Preferences: outbound_diversion = UPRN (if the called user expects Diversion header)
-
Domain’s Preferences: outbound_to_user = Original (Forwarding) called user if the callee expects the number of the subscriber forwarding the call, otherwise leave default.
The above parameters can be tuned to operator specifics as required. You can override these settings in the Subscriber Preferences if particular subscribers need special settings.
| On outgoing call from SIP-PBX subscriber the Network-Provided Number (NPN) is set to the cli preference prefilled with main E.164 number. In order to have the full alias number as NPN on outgoing call set preference extension_in_npn = Y. |
If the call forward takes place inside the SIP-PBX it can use one of the following specification for signaling the diversion number to the platform:
-
using Diversion method (RFC 5806): configure Subscriber’s Prefererences: inbound_uprn = Forwarder’s NPN / Received Diversion
-
using History-Info method (RFC 7044): Sipwise C5 platform extends the History-Info header received from the PBX by adding another level of indexing according to the specification RFC 7044.
Allowed CLIs
-
For correct calling number presentation on outgoing calls, you should include the pattern matching all the alias numbers of SIP-PBX or each individual alias number under the allowed_clis preference.
-
If the signalling calling number (usually taken from From user-part, see inbound_upn preferences) does not match the allowed_clis pattern, the user_cli or cli preference (Network-Provided Number) will be used for calling number presentation.
Registration
SIP-PBX can use either Static or Registration Mode. While SIPconnect 1.1 continues to require TLS support at MUST strength, one should note that using TLS for signaling does not require the use of the SIPS URI scheme. SIPS URI scheme is obsolete for this purpose.
While SIPconnect 1.1 allows the use of Static mode, this poses additional maintenance overhead on the operator. The administrator should create a static registration for the SIP-PBX: go to Susbcribers, Details→Registered Devices→Create Permanent Registration and put address of the SIP-PBX in the following format: sip:username@ipaddress:5060 where username=username portion of SIP URI and ipaddress = IP address of the device.
It is recommended to use the Registration mode with SIP credentials defined for the SIP-PBX subscriber.
| The use of RFC 6140 style "bulk number registration" is discouraged. The SIP-PBX should register one AOR with email-style SIP URI. The Sipwise C5 will take care of routing the aliases to the AOR with e164_to_ruri preference. |
Trusted Sources
If a SIP-PBX cannot perform the digest authentication, you can authenticate it by its source IP address in Sipwise C5. To configure the IP-based authentication, go to the subscriber’s preferences (Details→ Preferences→Trusted Sources) and specify the IP address of the SIP-PBX in the Source IP field.
To authenticate multiple subscribers from the same IP address, use theFrom field to distinguish these subscribers.
When this feature is configured for a subscriber, Sipwise C5 authenticates all calls that arrive from the specified IP address without challenging them.
| If the same IP address and the FROM field are mistakenly specified as trusted for different subscribers, Sipwise C5 will not know which subscriber to charge for the call and will randomly select one. |
Trusted Subscribers
In some cases, when you have a device that cannot authenticate itself against Sipwise C5, you may need to create a Trusted Subscriber. Trusted Subscribers use IP-based authentication and they have a Permanent SIP Registration URI in order to receive messages from Sipwise C5.
In order to make a regular subscriber trusted, perform the following extra steps:
-
Create a permanent registration via (Subscribers→Details→ Registered Devices→Create Permanent Registration)
-
Add the IP address of the device as Trusted Source in your subscriber’s preferences (Details→Preferences→Trusted Sources).
This way, all SIP messages coming from the device IP will be considered trusted (and get authenticated only by the source IP). All the SIP messages forwarded to the devices will be sent to the SIP URI specified in the subscriber’s permanent registration.
Peer Probing
The basic way of selecting the appropriate peering server, where an outbound call can be routed to, has already been described in basicconfiguration:basicconfiguration.adoc#peering_group_selection of the handbook.
This chapter provides information on the peer probing feature of Sipwise C5 that is available since the mr5.4.1 release.
Introduction to Peer Probing Feature
The Sipwise C5 provides a web admin panel and API capabilities to configure peering
servers in order to terminate calls to non-local subscribers. Those peering servers
may become temporarily unavailable due to overloading or networking issues.
The Sipwise C5 will fail over to another peering server (matching the corresponding peering
rules) after a timeout configured at system level (see the b2b.sbc.outbound_timeout
configuration parameter; 6 sec by default), if no provisional response (a response
with a code in the range of 100 to 199) is received for the outbound INVITE request.
Even if this timer is set much lower, like 3 sec, the call setup time is increased significantly. This is even more true if multiple peering servers fail at the same time, which will sum up the individual timeouts, finally causing call setup times reach the order of tens of seconds.
To optimize the call setup time in such scenarios, a new feature is implemented to continuously probe peering servers via SIP messages, and mark them as unavailable on timeout or when receiving unexpected response codes. Appropriate SIP response codes from the peering servers will mark them as available again.
Peering servers marked as unavailable are then skipped during call routing in the peering selection process, which significantly shortens the call setup times if peering servers fail.
Configuration of Peer Probing
The system administrator has to configure the peer probing feature in 2 steps:
-
System-level configuration enables the peer probing feature in general on the Sipwise C5 and determines the operational parameters, such as timeouts, the SIP method used for probing requests, etc.
-
Peering server configuration will add / remove a peering server to the list of probed endpoints.
System-level Configuration
The parameters of peer probing are found in the main system configuration file /etc/ngcp-config/config.yml. You can see the complete list of configuration parameters in appendices-main:appendices-main.adoc#config_yml_kamailio of the handbook, while the most significant ones are discussed here.
Enabling peer probing system-wide happens through the kamailio.proxy.peer_probe.enable
parameter. If it is set to 'yes' (which is the default value) then Sipwise C5 will consider
probing of individual peering servers based on their settings.
Timeout of a single probing request can be defined through kamailio.proxy.peer_probe.timeout
parameter. This is a value interpreted as seconds while Sipwise C5 will wait for a SIP
response from the peering server. Default is 5 seconds.
The probing interval can be set through the kamailio.proxy.peer_probe.interval
parameter. This is the time period in seconds that determines how often a probing
request is sent to the peering servers. Default is 10 seconds.
The SIP method used for probing requests can be defined through kamailio.proxy.peer_probe.method
parameter. Allowed values are: OPTIONS (default) and INFO.
| The system administrator, in most of the cases, will not need to modify the default configuration values other than that of timeout and interval. |
If no available peering server is found, the call is rejected with the response
code and reason configured in kamailio.proxy.early_rejects.peering_unavailable.announce_code
and kamailio.proxy.early_rejects.peering_unavailable.announce_reason. If a sound
file is configured within the system sound set assigned to the calling party,
an announcement is played as early media before the rejection.
Individual Peering Server Configuration
When the peer probing feature is enabled on system-level, it is possible to add each individual peering server to the list of probed endpoints. You can change the probed status of a server in two ways:
Enable probing of a peering server via the admin web interface
-
Open the properties panel of a peering server: Peerings → select a peering group → Details → select a peering server → Edit
-
Tick the checkbox Enable Probing
-
Save changes
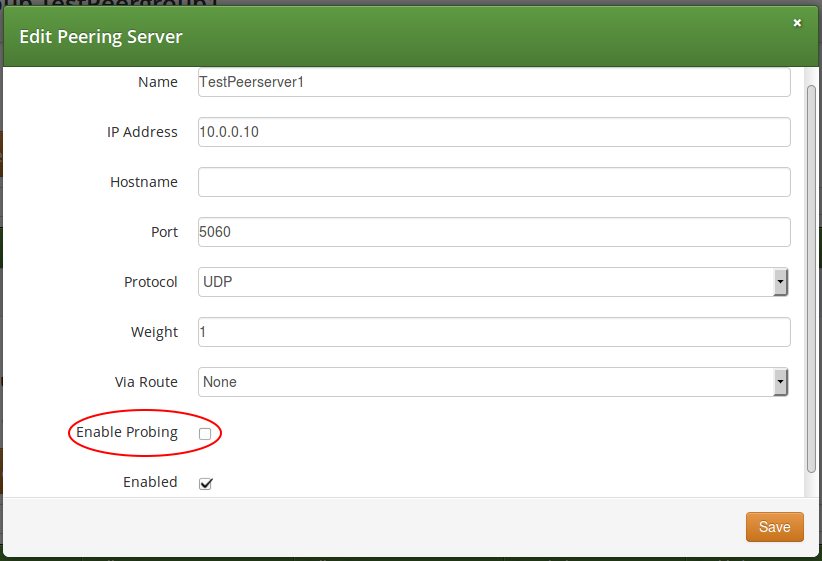
Enable probing of a peering server via the REST API
-
when you create a new peering server you will use an HTTP POST request and the target URL:
-
when you update an existing peering server you will use an HTTP PUT or PATCH request and the target URL:
In all cases you have to set the 'probe' property to true in order to enable
probing, and to false in order to disable probing. Default value is false and
this property may be omitted in a create/update request, which ensures backward
compatibility of the /api/peeringservers API resource.
Monitoring of Peer Probing
Peering server states, such as "reachable" / "unreachable", are continuously stored in a time-series database (Prometheus compatible database) by Sipwise C5 Proxy nodes. It is possible to graphically represent the state of peering servers on NGCP’s admin web interface, just like other system variables (like CPU and memory usage, number of registered subscribers, etc.). However this is not available by default and must be configured by Sipwise.
Further Details for Advanced Users
| This subchapter of the handbook is targeted on advanced system operators and Sipwise engineers and is not necessary to read in order to properly manage peer probing feature of NGCP. |
Behaviour of Kamailio Proxy Instances
Each kamailio-proxy instance on the proxy nodes performs the probing individually for performance reasons. Each proxy holds its result in its cache to avoid central storage and replication of the probing results.
Each peering server is cross-checked against the hash table filled during outbound probing requests and is skipped by call routing logic, if a match is found.
On start or restart of the kamailio-proxy instance, the probing will start after the first interval, and NOT immediately after start. In the first probing interval the proxy will always try to send call traffic to peering servers until the first probing round is finished, and will only then start to skip unavailable peering servers.
Changes to Kamailio Proxy Configuration
A new configuration template: /etc/ngcp/config/templates/etc/kamailio/proxy/probe.cfg.tt2 is introduced to handle outbound probing requests.
Database Changes
A new DB column: provisioning.voip_peer_hosts.probe with type TINYINT(1) (boolean) is added to the DB schema.
A peer status change will populate the kamailio.dispatcher table, inserting the
SIP URI in format sip:$ip:$port;transport=$transport in dispatcher group 100,
which defines the probing group for peering servers.
Also the kamailio.dispatcher.attrs column is populated with a parameter peerid=$id.
This ID is used during probing to load the peer preferences: outbound_socket and
lbrtp_set, that are required to properly route the probing request.
Voicemail System
Accessing the IVR Menu
For a subscriber to manage his voicebox via IVR, there are three ways to access the voicebox. One is to call the URI voicebox@yourdomain from the subscriber itself, allowing password-less access to the IVR, as the authentication is already done on SIP level. The second is to call the URI voiceboxpass@yourdomain from any number, causing the system to prompt for a mailbox and the PIN. The third is to call the URI voiceboxpin@yourdomain where only the password/PIN will be requested. The PIN can be set in the Voicemail and Voicebox section of the Subscriber Preferences.
Mapping numbers and codes to IVR access
Since access might need to be provided from external networks like PSTN/Mobile, and since certain SIP phones do not support calling alphanumeric numbers to dial voicebox, you can map any number to the voicebox URIs using rewrite rules.
To do so, you can provision a match pattern e.g. ^(00|\+)12345$ with a
replace pattern voicebox, voiceboxpass or voiceboxpin to map a
number to either password-less for the first one or password-based IVR
access for the other two. Create a new rewrite rule with the Inbound
direction and the Callee field in the corresponding rewrite rule set.
For inbound calls from external networks, assign this rewrite rule set to the corresponding incoming peer. If you also need to map numbers for on-net calls, assign the rewrite rule set to subscribers or the whole SIP domain.
External IVR access
When reaching voiceboxpass, the subscriber is prompted for her mailbox number and a password. All numbers assigned to a subscriber are valid input (primary number and any alias number). By default, the required format is in E.164, so the subscriber needs to enter the full number including country code, for example 4912345 if she got assigned a German number.
While reaching for voiceboxpin, the subscriber is only prompted for the PIN.
You can globally configure a rewrite rule in config.yml using asterisk.voicemail.normalize_match and asterisk.voicemail.normalize_replace, allowing you to customize the format a subscriber can enter, e.g. having ^0([1-9][0-9]+)$ as match part and 49$1 as replace part to accept German national format.
IVR Menu Structure
The following list shows you how the voicebox menu is structured.
-
'1' Read voicemail messages
-
'3' Advanced options
-
'3' To Hear messages Envelope
-
'*' Return to the main menu
-
-
'4' Play previous message
-
'5' Repeat current message
-
'6' Play next message
-
'7' Delete current message
-
'9' Save message in a folder
-
'0' Save in new Messages
-
'1' Save in old Messages
-
'2' Save in Work Messages
-
'3' Save in Family Messages
-
'4' Save in Friends Messages
-
'#' Return to the main menu
-
-
-
'2' Change folders
-
'0' Switch to new Messages
-
'1' Switch to old Messages
-
'2' Switch to Work Messages
-
'3' Switch to Family Messages
-
'4' Switch to Friends Messages
-
'#' Get Back
-
-
'3' Advanced Options
-
'*' To return to the main menu
-
-
'0' Mailbox options
-
'1' Record your unavailable message
-
'1' accept it
-
'2' Listen to it
-
'3' Rerecord it
-
-
'2' Record your busy message
-
'1' accept it
-
'2' Listen to it
-
'3' Rerecord it
-
-
'3' Record your name
-
'1' accept it
-
'2' Listen to it
-
'3' Rerecord it
-
-
'4' Record your temporary greetings
-
'1' accept it / or re-record if one already exist
-
'2' Listen to it / or delete if one already exist
-
'3' Rerecord it
-
-
'5' Change your password
-
'*' To return to the main menu
-
-
'*' Help
-
'#' Exit
Type Of Messages
A message/greeting is a short message that plays before the caller is allowed to record a message. The message is intended to let the caller know that you are not able to answer their call. It can also be used to convey other information like when you will be available, other methods to contact you, or other options that the caller can use to receive assistance.
The IVR menu has three types of greetings.
Unavailable Message
The standard voice mail greeting is the "unavailable" greeting. This is used if you don’t answer the phone and so the call is directed to your voice mailbox.
-
You can record a custom unavailable greeting.
-
If you have not recorded your unavailable greeting but have recorded your name, the system will play a generic message like: "Recorded name is unavailable."
-
If you have not recorded your unavailable greeting, the phone system will play a generic message like: "Digits-of-number-dialed is unavailable".
Busy Message
If you wish, you can record a custom greeting used when someone calls you and you are currently on the phone. This is called your "Busy" greeting.
-
You can record a custom busy greeting.
-
If you have not recorded your busy greeting but have recorded your name, the phone system will play a generic message: "Recorded name is busy."
-
If you have not recorded your busy greeting and have not recorded your name (see below), the phone system will play a generic message: "Digits-of-number-dialed is busy."
Temporary Greeting
You can also record a temporary greeting. If it exists, a temporary greeting will always be played instead of your "busy" or "unavailable" greetings. This could be used, for example, if you are going on vacation or will be out of the office for a while and want to inform people not to expect a return call anytime soon. Using a temporary greeting avoids having to change your normal unavailable greeting when you leave and when you come back.
Folders
The Voicemail system allows you to save and organize your messages into folders. There can be up to ten folders.
The Default Folder List
-
0 - New Messages
-
1 - Old Messages
-
2 - Work Messages
-
3 - Family Messages
-
4 - Friends Messages
When a caller leaves a message for you,the system will put the message into the "New Messages" folder. If you listen to the message, but do not delete the message or save the message to a different folder, it will automatically move the message to the "Old Messages" folder. When you first log into your mailbox, the Voicemail System will make the "New Messages" folder the current folder if you have any new messages. If you do not have any new messages the it will make the "Old Messages" folder the current folder.
Voicemail Languages Configuration
To add a new language or to change the pronunciation for an existing one, ensure that mode=new is defined in /etc/ngcp-config/templates/etc/asterisk/say.conf.tt2. Adjust the configuration in the same file using the manual in the beginning. Then, as usual, make the new configuration active.
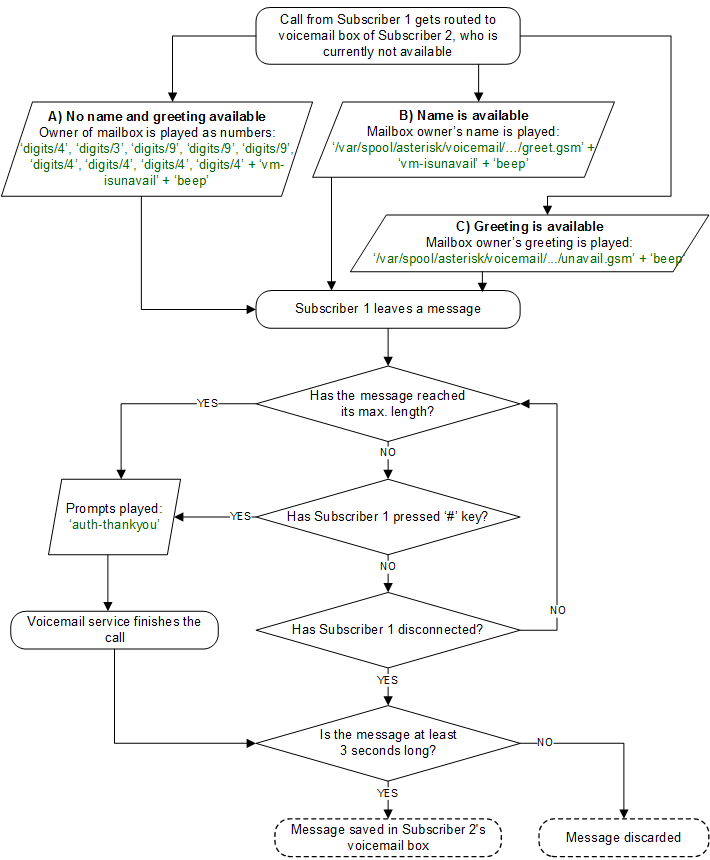
Configuring Subscriber IVR Language
The language for the Voicemail system IVR or Vertical Service Codes (VSC) IVRs may be set using the subscriber or domain preference language.
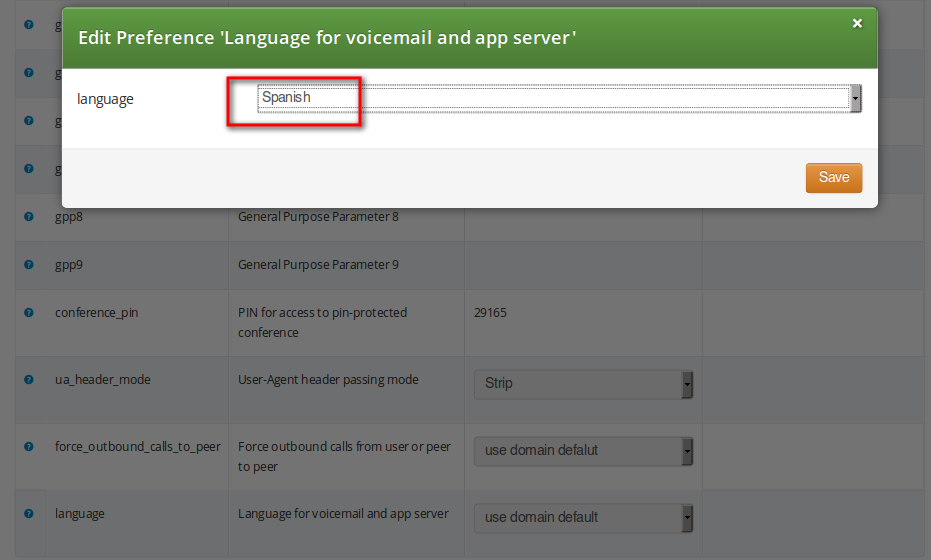
The Sipwise C5 provides the pre-installed prompts for the Voicemail in the English, Spanish, French and Italian languages and the pre-installed prompts for the Vertical Service Codes IVRs in English only.
The other IVRs such as the Conference system and the error announcements use the Sound Sets configured in Sipwise C5 Panel and uploaded by the administrator in his language of choice.
Sound Sets
The Sipwise C5 provides the administrator with ability to upload the voice prompts such as conference prompts or call error announcements on the Sound Sets page. There is a preference sound_set in the NAT and Media Flow Control section on Domain and Subscriber levels to link subscribers to the sound set that they should hear (as usual the subscriber preference overrides the domain one). Additionally Sound Sets can be configured on Peer level in order to play a dedicated early reject prompt when an incoming call doesn’t match any local subscriber. Sound Sets can be defined in Settings→Sound Sets. To create a new Sound Set, click Create Sound Set. Then click the Files button.
| As soon as the first audio files (for the sound sets) are uploaded, they will be stored using the SQL backend and will be not available in the filesystem (as usual files). But, as soon as these files are first time played for a caller, they will be stored (cached) in the '/ngcp-data/cache' directory. This is done so in order to reduce the time needed to retrieve them (on a routine basis). Anyway, this data will always be stored in the SQL backend as well for redundancy reasons. So your Sipwise C5 will always be able to retrieve them from SQL and cache them again if needed. |
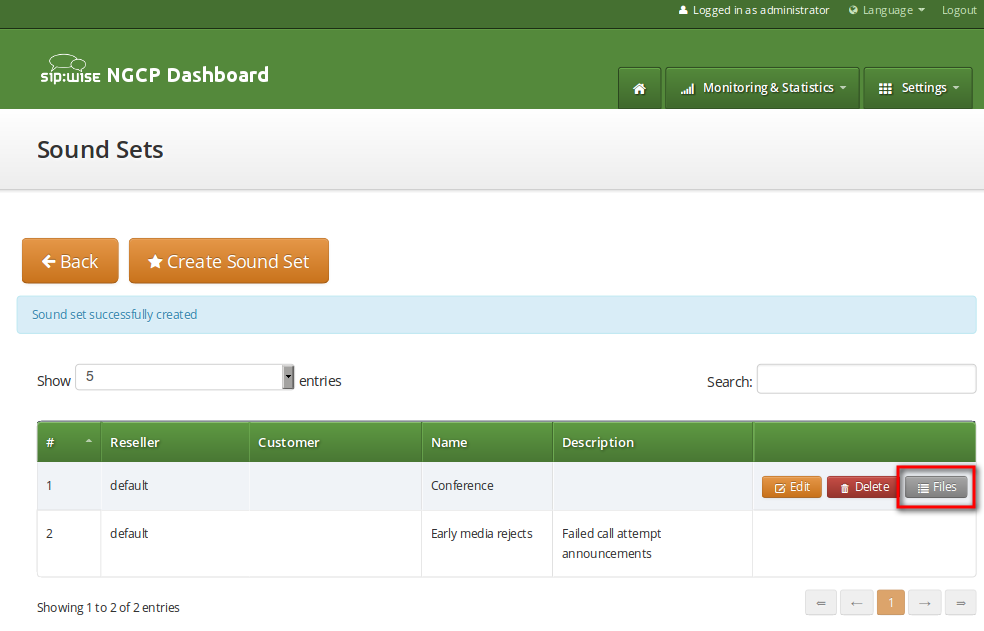
| You may use 8 or 16 bit mono WAV audio files for all of the voice prompts. |
Sound_Set and Contract_Sound_Set Usage
Sound_Set and Contract_Sound_Set are used for different purposes:
-
Contract_Sound_Set is a customer-specific sound set used for the Cloud PBX features. It can be assigned only to a PBX customer.
-
Sound_Set contains general prompts, e.g. for the Conference, Music on Hold, Early Rejects, etc.
The Music on Hold and Digit prompts can be uploaded to both Contract_Sound_Set and Sound_Set. In this case, the one from the Contract_Sound_Set will take precedence.
Configuring Early Reject Sound Sets
The call error announcements are grouped under Early Rejects section. Unfold the section and click Upload next to the sound handles (Names) that you want to use. Choose a WAV file from your file system, and click the Loopplay setting if you want to play the file in a loop instead of only once. Click Save to upload the file.
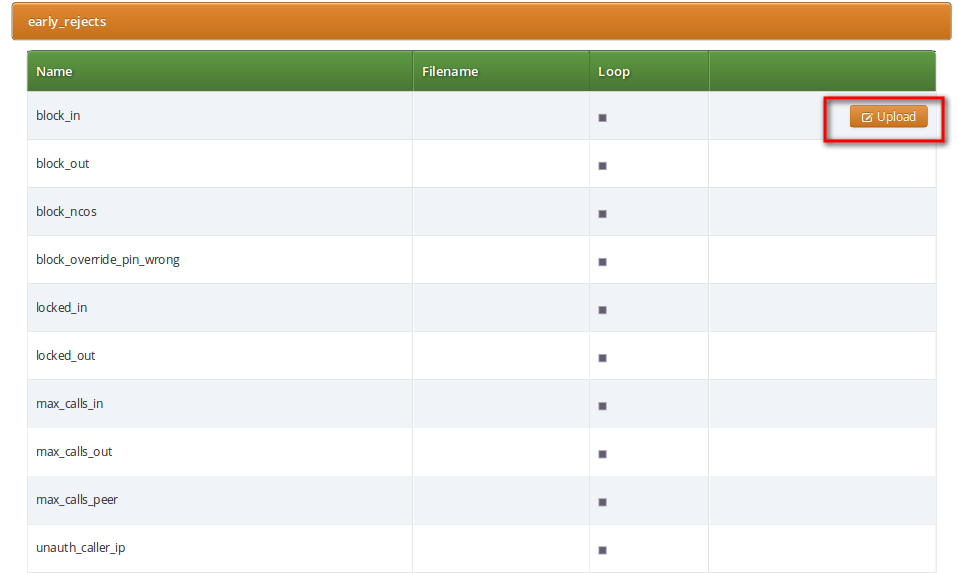
The call error announcements are played to the user in early media hence the name "Early Reject". If you don’t provide the sound files for any handles they will not be used and Sipwise C5 will fallback to sending the error response code back to the user.
The exact error status code and text are configurable in the /etc/ngcp-config/config.yml file, in kamailio.proxy.early_rejects section. Please look for the announcement handle listed in below table in order to find it in the configuration file.
| Handle | Description | Message played |
|---|---|---|
|
This is what the calling party hears when a call is made from a number that is blocked by the incoming block list (adm_block_in_list, block_in_list customer/subscriber preferences) |
Your call is blocked by the number you are trying to reach. |
|
This is what the calling party hears when a call is made to a number that is blocked by the outgoing block list (adm_block_out_list, block_out_list customer/subscriber preferences) |
Your call to the number you are trying to reach is blocked. |
|
This is what the calling party hears when a call is made to a number that is blocked by the NCOS level assigned to the subscriber or domain (the NCOS level chosen in ncos and adm_ncos preferences). PLEASE NOTE: It is not possible to configure the status code and text. |
Your call to the number you are trying to reach is not permitted. |
|
Announcement played to calling party if it used wrong PIN code to override the outgoing user block list or the NCOS level for this call (the PIN set by block_out_override_pin and adm_block_out_override_pin preferences) |
The PIN code you have entered is not correct. |
|
Announcement played on incoming call to the subscriber which is currently busy (486 response from the UAS) |
The number you are trying to reach is currently busy. Please try again later. |
|
Announcement played on incoming call to the subscriber which is currently not registered |
The number you are trying to reach is currently not available. Please try again later. |
|
Announcement played on incoming call to the subscriber which is currently unavailable (408, other 4xx or no response code or 30x with malformed contact) |
The number you are trying to reach is currently not available. Please try again later. |
|
Announcement that is played on call to unknown or invalid number (not associated with any of our subscribers/hunt groups) |
The number you are trying to reach is not in use. |
|
Announcement played when the called subscriber has the call forwarding configured to itself |
The number you are trying to reach is forwarded to an invalid destination. |
|
Announcement played when emergency destination is dialed but the destination is not provisioned for the location of the user. PLEASE NOTE: The configuration entry for this case in /etc/ngcp-config/config.yml file is emergency_invalid. |
The emergency number you have dialed is not available in your region. |
|
Announcement played when emergency destination is dialed but the emergency calls are administratively prohibited for this user or domain (reject_emergency preference is enabled) |
You are not allowed to place emergency calls from this line. Please use a different phone. |
|
Announcement played when was an error during call processing. PLEASE NOTE: This announcement may be configured in the sound set in voucher_recharge section. |
An error has occurred. Please try again later. |
|
This is what the calling party hears when it calls an empty speed-dial slot |
The speed dial slot you are trying to use is not available. |
|
Announcement played on incoming call to a subscriber that is locked for incoming calls |
The number you are trying to reach is currently not permitted to receive calls. |
|
Announcement played on outgoing call to subscriber that is locked for outgoing calls |
You are currently not allowed to place outbound calls. |
|
Announcement played on incoming call to a subscriber who has exceeded the concurrent_max or concurrent_max_in limit or whose customer has exceeded the concurrent_max_per_account or concurrent_max_in_per_account limit calls |
The number you are trying to reach is currently busy. Please try again later. |
|
Announcement played on outgoing call to a subscriber who has exceeded the concurrent_max (total limit) or concurrent_max_out (limit on number of outbound calls) or whose customer has exceeded the concurrent_max_per_account or concurrent_max_out_per_account limit |
All outgoing lines are currently in use. Please try again later. |
|
Announcement played on calls from the peering if that peer has reached the maximum number of concurrent calls (configured by admin in concurrent_max preference of peering server). PLEASE NOTE: There is no configuration option of the status code and text in config.yml file for this case. |
The network you are trying to reach is currently busy. Please try again later. |
|
Announcement played when prepaid account has insufficient balance to make a call to this destination |
You don’t have sufficient credit balance for the number you are trying to reach. |
|
Announcement played in case of outgoing off-net call when there is no peering rule matching this destination and/or source |
The network you are trying to reach is not available. |
|
When the VSC (Vertical Service Code) service is disabled in domain or subscriber preferences (Access Restrictions / reject_vsc is set to TRUE) and a subscriber tries to make a call with VSC, an announcement is played. |
N/A (custom message, no default) |
|
Announcement played on inbound call from trusted IP (e.g. external PBX) with non-local Request-URI domain |
The network you are trying to reach is not available. |
|
This is what the calling party hears when it tries to make a call from unauthorized IP address or network (allowed_ips, man_allowed_ips preferences) |
You are not allowed to place calls from your current network location. |
|
PLEASE NOTE: This announcement is already obsolete, as of Sipwise C5 version mr5.3 |
The voicemail of the number you are trying to reach is currently not available. Please try again later. |
There are some early reject scenarios when either no voice announcement is played, or a fixed announcement is played. In either case a SIP error status message is sent from Sipwise C5 to the calling party. It is possible to configure the exact status code and text for such cases in the /etc/ngcp-config/config.yml file, in kamailio.proxy.early_rejects section. The below table gives an overview of those early reject cases.
| Handle | Description |
|---|---|
|
Caller blocked by adm_block_in_list, adm_block_in_clir and callee blocked by adm_block_out_list (customer or subscriber preference) |
|
Callee blocked by subscriber preference block_out_list |
|
Caller blocked by subscriber preference block_in_list, block_in_clir |
|
Caller blocked by customer preference block_in_list, block_in_clir and callee blocked by customer preference block_out_list |
|
Callee is a PBX group with 0 members. Announcement callee_tmp_unavailable is played; status code and text can be configured. |
|
Callee is a PBX group and we have a timeout (i.e. no group member could be reached). Announcement callee_tmp_unavailable is played; status code and text can be configured. |
|
PLEASE NOTE: This handle refers to the same early reject case as emergency_geo_unavailable, but is labeled differently in the configuration file. |
Play an announcement on behalf of callee server failure in case of outbound calls
The Sipwise C5 makes it possible to play an announcement on behalf of callee server failure in case of outbound calls. The features can be activated on Subscribers and on Peers. For example: if subscriber A calls subscriber B and B refuses the call with code 404 without providing any announcement, Sipwise C5 can be configured to play a customized announcement to A on behalf of B.
To activate this feature, first create a system Sound Set, or use an already existing one, and then assign it to the callee subscriber. Upload in the Sound Set one or more announcements. Once the Sound Set is configured, the subscriber’s preference announce_error_codes_enable must be enabled under Subscriber → Preferences → NAT and Media Flow Control menu. Last step is to list in the subscriber’s preference announce_error_codes_list the announcements that will be played to the caller in case a particular error code is returned back from the callee. Each entry of the list has to be a string composed in the following way: <error_code>;<announcement_name>, where error_code is the SIP return code and announcement_name is name of the announcement taken from the sound_set list. Returning to the example above, to play callee_unknown message in case of 404 returned from the callee, the entry '404;callee_unknown' has to be added in announce_error_codes_list preference.
The same feature is available for peer as well.
| In case announce_error_codes_enable is enabled, it is important that the remote endpoint doesn’t play any announcement for error codes listed in announce_error_codes_list otherwise the final result will be to have two announcements: one generated by the remote endpoint and one generated by Sipwise C5. |
Conference System
The Sipwise C5 provides the simple pin-protected conferencing service built using the SEMS DSM scripting language. Hence it is open for all kinds of modifications and extensions.
Template files for the sems conference scripts stored in /etc/ngcp-config/templates/etc/ngcp-sems/:
-
IVR script: /etc/ngcp-config/templates/etc/ngcp-sems/dsm/confpin.dsm.tt2
-
Config: /etc/ngcp-config/templates/etc/ngcp-sems/dsm/confpin.conf.tt2
Configuring Call Forward to Conference
Go to your Subscriber Preferences and click Edit on the Call Forward Type you want to set (e.g. Call Forward Unconditional).
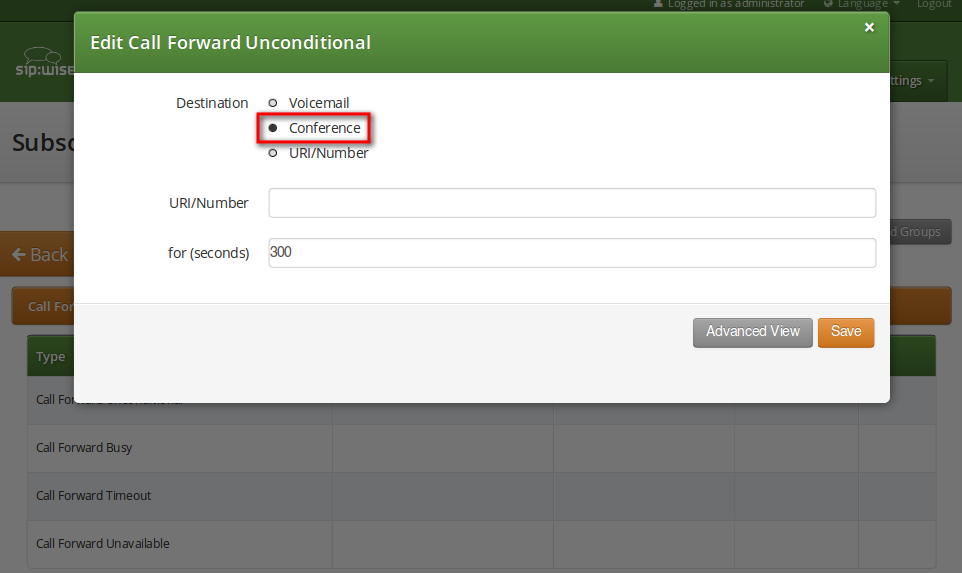
You should select Conference option in the Destination field and leave the URI/Number empty. The timeout defines for how long this destination should be tried to ring.
Configuring Conference Sound Sets
Sound Sets can be defined in Settings→Sound Sets. To create a new Sound Set, click Create Sound Set. Then click the Files button.
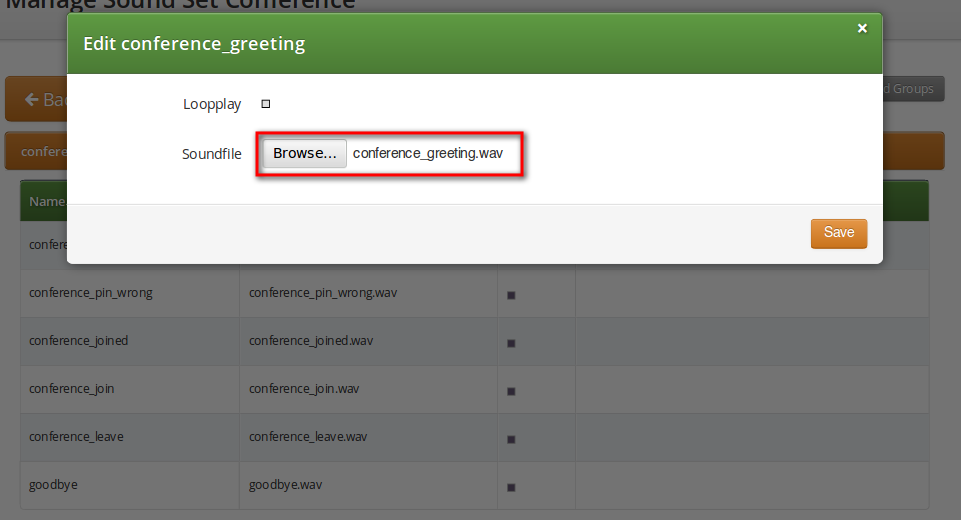
Upload the following files:
| Handle | Message played |
|---|---|
conference_greeting |
Welcome to the conferencing service. |
conference_pin |
Please enter your PIN, followed by the pound key. |
conference_pin_wrong |
You have entered an invalid PIN number. Please try again. |
conference_joined |
You will be placed into the conference. |
conference_first |
You are the first person in the conference. |
conference_join |
A person has joined the conference. |
conference_leave |
A person has left the conference. |
conference_max_participants |
All conference lines are currently in use. Please try again later. |
conference_waiting_music |
…waiting music… |
goodbye |
Goodbye. |
| You may use 8 or 16 bit mono WAV audio files. |
Then set the preference sound_set on the Domain or Subscriber level in order to assign the Sound Set you have just created to the subscriber (as usual the subscriber preference overrides the domain one).
Joining the Conference
There are 2 ways of joining a conference: with or without PIN code. The actual way of joining the conference depends on Subscriber settings. A subscriber who has activated the conference through call forwarding may set a PIN in order to protect the conference from unauthorized access. To activate the PIN one has to enter a value in Subscriber → Details → Preferences → Internals → conference_pin field.
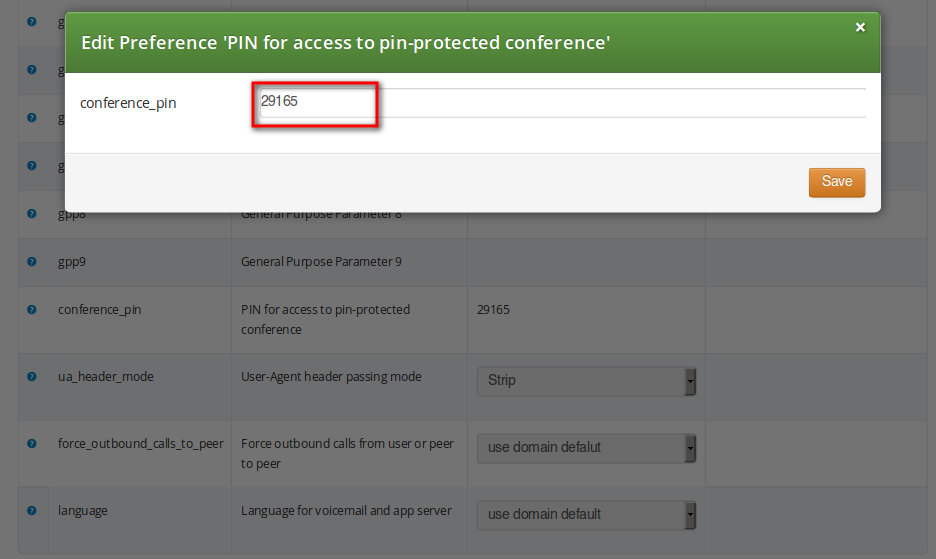
In case the PIN protection for the conference is activated, when someone calls the subscriber who has enabled the conference, the caller is prompted to enter the PIN of the conference. Upon the successful entry of the PIN the caller hears the announcement that he is going to be placed into the conference and at the same time this is announced to all participants already in the conference.
Malicious Call Identification (MCID)
MCID feature allows customers to report unwanted calls to the platform operator.
Setup
To enable the feature first edit config.yml and enable there apps: malicious_call: yes and kamailio: store_recentcalls: yes. The latter option enables kamailio to store recent calls per subscrbriber UUID in the redis DB (the amount of stored recent calls will not exceed the amount of provisionined subscribers).
Next step is to create a system sound set for the feature. In Settings→Sound Sets either use your already existing Sound Set or create a new Sound Set and then assign it to your domain or subscribers. In the Sound Set there is a fileset malicious_call_identification→mailicious_call_report for that purpose.
Once the Sound Set is created the Subscriber’s Preferences Malicious Call Identification must be enabled under Subcriber → Preferences → Applications menu. The same parameter can be set in the Customer’s preferences to enable this feature for all its subscribers.
The final step is to create a new Rewrite Rule and to route calls to, for instance *123 -> MCID application. For that you create a Calee Inbound rewrite rule ^(\*123)$ → malicious_call
Finally you run ngcpcfg apply "Enabling MCID" to recreate the templates and automatically restart depended services.
Usage
As a subscriber, to report a malicious call you call to either malicious_call or to your custom number assigned for that purpose. Please note that you can report only your last received call. You will hear the media reply from the Sound Set you have previously configured.
To check reported malicious calls as the plafrom operator open Settings→Malicious Calls tab where you will see a list of registered calls. You can selectively delete records from the list and alternatively you can manage the reported calls by using the REST API.
Subscriber Profiles
The preferences a subscriber can provision by himself via the CSC can be limited via profiles within profile sets assigned to subscribers.
Subscriber Profile Sets
Profile sets define containers for profiles. The idea is to define profile sets with different profiles by the administrator (or the reseller, if he is permitted to do so). Then, a subscriber with administrative privileges can re-assign profiles within his profile sets for the subscribers of his customer account.
Profile Sets can be defined in Settings→Subscriber Profiles. To create a new Profile Set, click Create Subscriber Profile Set.
You need to provide a reseller, name and description.
To create Profiles within a Profile Set, hover over the Profile Set and click the Profiles button.
Profiles within a Profile Set can be created by clicking the Create Subscriber Profile button.
Checking the Default Profile option causes this profile to get assigned automatically to all subscribers, who have the profile set assigned. Other options define the user preferences which should be made available to the subscriber.
| When the platform administrator selects Preferences of the Subscriber Profile he will get an empty page like in the picture below, if none or only certain options are selected in the Subscriber Profile. |
Some of the options, like ncos (NCOS level), will enable the definition of that preference within the Subscriber Profile Preferences. Thus all subscribers who have this profile assigned to will have the preference activated by default. The below picture shows the preferences linked to the sample Subscriber Profile:
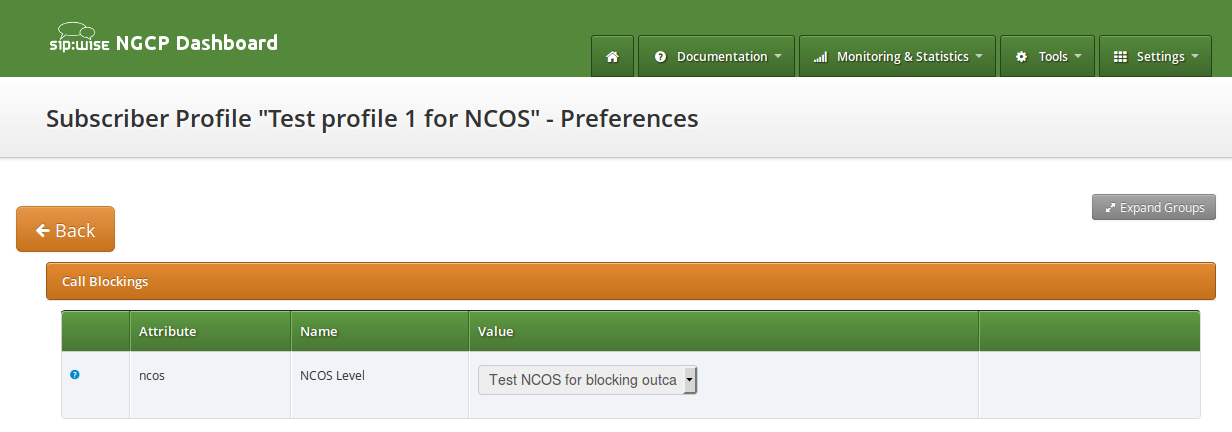
SIP Loop Detection
In order to detect a SIP loop ( incoming call as a response for a call request ) Sipwise C5 checks the combination of SIP-URI, To and From headers.
This check can be enabled in config.yml by setting kamailio.proxy.loop_detection.enable: yes. The system tolerates kamailio.proxy.loop_detection.max loops within kamailio.proxy.loop_detection.expire seconds. Higher occurrence of loops will be reported with a SIP 482 "Loop Detected" error message
.
Invoices and Invoice Templates
Content and vision of the invoices are customizable by invoice templates.
| The Sipwise C5 generates invoices in pdf format. |
Invoices Management
Invoices can be requested for generation, searched, downloaded and deleted on the administrative web interface. Navigate to Settings → Invoices menu and you get a list of all invoices currently stored in the database.
| The system operator or a third party application can also generate, list, retrieve and delete invoices via the REST API. Please read further details here. |
To request invoice generation for the particular customer and period press "Create invoice" button. On the invoice creation form following parameters are available for selection:
-
Template: any of existent invoice template can be selected for the invoice generation.
-
Customer: owner of the billing account, recipient of the invoice.
-
Invoice period: billing period. Can be specified only as one calendar month. Calls with start time between first and last second of the period will be considered for the invoice
All form fields are mandatory.
Generated invoice can be downloaded as pdf file.
To do it press button "Download" against invoice in the invoice management interface.
Respectively press on the button "Delete" to delete invoice.
Invoice Management via REST API
Besides managing invoices on the admin web interface of NGCP, the system administrator (or a third party system) has the opportunity to request generation and retrieval of invoices via the REST API.
The subsequent sections describe the available operations for invoice management
with API requests in details. All operations work on the Invoices resource and
use the /api/invoices base path. The authentication method is username/password
in the examples given below, however it is recommended to use a TLS client certificate
for authentication on the REST API.
| The full API documentation is always available at the location: https://<IP_of_NGCP_web_panel>:1443/api |
Generate a New Invoice
The prerequisite for generating a new invoice is that the customer has to have an invoice template assigned to him.
The following example shows a CURL command that will request generation of an invoice:
-
for customer with ID "79"
-
for the time period of November 2017
-
based on the invoice template with ID "1"
curl -i -X POST -H 'Connection: close' -H 'Content-Type: application/json' \
  --user adminuser:adminpwd -k 'https://127.0.0.1:1443/api/invoices/'      \
  --data-binary '{ "customer_id" : "79", "template_id" : "1",              \
  "period_start": "2017-11-01 00:00:00", "period_end": "2017-11-30 23:59:59"  }'
Please note that in this operation we used the /api/invoices path (the invoices
collection) and a POST request on it to create a new invoice item.
In case of a successful operation, Sipwise C5 will reply with **201 Created** HTTP status
and send the ID of the invoice in Location header. In our example the new invoice
item may be directly referred as /api/invoices/3 (ID = 3).
HTTP/1.1 201 Created
Server: nginx
Date: Tue, 14 Nov 2017 13:38:40 GMT
Content-Length: 0
Connection: close
Location: /api/invoices/3
Set-Cookie: ngcp_panel_session=d5e4a8dd003fd7cac646653a6b5aefa703cf3e66; path=/; expires=Tue, 14-Nov-2017 14:38:38 GMT; HttpOnly
X-Catalyst: 5.90114
Strict-Transport-Security: max-age=15768000
In case of a failed operation, e.g. when we request an invoicing period that is invalid for the customer, Sipwise C5 will reply with **422 Unprocessable Entity** or **500 Internal Server Error** HTTP status.
Download Invoice Data
You can download properties / data of a specific invoice by selecting the item by its ID, using an HTTP GET request.
curl -i -X GET -H 'Connection: close' --user adminuser:adminpwd -k \
'https://127.0.0.1:1443/api/invoices/3'
The above request will return a JSON data structure containing invoice properties:
HTTP/1.1 200 OK
Server: nginx
Date: Wed, 15 Nov 2017 12:13:04 GMT
Content-Type: application/hal+json; profile="http://purl.org/sipwise/ngcp-api/"; charset=utf-8
Content-Length: 759
Connection: close
Link: </api/invoices/>; rel=collection
Link: <http://purl.org/sipwise/ngcp-api/>; rel=profile
Link: </api/invoices/3>; rel="item self"
Link: </api/invoices/3>; rel="item http://purl.org/sipwise/ngcp-api/#rel-invoices"
Link: </api/customers/79>; rel="item http://purl.org/sipwise/ngcp-api/#rel-customers"
Set-Cookie: ngcp_panel_session=219feccbee4fa936defd1ee511c84efe7b5a6d6a; path=/; expires=Wed, 15-Nov-2017 13:13:03 GMT; HttpOnly
Strict-Transport-Security: max-age=15768000

{
   "_links" : {
      "collection" : {
         "href" : "/api/invoices/"
      },
      "curies" : {
         "href" : "http://purl.org/sipwise/ngcp-api/#rel-{rel}",
         "name" : "ngcp",
         "templated" : true
      },
      "ngcp:customers" : {
         "href" : "/api/customers/79"
      },
      "ngcp:invoices" : {
         "href" : "/api/invoices/3"
      },
      "profile" : {
         "href" : "http://purl.org/sipwise/ngcp-api/"
      },
      "self" : {
         "href" : "/api/invoices/3"
      }
   },
   "amount_net" : 0,
   "amount_total" : 0,
   "amount_vat" : 0,
   "id" : 3,
   "period_end" : "2017-11-30T23:59:59+00:00",
   "period_start" : "2017-11-01T00:00:00+00:00",
   "sent_date" : null,
   "serial" : "INV2017110000003"
}
It is also possible to query the complete invoices collection and use a filter (e.g. invoicing period, customer ID, etc.) to get the desired invoice item. In the example below we request all available invoices that belong to the customer with ID "79".
curl -i -X GET -H 'Connection: close' --user adminuser:adminpwd -k \
'https://127.0.0.1:1443/api/invoices/?customer_id=79'
The returned dataset is now slightly different because it is represented as an array of items, although in our example the array consist of only 1 item:
{
   "_embedded" : {
      "ngcp:invoices" : [
         {
            "_links" : {
               "collection" : {
                  "href" : "/api/invoices/"
               },
               "curies" : {
                  "href" : "http://purl.org/sipwise/ngcp-api/#rel-{rel}",
                  "name" : "ngcp",
                  "templated" : true
               },
               "ngcp:customers" : {
                  "href" : "/api/customers/79"
               },
               "ngcp:invoices" : {
                  "href" : "/api/invoices/3"
               },
               "profile" : {
                  "href" : "http://purl.org/sipwise/ngcp-api/"
               },
               "self" : {
                  "href" : "/api/invoices/3"
               }
            },
            "amount_net" : 0,
            "amount_total" : 0,
            "amount_vat" : 0,
            "id" : 3,
            "period_end" : "2017-11-30T23:59:59+00:00",
            "period_start" : "2017-11-01T00:00:00+00:00",
            "sent_date" : null,
            "serial" : "INV2017110000003"
         }
      ]
   },
   "_links" : {
      "curies" : {
         "href" : "http://purl.org/sipwise/ngcp-api/#rel-{rel}",
         "name" : "ngcp",
         "templated" : true
      },
      "ngcp:invoices" : {
         "href" : "/api/invoices/3"
      },
      "profile" : {
         "href" : "http://purl.org/sipwise/ngcp-api/"
      },
      "self" : {
         "href" : "/api/invoices/?page=1&rows=10"
      }
   },
   "total_count" : 1
}
Download Invoice as PDF File
You can download a specific invoice as a PDF file in the following way:
-
selecting the item by its ID (as in our example, but you can also use a filter and query the complete invoices collection)
-
using an HTTP GET request
-
adding "Accept: application/pdf" header to the request
curl -X GET -H 'Connection: close' -H 'Accept: application/pdf' \
  --user adminuser:adminpwd -k 'https://127.0.0.1:1443/api/invoices/3' > result.pdf
Please note that in the example above we do not add the "-i" option that would also include the headers of the HTTP response in the output file. The output of the CURL command, i.e. the PDF file, is saved as "result.pdf" locally.
Delete an Invoice
In order to delete an invoice item you have to send a DELETE request on the specific item:
curl -i -X DELETE -H 'Connection: close' --user adminuser:adminpwd -k \
'https://127.0.0.1:1443/api/invoices/3'
In case of successful deletion Sipwise C5 should send HTTP status 204 No Content as
a response:
HTTP/1.1 204 No Content
Server: nginx
Date: Wed, 15 Nov 2017 13:42:42 GMT
Connection: close
Set-Cookie: ngcp_panel_session=10b66a6baf25a09739c2bb2377c70ecceee78387; path=/; expires=Wed, 15-Nov-2017 14:42:42 GMT; HttpOnly
X-Catalyst: 5.90114
Strict-Transport-Security: max-age=15768000
Invoice Templates
Invoice template defines structure and look of the generated invoices. The Sipwise C5 makes it possible to create some invoice templates. Multiple invoice templates can be used to send invoices to the different customers using different languages.
| At least one invoice template should be created to enable invoice generation. Each customer has to be associated to one of the existent invoice template, otherwise invoices will be not generated for this customer. |
Customer can be linked to the invoice template in the customer interface.
Invoice Templates Management
Invoice templates can be searched, created, edited and deleted in the invoice templates management interface.
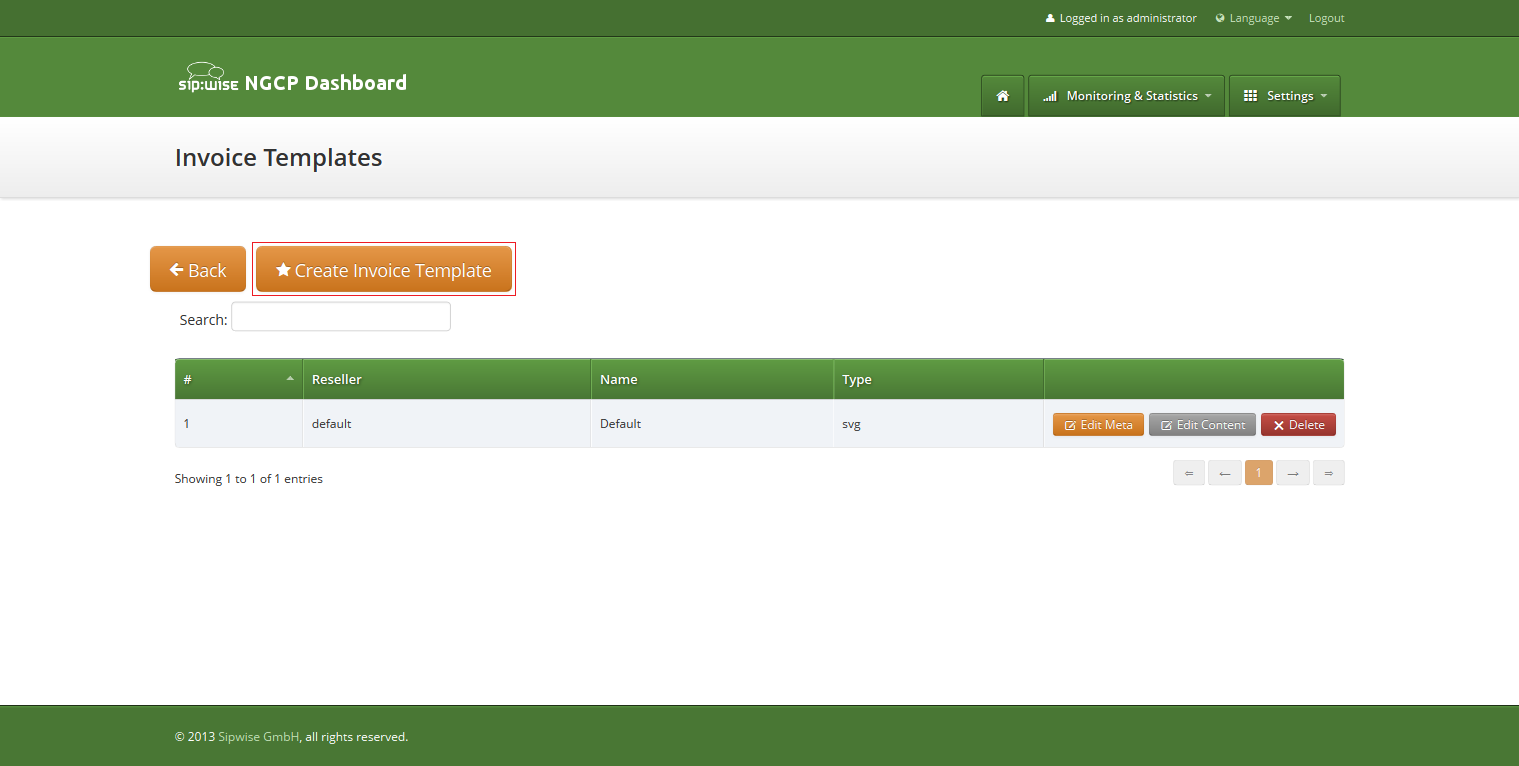
Invoice template creation is separated on two steps:
-
Register new invoice template meta information.
-
Edit content (template itself) of the invoice template.
To register new invoice template press "Create Invoice Template" button.
On the invoice template meta information form following parameters can be specified:
-
Reseller: reseller who owns this invoice template. Please note, that it doesn’t mean that the template will be used for the reseller customers by default. After creation, invoice template still need to be linked to the reseller customers.
-
Name: unique invoice template name to differentiate invoice templates if there are some.
-
Type: currently Sipwise C5 supports only svg format of the invoice templates.
All form fields are mandatory.
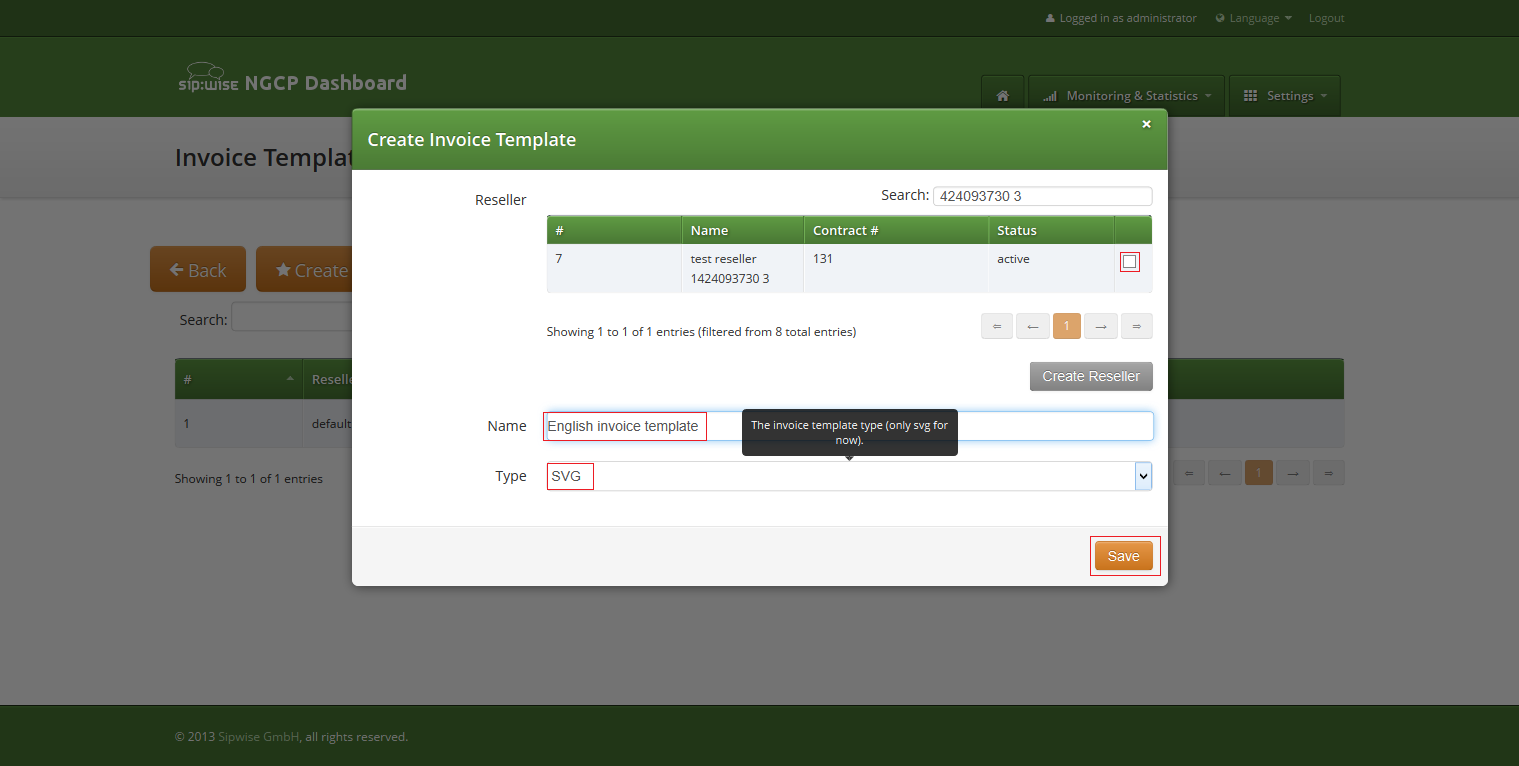
After registering new invoice template you can change invoice template structure in WYSIWYG SVG editor and preview result of the invoice generation based on the template.
Invoice Template Content
Invoice template is a XML SVG source, which describes content, look and position of the text lines, images or other invoice template elements. The Sipwise C5 provides embedded WYSIWYG SVG editor svg-edit 2.6 to customize default template. The Sipwise C5 svg-edit has some changes in layers management, image edit, user interface, but this basic introduction still may be useful.
Template refers to the owner reseller contact ("rescontact"), customer contract ("customer"), customer contact ("custcontact"), billing profile ("billprof"), invoice ("invoice") data as variables in the "[%%]" mark-up with detailed information accessed as field name after point e.g. [%invoice.serial%]. During invoice generation all variables or other special tokens in the "[% %]" mark-ups will be replaced by their database values.
Press on "Show variables" button on invoice template content page to see full list of variables with the fields:
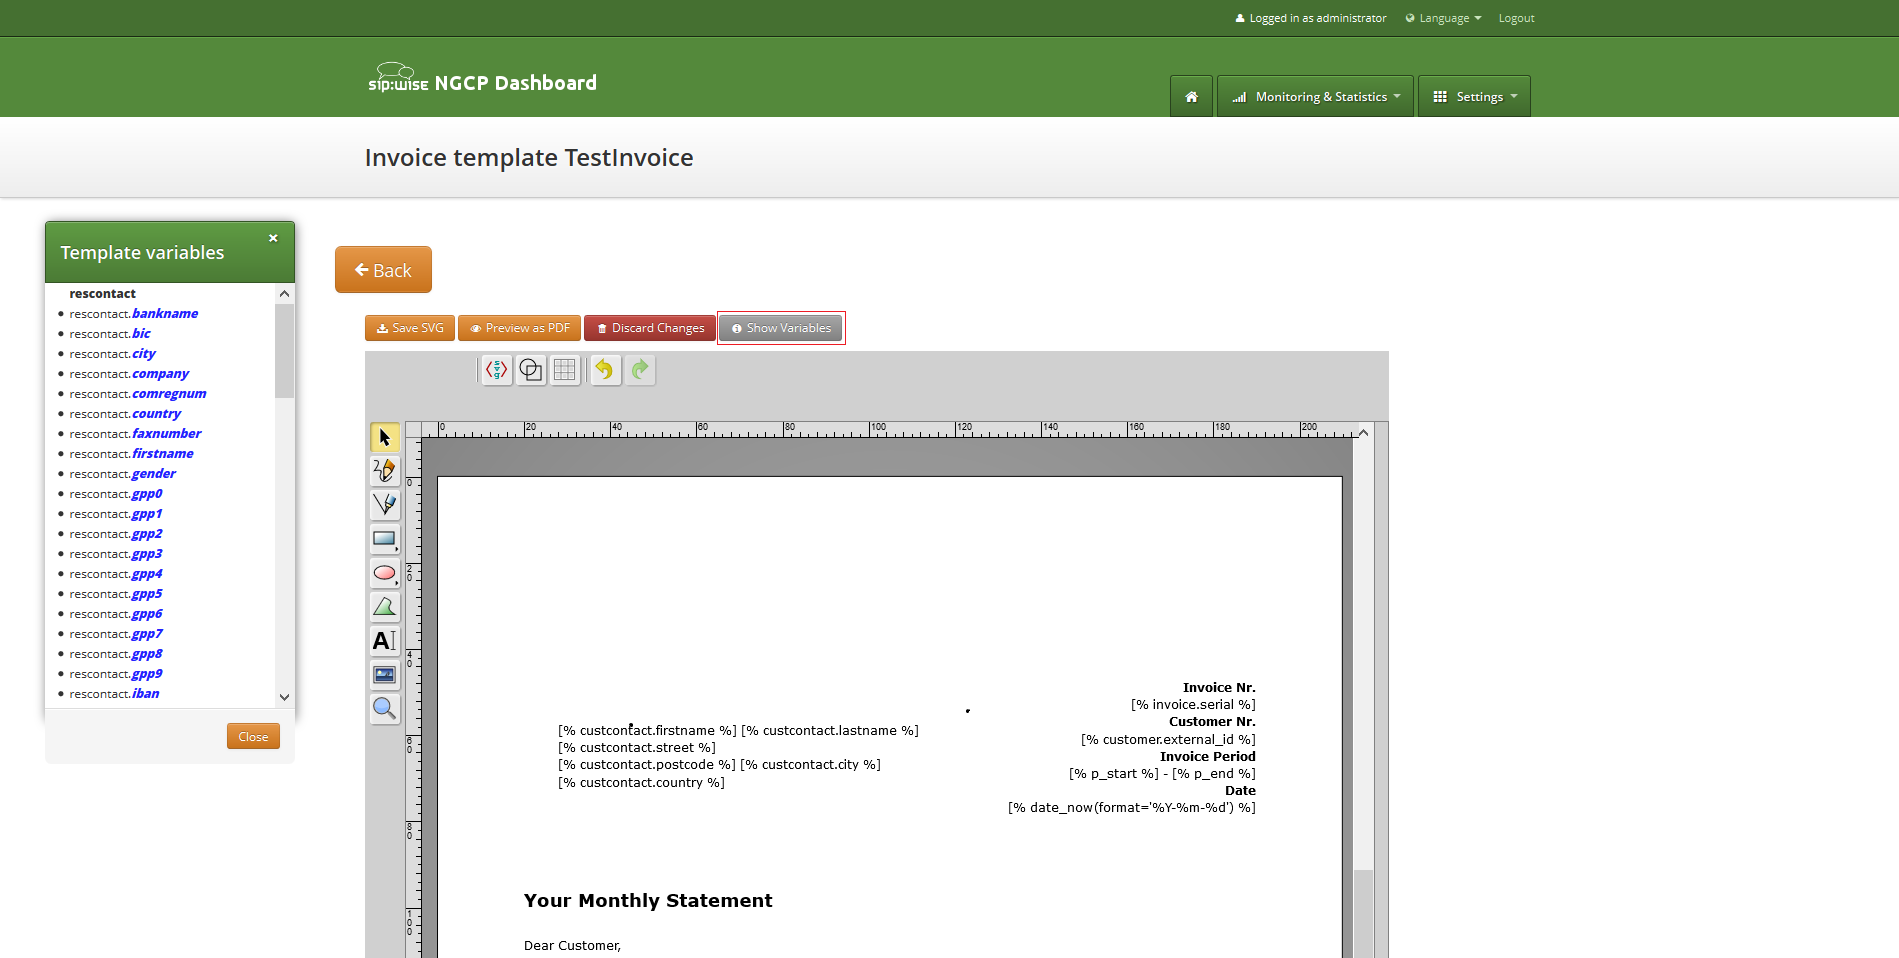
You can add/change/remove embedded variables references directly in main svg-edit window. To edit text line in svg-edit main window double click on the text and place cursor on desired position in the text.
After implementation of the desired template changes, invoice template should be saved.
To return to Sipwise C5 invoice template default content you can press on the "Discard changes" button.
| "Discard changes" operation can’t be undone. |
Layers
Default template contains three groups elements (<g/>), which can be thinked of as pages, or in terms of svg-edit - layers. Layers are:
-
Background: special layer, which will be repeated as background for every other page of the invoice.
-
Summary: page with a invoice summary.
-
CallList: page with calls made in a invoice period. Is invisible by default.
To see all invoice template layers, press on "Layers" vertical sign on right side of the svg-edit interface:
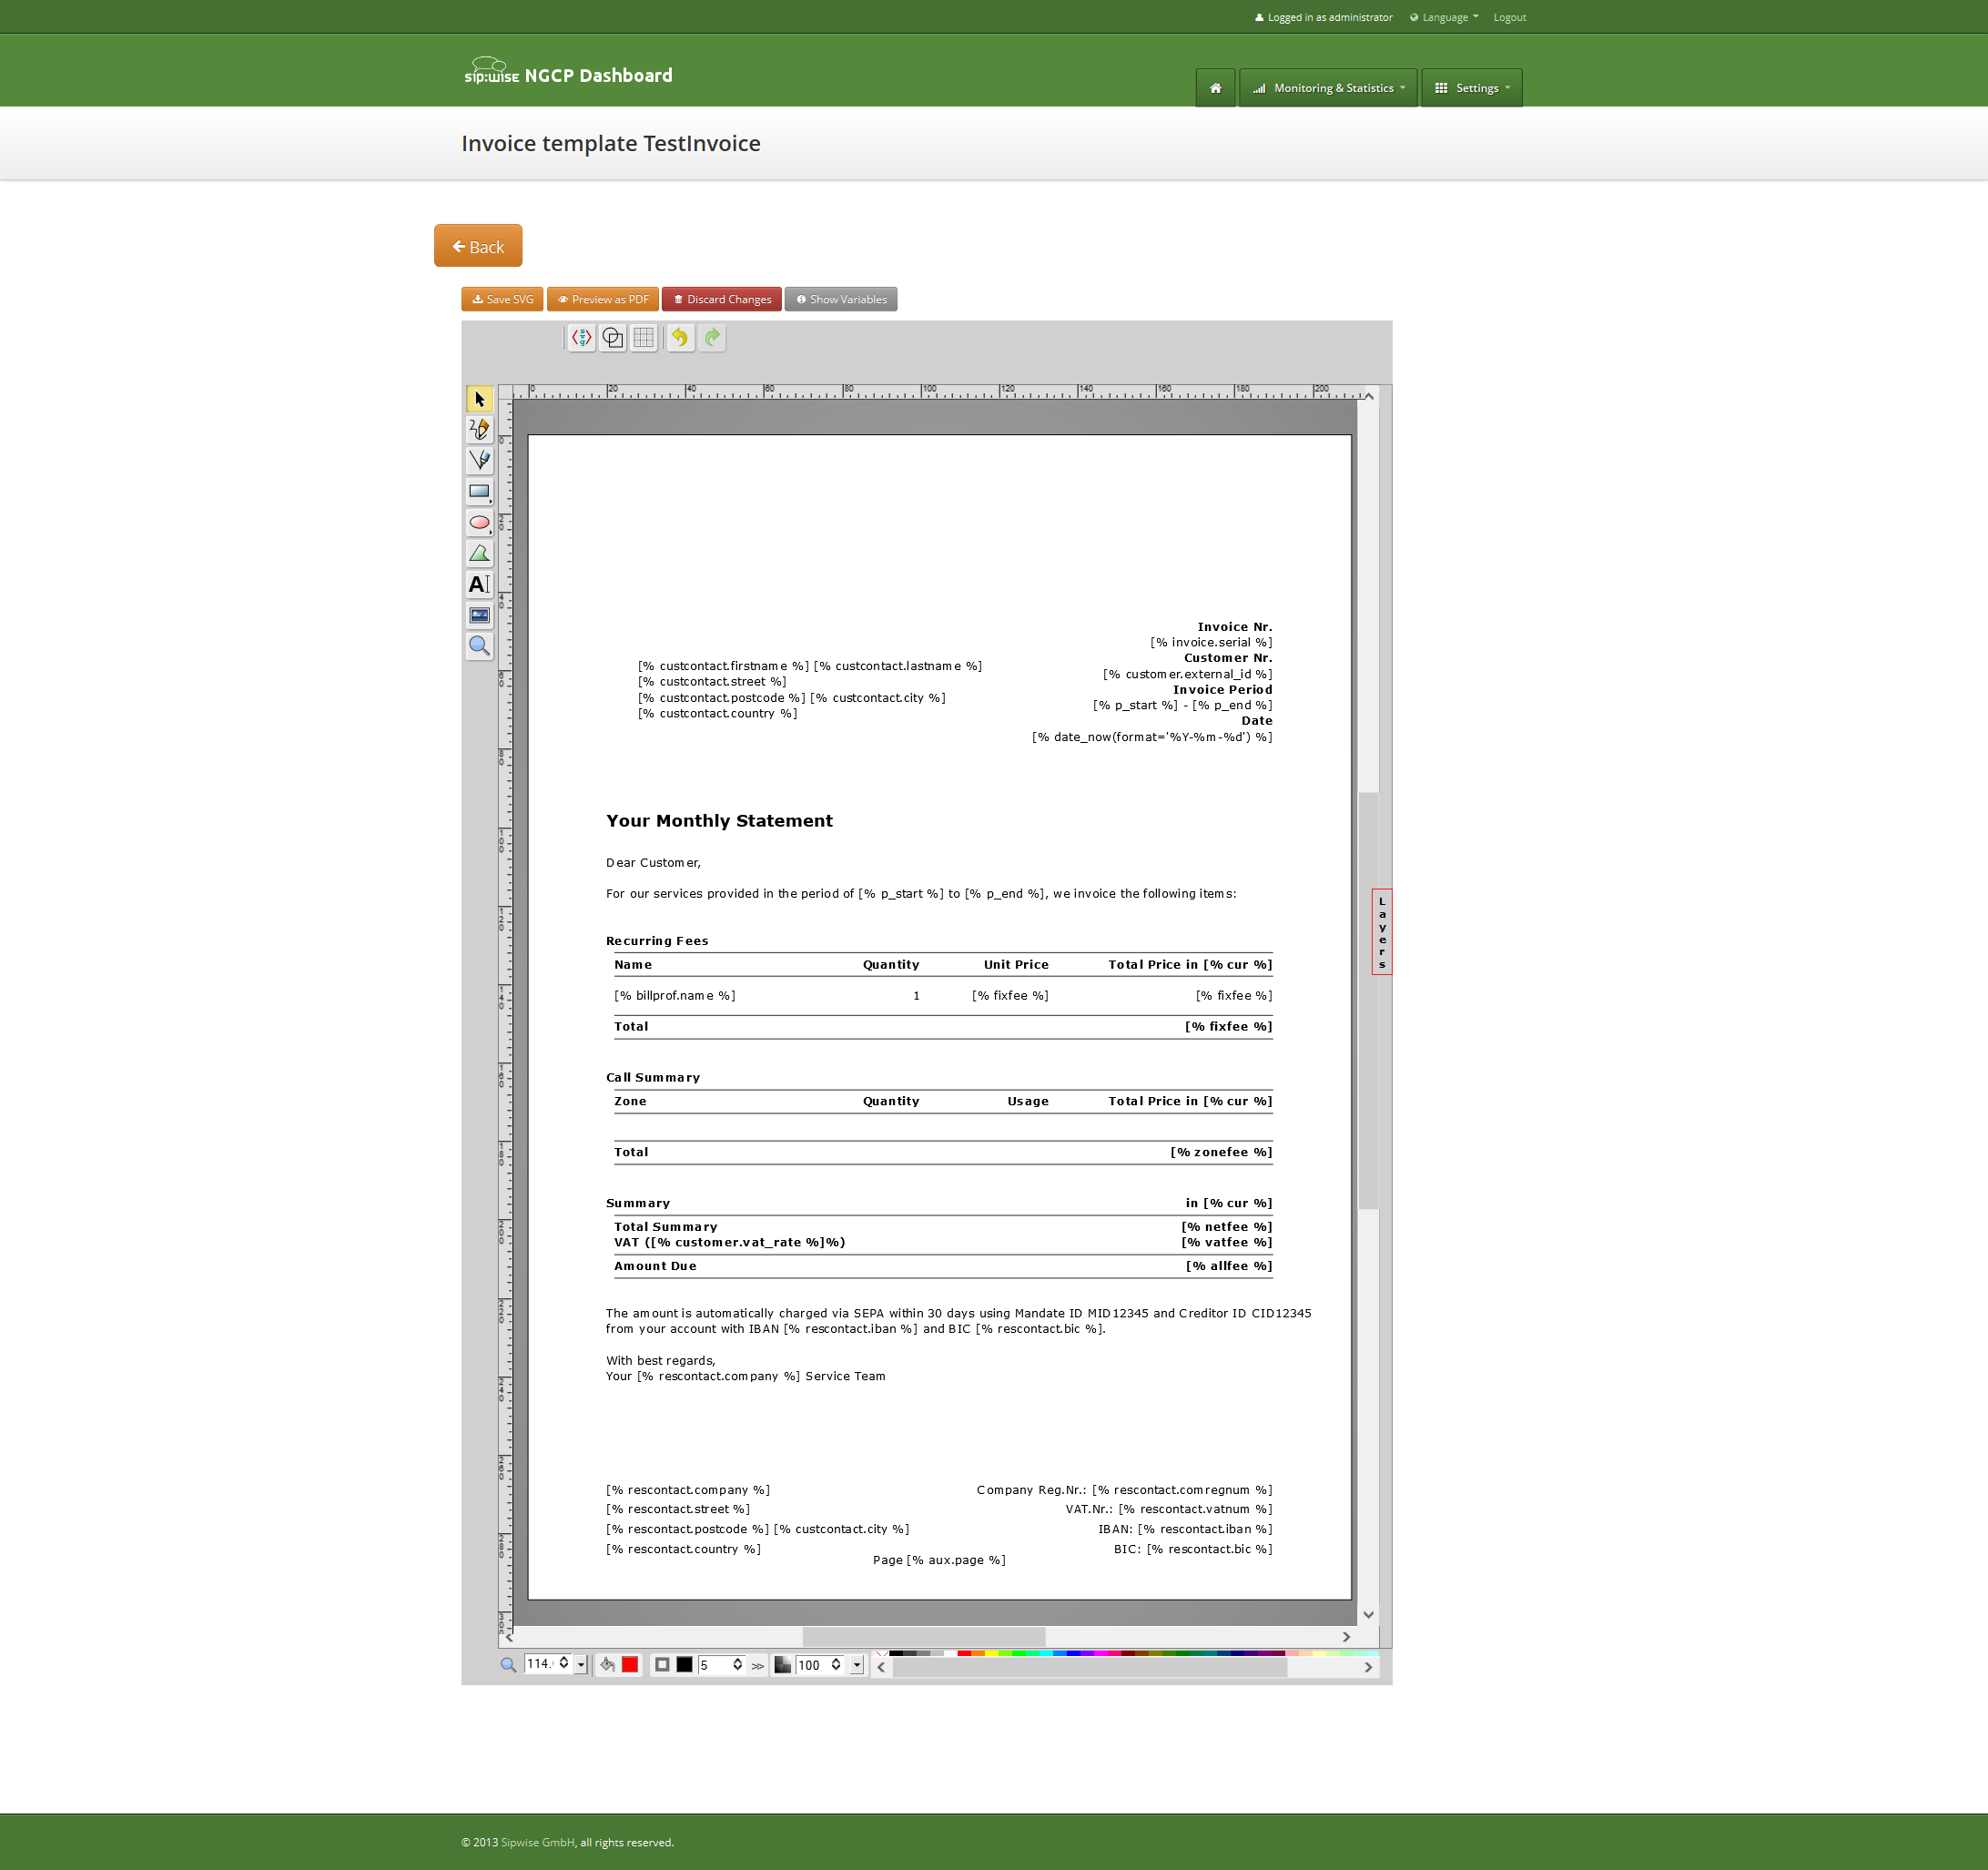
Side panel with layers list will be shown.
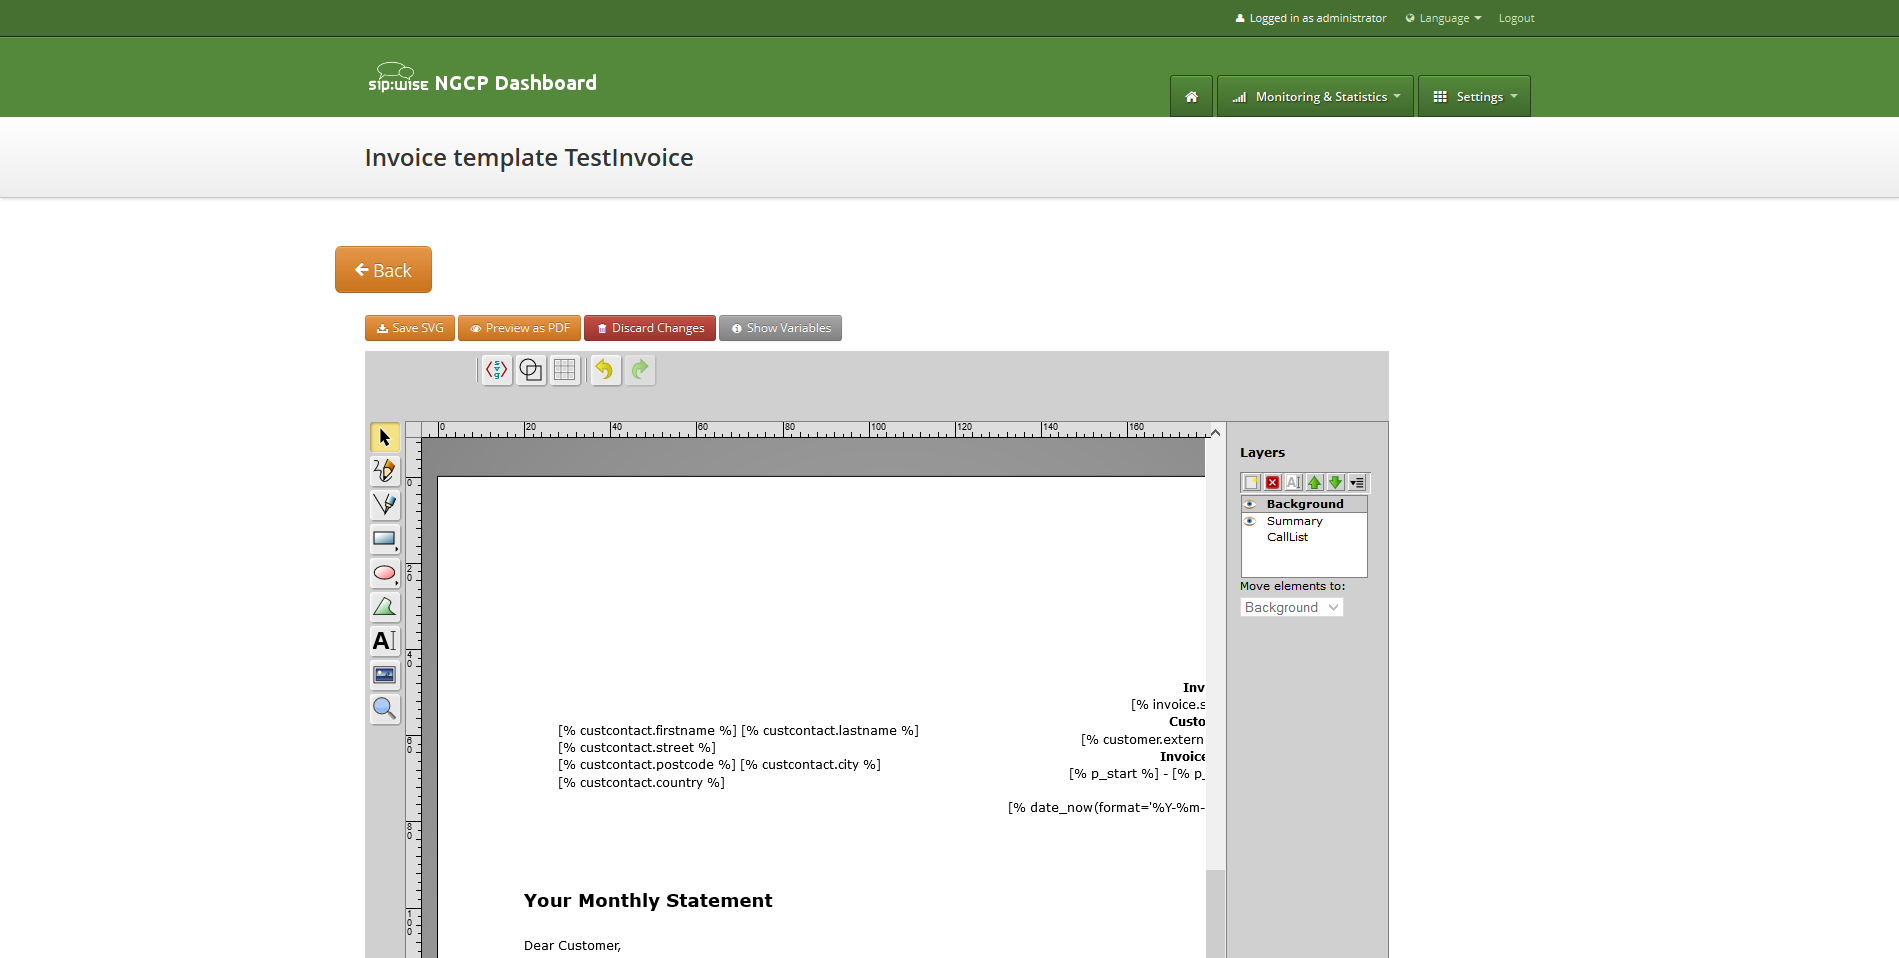
One of the layers is active, and its element can be edited in the main svg-edit window. Currently active layer’s name is bold in the layers list. The layers may be visible or invisible. Visible layers have "eye" icon left of their names in the layers list.
To make a layer active, click on its name in the layers list. If the layer was invisible, its elements became visible on activation. Thus you can see mixed elements of some layers, then you can switch off visibility of other layers by click on their "eye" icons. It is good idea to keep visibility of the "Background" layer on, so look of the generated page will be seen.
Edit SVG XML source
Sometimes it may be convenient to edit svg source directly and svg-edit makes it possible to do it. After press on the <svg> icon in the top left corner of the svg-edit interface:
SVG XML source of the invoice template will be shown.
SVG source can be edited in place or copy-pasted as usual text.
| Template keeps sizes and distances in pixels. |
| When edit svg xml source, please change very carefully and thinkfully things inside special comment mark-up "<!--{ }-→". Otherwise invoice generation may be broken. Please be sure that document structure repeats default invoice template: has the same groups (<g/>) elements on the top level, text inside special comments mark-up "<!--{ }-→" preserved or changed appropriately, svg xml structure is correct. |
To save your changes in the svg xml source, first press "OK" button on the top left corner of the source page:
And then save invoice template changes.
| You can copy and keep the svg source of your template as a file on the disk before start experimenting with the template. Later you will be able to return to this version replacing svg source. |
Change logo image
-
Make sure that "Select tool" is active.
-
Select default logo, clicking on the logo image.
-
Press "Change image" button, which should appear on the top toolbar.
After image uploaded save invoice template changes.
Save and preview invoice template content
To save invoice template content changes press button "Save SVG".
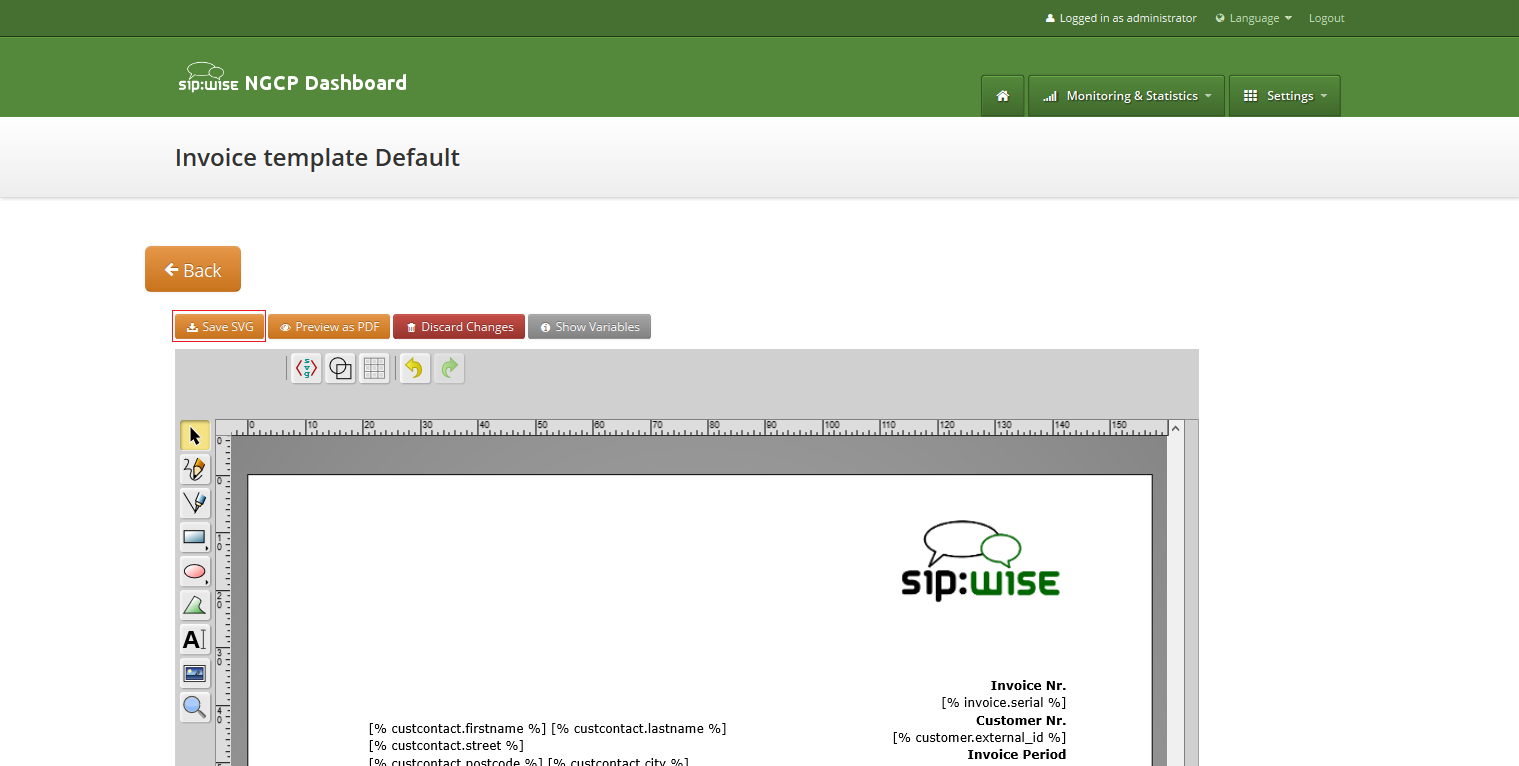
You will see message about successfully saved template. You can preview your invoice look in PDF format. Press on "Preview as PDF" button.

Invoice preview will be opened in the new window.
| Example fake data will be used for preview generation. |
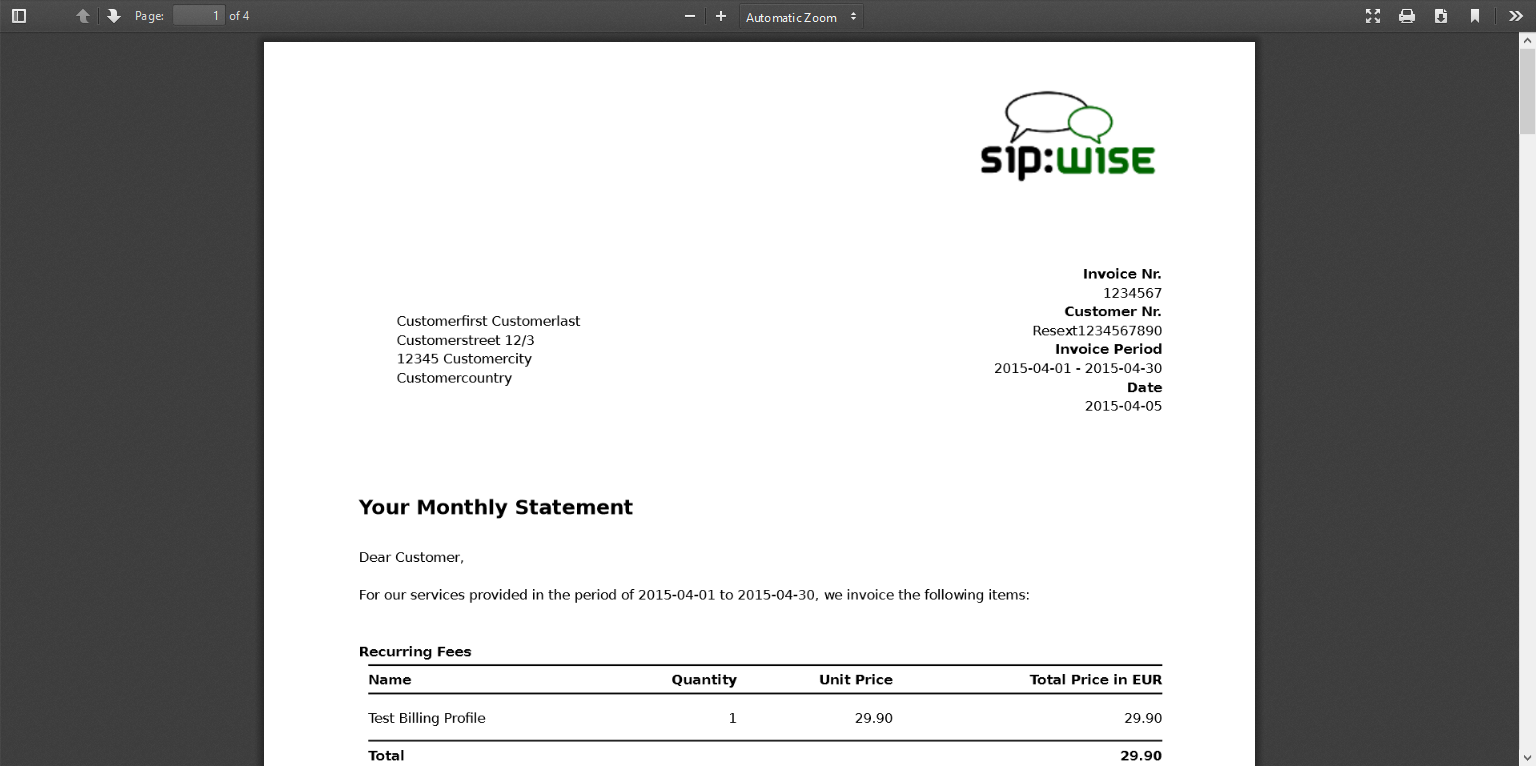
Email Reports and Notifications
Email events
The Sipwise C5 makes it possible to customize content of the emails sent on the following actions:
-
Web password reset requested. Email will be sent to the subscriber, whom password was requested for resetting. If the subscriber doesn’t have own email, letter will be sent to the customer, who owns the subscriber.
-
Administrator password reset requested. Email will be sent to the administrator, whom password was requested for resetting. If the administrator doesn’t have an email, an error message will appear when requesting the password reset.
-
New subscriber created. Email will be sent to the newly created subscriber or to the customer, who owns new subscriber.
-
Letter with the invoice. Letter will be sent to the customer.
Initial template values and template variables
Default email templates for each of the email events are inserted on the initial Sipwise C5 database creation. Content of the default template is described in the corresponding sections. Default email templates aren’t linked to any reseller and can’t be changed through Sipwise C5 Panel. They will be used to initialize default templates for the newly created reseller.
Each email template refers to the values from the database using special mark-ups "[%" and "%]". Each email template has fixed set of the variables. Variables can’t be added or changed without changes in Sipwise C5 Panel code.
Subscriber password reset email template
Email will be sent after subscriber or subscriber administrator requested password reset for the subscriber account. Letter will be sent to the subscriber. If subscriber doesn’t have own email, letter will be sent to the customer owning the subscriber.
Default content of the password reset email template is:
Template name |
passreset_default_email |
From |
|
Subject |
Password reset email |
Body |
Dear Customer, Please go to [%url%] to set your password and log into your self-care interface. Your faithful Sipwise system -- This is an automatically generated message. Do not reply. |
Following variables will be provided to the email template:
-
[%url%]: specially generated url where subscriber can define his new password.
-
[%subscriber%]: username@domain of the subscriber, which password was requested for reset.
Administrator password reset email template
Email will be sent after administrator requested password reset for it’s account. Letter will be sent to the administrator. If the administrator doesn’t have an email, an error message will appear when requesting the password reset.
Default content of the password reset email template is:
Template name |
admin_passreset_default_email |
From |
|
Subject |
Password reset email |
Body |
Dear Customer, Please go to [%url%] to set your password and log into your admin interface. Your faithful Sipwise system -- This is an automatically generated message. Do not reply. |
Following variables will be provided to the email template:
-
[%url%]: specially generated url where administrator can define his new password.
-
[%admin%]: username@domain of the administrator, which password was requested for reset.
New subscriber notification email template
Email will be sent on the new subscriber creation. Letter will be sent to the newly created subscriber if it has an email. Otherwise, letter will be sent to the customer who owns the subscriber.
| By default email content template is addressed to the customer. Please consider this when create the subscriber with an email. |
Template name |
subscriber_default_email |
From |
|
Subject |
Subscriber created |
Body |
Dear Customer, A new subscriber [%subscriber%] has been created for you. Your faithful Sipwise system -- This is an automatically generated message. Do not reply. |
Following variables will be provided to the email template:
-
[%url%]: specially generated url where subscriber can define his new password.
-
[%subscriber%]: username@domain of the subscriber, which password was requested for reset.
Invoice email template
Template name |
invoice_default_email |
From |
|
Subject |
Invoice #[%invoice.serial%] from [%invoice.period_start_obj.ymd%] to [%invoice.period_end_obj.ymd%] |
Body |
Dear Customer, Please find your invoice #[%invoice.serial%] for [%invoice.period_start_obj.month_name%], [%invoice.period_start_obj.year%] in attachment of this letter. Your faithful Sipwise system -- This is an automatically generated message. Do not reply. |
Variables passed to the email template:
-
[%invoice%]: container variable for the invoice information.
|
Invoice fields
The fields [%invoice.period_start_obj%] and [%invoice.period_end_obj%] provide methods of the perl package DateTime for the invoice start date and end date. Further information about DateTime can be obtained from the package documentation: man DateTime |
-
[%provider%]: container variable for the reseller contact. All database contact values will be available.
-
[%client%]: container variable for the customer contact.
|
Contact fields example for the "provider". Replace "provider" to client to access proper "customer" contact fields.
|
Email templates management
Email templates linked to the resellers can be customized in the email templates management interface. For the administrative account email templates of all the resellers will be shown. Respectively for the reseller account only owned email templates will be shown.

To create new email template press button "Create Email Template".
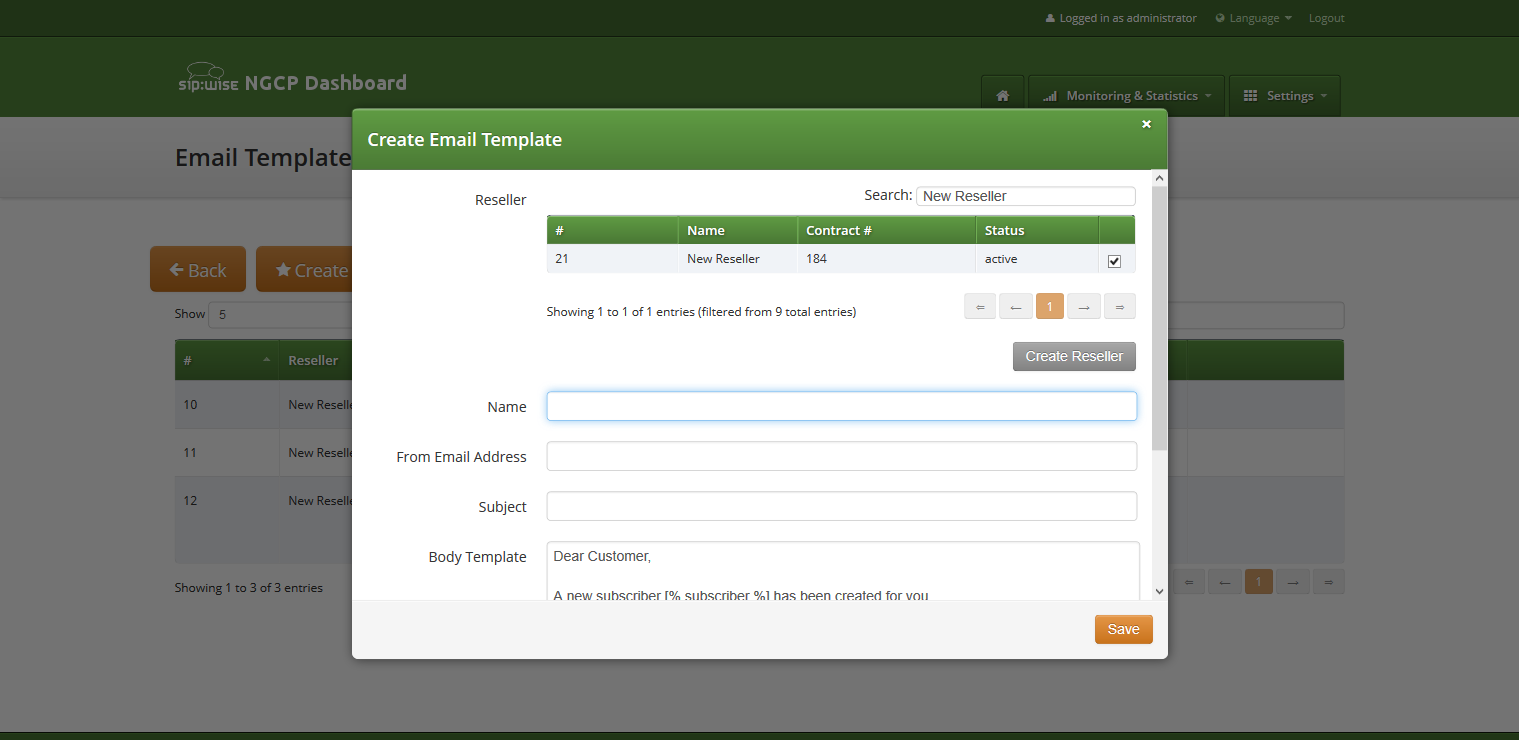
On the email template form all fields are mandatory:
-
Reseller: reseller who owns this email template.
-
Name: currently only email template with the following names will be considered by Sipwise C5 on the appropriate event :
-
admin_passreset_default_email;
-
passreset_default_email;
-
subscriber_default_email;
-
invoice_default_email;
-
-
From Email Address: email address which will be used in the From field in the letter sent by Sipwise C5 .
-
Subject: Template of the email subject. Subject will be processed with the same template variables as the email body.
-
Body: Email text template. Will be processed with appropriate template variables.
The Vertical Service Code Interface
Vertical Service Codes (VSC) are codes a user can dial on his phone to provision specific features for his subscriber account. The format is <code><value> to activate a specific feature, and <code> or <code># to deactivate it. The code parameter is a two-digit code, e.g. 72. The value parameter is the value being set for the corresponding feature.
| The value user input is normalized using the Rewrite Rules Sets assigned to domain as described in basicconfiguration:basicconfiguration.adoc#dialplans. |
By default, the following codes are configured for setting features. The examples below assume that there is a domain rewrite rule normalizing the number format 0<ac><sn> to <cc><ac><sn> using 43 as country code.
-
72 - enable Call Forward Unconditional e.g. to 431000 by dialing
*72*01000, and disable it by dialing#72. -
90 - enable Call Forward on Busy e.g. to 431000 by dialing
*90*01000, and disable it by dialing#90. -
92 - enable Call Forward on Timeout e.g. after 30 seconds of ringing to 431000 by dialing
*92*30*01000, and disable it by dialing#92. -
93 - enable Call Forward on Not Available e.g. to 431000 by dialing
*93*01000, and disable it by dialing#93. -
96 - disable at once all the Call Forwards previously configured using VSC, e.g. disable all the CFs by dialing
#96. -
50 - set Speed Dial Slot, e.g. set slot 1 to 431000 by dialing
*50*101000, which then can be used by dialing*1. There is no code to disable a speed dial slot. When a slot is no longer necessary, it can be ultimately removed using the web interface or can be ignored, because it is not impacting the calls from and to this subscriber. -
55 - set One-Shot Reminder Call e.g. to 08:30 by dialing
*55*0830. -
31 - set Calling Line Identification Restriction for one call, e.g. to call 431000 anonymously dial
*31*01000. -
32 - enable Block Incoming Anonymous Calls by dialing
32, and disable it by dialing#32. -
80 - call using Call Block Override PIN, number should be prefixed with a block override PIN configured in admin panel to disable the outgoing user/admin block list and NCOS level for a call. For example, when override PIN is set to 7890, dial
*80*789001000to call 431000 bypassing block lists. -
95 - allow to redial the last dialed number by the subscriber. Note: the feature has to be enabled for the subscriber/domain using preference last_number_redial.
-
71 - allow to hear a voice announcement of the last caller’s number, after the announcement dial the key defined in sems→vsc→callback_last_caller_confirmation_key to return the call. Note: it is not possible return a call if the caller’s number is unavailable.
-
74 - allow to return the call to the last caller’s number who called you without hearing the last call ID announcement. Note: it is not possible return a call if the caller’s number is unavailable.
-
20 - allow to remove the records of the recent calls to and from you.
In order to use the feature codes related to recent calls (95, 71, 74, 20) the kamailio→proxy→store_recentcalls preference in /etc/ngcp-config/config.yml has to be set to yes. Additionally, to handle caller numbers coming from Peers (e.g. PSTN), set the kamailio→proxy→foreign_domain_via_peer preference to yes in /etc/ngcp-config/config.yml file.
|
Configuration of Vertical Service Codes
You can change any of the codes (but not the format) in /etc/ngcp-config/config.yml in the section sems→vsc. After the changes, execute ngcpcfg apply "changed VSC codes".
| If you have the EMTAs under your control, make sure that the specified VSCs don’t overlap with EMTA-internal VSCs, because the VSC calls must be sent to Sipwise C5 via SIP like normal telephone calls. |
Voice Prompts for Vertical Service Code Configuration
| Prompt Handle | Related VSC | Message |
|---|---|---|
vsc_error |
any |
An error has occurred. Please try again later. |
vsc_invalid |
wrong code |
Invalid feature code. |
reject_vsc |
any |
Vertical service codes are disabled for this line. |
vsc_cfu_on |
72 (Call Forward Unconditional) |
Your unconditional call forward has successfully been activated. |
vsc_cfu_off |
72 (Call Forward Unconditional) |
Your unconditional call forward has successfully been deactivated. |
vsc_cfb_on |
90 (Call Forward Busy) |
Your call forward on busy has successfully been activated. |
vsc_cfb_off |
90 (Call Forward Busy) |
Your call forward on busy has successfully been deactivated. |
vsc_cft_on |
92 (Call Forward on Timeout) |
Your call forward on ring timeout has successfully been activated. |
vsc_cft_off |
92 (Call Forward on Timeout) |
Your call forward on ring timeout has successfully been deactivated. |
vsc_cfna_on |
93 (Call Forward on Not Available) |
Your call forward while not reachable has successfully been activated. |
vsc_cfna_off |
93 (Call Forward on Not Available) |
Your call forward while not reachable has successfully been deactivated. |
vsc_speeddial |
50 (Speed Dial Slot) |
Your speed dial slot has successfully been stored. |
vsc_reminder_on |
55 (One-Shot Reminder Call) |
Your reminder has successfully been activated. |
vsc_reminder_off |
55 (One-Shot Reminder Call) |
Your reminder has successfully been deactivated. |
vsc_blockinclir_on |
32 (Block Incoming Anonymous Calls) |
Your rejection of anonymous calls has successfully been activated. |
vsc_blockinclir_off |
32 (Block Incoming Anonymous Calls) |
Your rejection of anonymous calls has successfully been deactivated. |
XMPP and Instant Messaging
Instant Messaging (IM) based on XMPP comes with Sipwise C5 out of the box. Sipwise C5 uses prosody as internal XMPP server. Each subscriber created on the platform have assigned a XMPP user, reachable already - out of the box - by using the same SIP credentials. You can easily open an XMPP client (e.g. Pidgin) and login with your SIP username@domain and your SIP password. Then, using the XMPP client options, you can create your buddy list by adding your buddies in the format user@domain.
Call Recording
Introduction to Call Recording Function
Sipwise C5 provides an opportunity to record call media content and store that in files. This function is available since mr5.3.1 version of Sipwise C5 .
Some characteristics of the Call Recording:
-
Call Recording function can store both unidirectional (originating either from caller, or from callee) or bidirectional (combined) streams from calls, resulting in 1, 2 or 3 physical files as output
-
The location and format of the files is configurable.
-
File storage is planned to occur on an NFS shared folder.
-
Activation of call recording may happen generally for a Domain / Peer / Subscriber through Sipwise C5 admin web interface.
NGCP’s Call Recording function is not meant for individual call interception purpose! Sipwise provides its Lawful Interception solution for that use case. -
Querying or deletion of existing recordings may happen through the REST API.
-
Listing recordings of a subscriber is possible on NGCP’s admin web interface.
The Call Recording function is implemented using NGCP’s rtpengine module.
| There are 2 rtpengine daemons employed when call recording is enabled and active. The main rtpengine takes care of forwarding media packets between caller and callee, as usual, while the secondary rtpengine (recording) daemon is responsible for storing call data streams in the file system. |
Call Recording is disabled by default. Enabling and configuration of Call Recording takes place in 2 steps:
-
Enabling the feature on Sipwise C5 by setting configuration parameters in the main config.yml configuration file.
-
Activating the feature for a Domain / Peer / Subscriber.
Information on Files and Directories
NGCP’s Call Recording function uses an NFS shared folder to save recorded streams.
| Since call data amount may be huge (depending on the number and duration of calls), it is strongly not recommended to store recorded streams on NGCP’s local disks. However if you have to store recorded streams as files in the local filesystem, please contact Sipwise Support team in order to get the proper configuration of Call Recording function. |
The NFS share gets mounted during startup of the recording daemon. If the NFS share cannot be mounted for some reason, the recording daemon will not start.
Filenames have the format: <call_ID>-<random>-<SSRC>.<extension>, where:
-
call_ID: SIP Call-ID of the call being recorded
-
random: is a string of random characters, unique for each recorded call. It’s purpose is to avoid possible filename collisions if a Call-ID ever gets reused.
-
SSRC: is the RTP SSRC for unidirectional recordings, or “mix” for the bidirectional (combined) audio.
-
extension: is either “mp3” or “wav”, depending on the configuration (rtpengine.recording.output_format)
There might be 1, 2 or 3 files produced as recorded streams. The number of files depends on the configuration:
-
rtpengine.recording.output_mixed = ‘yes’(combined stream required)rtpengine.recording.output_single = ‘no’(unidirectional streams not required) -
rtpengine.recording.output_mixed = ‘no’(combined stream not required)rtpengine.recording.output_single = ‘yes’(unidirectional streams required) -
rtpengine.recording.output_mixed = ‘yes’(combined stream required)rtpengine.recording.output_single = ‘yes’(unidirectional streams required)
Configuration
The Call Recording function can be enabled and configured on Sipwise C5 by changing the following configuration parameters in config.yml file:
rtpengine:
  ...
  recording:
    enable: no
    mp3_bitrate: '48000'
    nfs_host: 192.168.1.1
    nfs_remote_path: /var/recordings
    output_dir: /var/lib/rtpengine-recording
    output_format: wav
    output_mixed: yes
    output_single: yes
    resample: no
    resample_to: '16000'
    spool_dir: /var/spool/rtpengine
Enabling Call Recording
Enabling the function requires changing the value of rtpengine.recording.enable parameter to “yes”. In order to make the new configuration active, it’s necessary to do:
ngcpcfg apply 'Activated call recording'Description of configuration parameters:
-
enable: when set to “yes” Call Recording function is enabled; default: “no”
-
mp3_bitrate: the bitrate used when recording happens in MP3 format; default: "48000"
-
nfs_host: IP address of the NFS host that provides storage space for recorded streams; default: "192.168.1.1"
-
nfs_remote_path: the remote path (folder) where files of recorded streams are stored on the NFS share; default: "/var/recordings"
-
output_dir: is the local mount point for the NFS share, and thus where the final audio files will be written; default: "/var/lib/rtpengine-recording"
Normally you don’t need to change the default setting. If you do change the value, please be aware that recorded files will be written by root user in that directory. -
output_format: possible values are “wav” (Wave) or “mp3” (MP3); default: “wav”
-
output_mixed: “yes” means that there is a file that contains a mixed stream of caller and callee voice data; default: "yes"
-
output_single: “yes” means that there is a separate file for each stream direction, i.e. for the streams originating from caller and callee; default: "yes"
-
resample: when set to “yes” the call data stream will be resampled before storing it in the file; default: “no”
-
resample_to: the sample rate used for resampling output; default: "16000"
-
spool_dir: is the place for temporary metadata files that are used by the recording daemon and the main rtpengine daemon for their communication; default: "/var/spool/rtpengine"
You should not change the default setting unless you have a good reason to do so! Sipwise has thoroughly tested the Call Recording function with the default setting.
If Call Recording is enabled you can see 2 rtpengine processes running when checking Sipwise C5 system state with ngcp-service tool:
root@sp1:/etc/ngcp-config# ngcp-service summary
Ok Service                        Managed    Started   Status
-- ------------------------------ ---------- --------- ---------
…
   kamailio-lb                    managed    by-ha     active
   ngcp-voisniff                  managed    by-ha     active
   rtpengine                      managed    by-ha     active
   rtpengine-recording            managed    by-ha     active
…
Activating Call Recording
Activating Call Recording for e.g. a Subscriber: please use NGCP’s admin web interface for this purpose. On the web interface one has to navigate as follows: Settings → Subscribers → select subscriber Details → Preferences → NAT and Media Flow Control. Afterwards the record_call option has to be enabled by pressing the Edit button and ticking the checkbox.
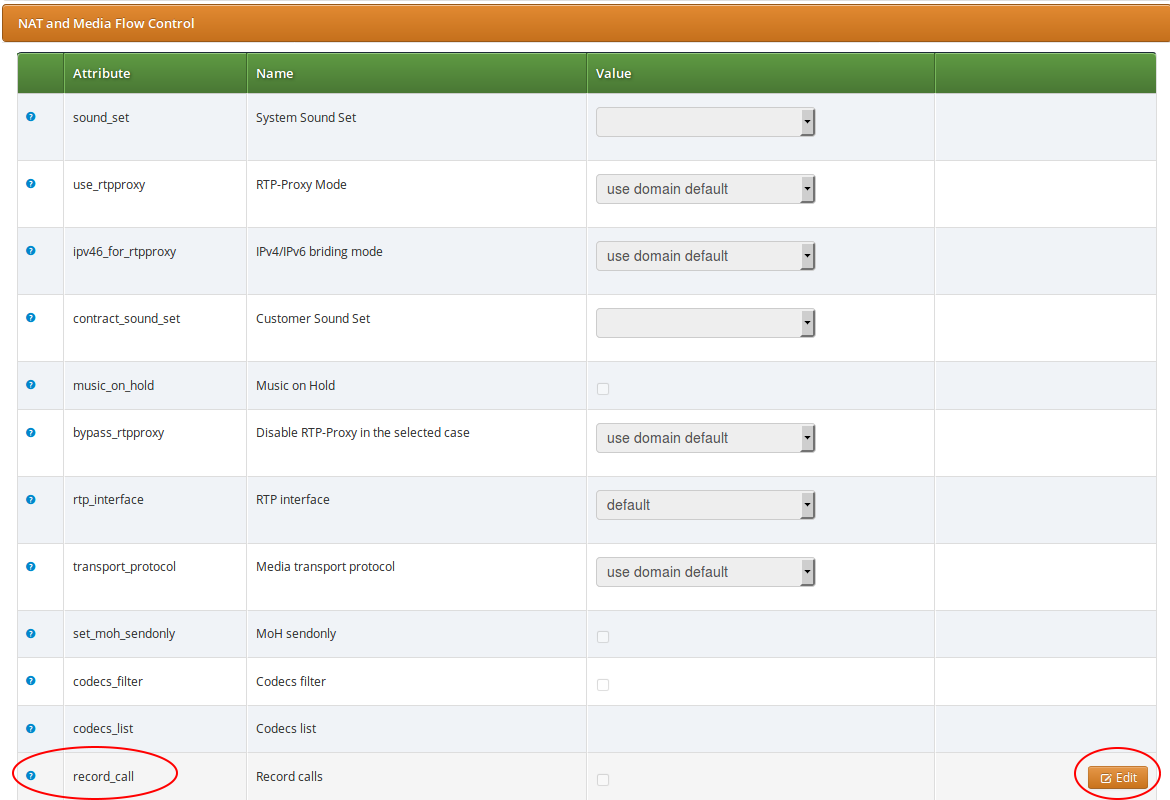
| The call recording function may be activated for a single Subscriber, a Domain and a Peer server in the same way: Preferences → NAT and Media Flow Control → record_call. When activating call recording for a Domain or Peer this effectively activates the function for all subscribers that belong to the selected domain, and for all calls with a local endpoint going through the selected peer server, respectively. |
Once the call recording is active it’s also possible to play a pre recording announcement to the caller before the call is established. In order to do this set Preferences → Applications → play_announce_before_recording to "Always" or "External/Internal calls only" depending if you want to play the message only for calls coming from PSTN or only for calls coming from local subscribers. In order to play the message it’s mandatory to upload an audio file into early_media → announce_before_recording inside the corresponding Sound Set. The play_announce_before_recording preference can be activated hierarchically at domain, customer and subscriber level.
It is possible to list existing call recordings of a Subscriber through the admin web interface of NGCP. In order to do so, please navigate to: Settings → Subscribers → select subscriber Details → Call Recordings
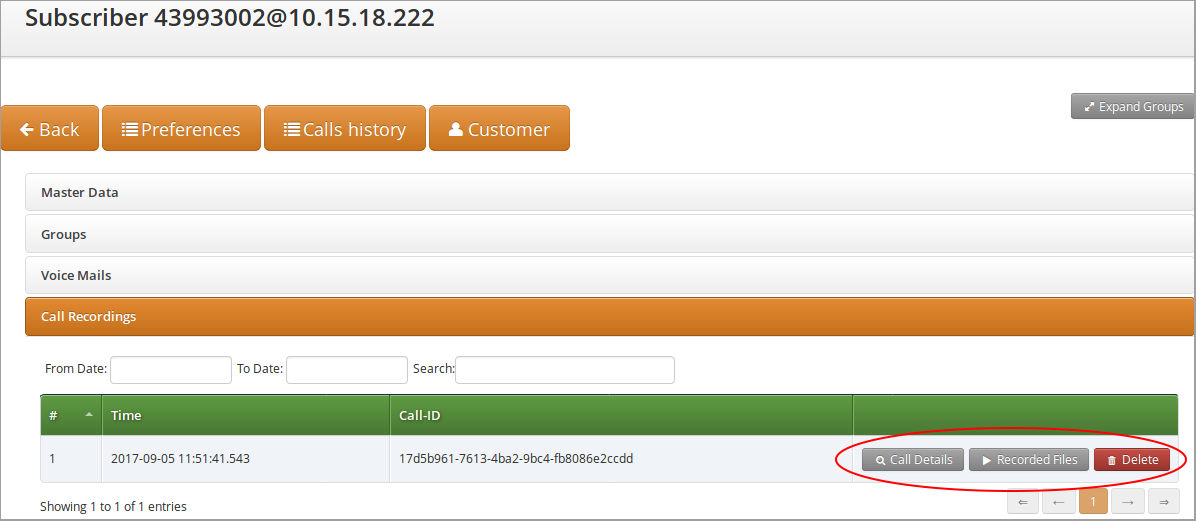
If you select an item in the list, besides the main properties such as the time of call and the SIP Call-ID, you can retrieve the details of the related call (press the Call Details button), get the list of recorded files (press the Recorded Files button) or Delete the recorded call.
When selecting Call Details you will see the most important accounting data of the call. Furthermore you can see the SIP Call Flow or the complete Call Details if you press the respective buttons.
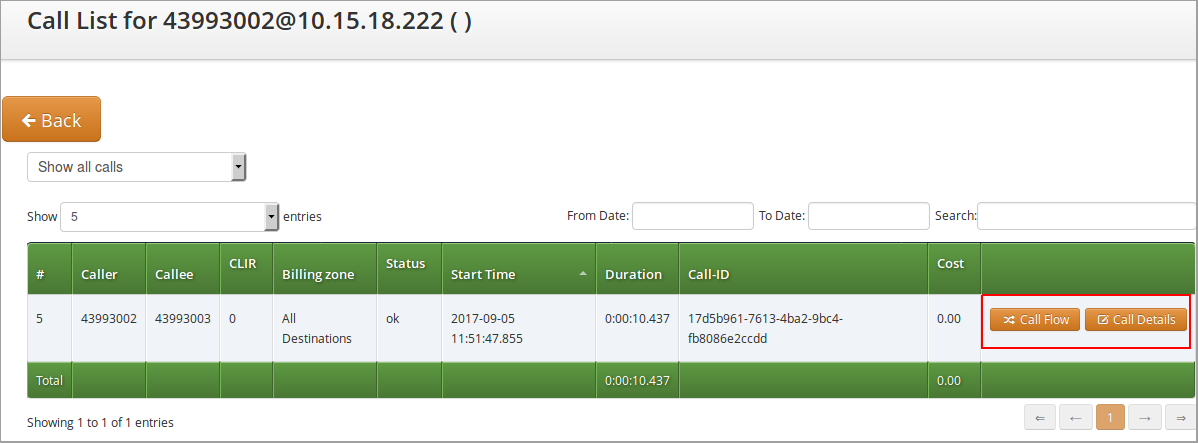
When navigating to Recorded Files of a call you will be presented with a list of files. For each file item:
-
type of stream is shown, that can be either "mixed" (combined voice data), or "single" (voice data of caller or callee)
-
file format is shown, that can be either "wav", or "mp3"
-
you can download the file by pressing the Play button
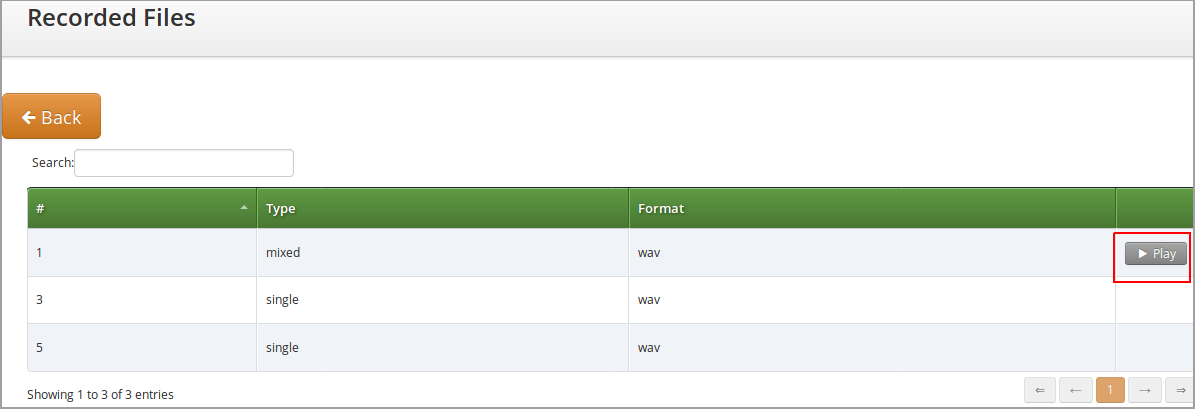
REST API
The Sipwise C5 REST API provides methods for querying and deletion of existing recording data. The full documentation of the available API methods is available on the admin web interface of the NGCP, as usual.
The following API methods are provided for managing Call Recordings:
-
CallRecordings:
-
Provides information about the calls recorded in the system; can also be used to delete a recording entry
-
accessible by the path: /api/callrecordings (collection) or /api/callrecordings/id (single item)
-
Supported HTTP methods: OPTIONS, GET, DELETE
-
-
CallRecordingStreams:
-
Provides information about recorded streams, such as start time, end time, format, mixed/single type, etc.; can also be used to delete a recorded stream
-
accessible by the path: /api/callrecordingstreams (collection) or /api/callrecordingstreams/id (single item)
-
Supported HTTP methods: OPTIONS, GET, DELETE
-
-
CallRecordingFiles:
-
Provides information about recorded streams, such as start time, end time, format, mixed/single type, etc.; additionally returns the file content too
-
accessible by the path: /api/callrecordingfiles (collection) or /api/callrecordingfiles/id (single item)
-
Supported HTTP methods: OPTIONS, GET
-
Pre-Recording Announcement
Many country regulations require that an informative announcement is played to the caller before the call is actually recorded. The Sipwise C5 allows you to configure your own custom announcement with few simple steps.
First create a system sound set for the feature. In Settings → Sound Sets either use your already existing Sound Set or create a new Sound Set and then assign it to your domain or subscribers. In the Sound Set there is an announcement early_media → announce_before_recording for that purpose.
Once the Sound Set is created the subscriber’s preference play_announce_before_recording of the callee must be enabled under Subscriber → Preferences → Applications menu. The same parameter can be set in the Domain’s or Customer’s preferences to enable this feature for all its subscribers.
| The announcement will be played to caller before the call is routed to the callee. |
| In case of CFU or CFNA with Pre-Recording Announcement feature enabled on both the forwarder and the final callee, only the Announcement of final callee will be played to caller. In case of CFB and CFT, instead, the announcement of the forwarder will be played first, then the announcement of final callee will be played after the call forward is executed. |
Media Transcoding and Transrating
Overview
Starting with version mr6.2.1, Sipwise C5 offers the capability to convert RTP media between several supported codecs, a feature known as transcoding. While this feature is always available on Sipwise C5, it’s engaged only when a subscriber, peer, or domain is explicitly configured for it. By default, Sipwise C5 lets RTP endpoints negotiate the codec to use among themselves without interfering.
| Media transcoding is a relatively CPU-intensive feature. As such, each individual node of a Sipwise C5 performing media transcoding can only support a limited number of concurrent calls for which transcoding is active. |
Supported Codecs
The following audio codecs, which are commonly found in use by SIP/RTP clients, are currently supported for transcoding.
-
G.711 (µ-Law and a-Law)
-
G.722
-
G.723.1
-
G.729
-
GSM
-
AMR (narrowband and wideband, the latter also known as AMR-WB)
-
Opus
-
Speex
-
DTMF event packets (telephone-event)
-
Comfort noise
Some codecs operate at different sampling rates than other codecs. If transcoding happens between two such codecs, the audio will be resampled as necessary. Similarly, if transcoding happens between a mono (1-channel) and a stereo (2-channel) codec, the audio will be up-mixed and down-mixed as necessary.
Configuration
Transcoding can be engaged for individual subscribers, peers, or domains on their respective preferences page in the Sipwise C5 admin web interface.
Setting any of the transcoding options for a domain makes it affect all the subscribers in this domain.
Individual options are described below.
ptime
Packetisation time in milliseconds. Normally Sipwise C5 lets the RTP endpoints select and negotiate the packetisation time they want to use. Setting this option to anything other than unchanged will engage transrating via the transcoding engine towards this subscriber or peer even if none of the other transcoding options are set, in which case the media will be transrated (repacketised).
For example, setting this to 40 ms would mean that each RTP packet sent towards this subscriber or peer would contain 40 milliseconds worth of audio, even if the other side of the call sends media that is packetised differently. It would also make Sipwise C5 indicate towards this subscriber or peer that it would prefer to receive audio in 40 millisecond packets (through the a=ptime SDP attribute).
transcode_…
Enabling one of these options adds the selected codecs to the list of codecs offered to this subscriber or peer, even if the original list of offered codecs did not include it. If this additional codec ends up being accepted by this subscriber or peer, then it will be transcoding to the first supported codec that was originally offered.
For example, if a calling RTP client A indicates support for PCMA (G.711 a-Law) as well as G.722, and calls a subscriber B that is configured for transcoding to G.729, then subscriber B would be offered PCMA, G.722, and G.729 by Sipwise C5. If subscriber B then accepts G.729 and starts sending G.729, Sipwise C5 would engage its transcoding engine and transcode the audio to PCMA (because PCMA and not G.722 was the codec preferred by A) before forwarding it to A. Vice versa, PCMA arriving from A would be transcoded to G.729 before being sent to B. (If B were to reject G.729 and instead starts to send PCMA or G.722, no transcoding would happen.)
Notes on individual codecs:
-
AMR is available in both narrowband (AMR operating at 8 kHz) and wideband (AMR-WB operating at 16 kHz) variants. These are distinct codecs and can be configured for transcoding separately or together.
-
Opus always operates at 48 kHz, but is supported in both mono and stereo (1 and 2 audio channels respectively). Both can be offered at the same time if so desired.
-
Speex is supported at sampling rates of 8, 16, and 32 kHz. These can be configured separately for transcoding, or together.
-
DTMF is not an actual audio codec, but rather represents transcoding between DTMF event packets and in-band DTMF audio tones. This is described in more detail below.
-
CN refers to comfort noise payloads. More information about this is below.
…_bitrate
Some codecs (Opus and G.723.1 in particular) can be configured for different bitrates, which would impact the amount of network bandwidth they use, as well as the audio quality produced. For Opus, different bitrates can be selected for their mono and stereo instances. Selecting a bitrate has no effect if transcoding to the respective codec is not engaged.
AMR-specific Options
AMR and AMR-WB support dynamic mode switching (adapting the bitrate) during runtime. The configurable bitrate therefore is only the initial bitrate at which the encoder is started, and is further constrained by the mode-set option.
The mode-set is a list of comma-separated AMR modes, e.g. 0,1,2,3. If a mode-set is received from a remote peer, then only the modes (bitrates) given in the list will be used for the encoder. If a specific bitrate is also configured, then this bitrate will be used as the highest possible starting bitrate. If this bitrate is not allowed by the mode-set, then the next lower bitrate will be used. If no lower bitrates are permitted, then the next higher bitrate will be used.
For outgoing AMR offers, a mode-set can be configured in the preferences page, and it will be honoured just like a mode-set that is received from a remote peer. A remote AMR peer may support only a specific subset of AMR modes, which would need to be configured in the mode-set. The Sipwise C5 supports encoding and decoding all possible AMR modes.
If no mode-set is received nor configured, then all bitrates are permitted.
AMR has two basic payload variants: bandwidth-efficient and octet-aligned. A remote AMR peer may support only one of them, in which case the correct one must be configured in the preferences. The default is bandwidth-efficient. The Sipwise C5 supports sending and receiving both and will honour the request made by a remote AMR peer for one or the other.
Further options that may be required by a remote AMR peer to restrict permissible mode changes are: mode-change-period restricts mode changes to be made only every other packet if set to 2 (the default is 1); mode-change-capability advertises the capability to restrict the modes changes as such without actually restricting them; and mode-change-neighbor restricts mode changes to be made only to neighbouring modes if enabled (the default is disabled).
AMR supports requesting specific encoder modes from the remote peer via Codec Mode Requests (CMR). The Sipwise C5 will honour a CMR received from the remote peer and switch encoder mode accordingly. Then optionally, if no further CMRs are received from the peer, the Sipwise C5 can then try to increase encoder bitrate again to improve audio quality. This can be enabled by setting the mode change interval preference to non-zero. It specifies an interval in milliseconds at which to switch to a higher encoder bitrate if no CMR was received during that time, and if a higher bitrate is available and allowed by the mode-set.
In the opposite direction, the Sipwise C5 can optionally request higher bitrates from the remote peer by sending CMRs out. This can be enabled by setting the CMR interval preference to non-zero. It specifies an interval in milliseconds at which the Sipwise C5 will request a higher bitrate from the remote encoder if a higher bitrate is available and it was not being used during that time.
always_transcode
Setting this flag instructs Sipwise C5 to always engage transcoding to the first (preferred) codec indicated by an RTP endpoint, even if another codec is available that is supported by both parties to a call. Enabling this flag can potentially engage the transcoding engine for a call even if none of the other transcoding options are set.
For example: Subscriber A is calling subscriber B. Subscriber A is indicating support for PCMA and G.722. Subscriber B answers the call, rejects PCMA but accepts G.722, and starts sending G.722 to A. Normally Sipwise C5 would not get involved and would let G.722 pass between A and B. But if subscriber B has the always_transcode flag set, Sipwise C5 would now start transcoding the G.722 sent by B into PCMA before forwarding it to A, because PCMA was indicated as the preferred codec by A. Vice versa, PCMA arriving from A would be transcoded into G.722 and then forwarded to B.
DTMF transcoding
Sipwise C5 supports transcoding between DTMF event packets (using the RTP telephone-event type payload) and DTMF tones carried in-band in the audio stream. DTMF transcoding is supported in both directions: transcoding DTMF event packets to DTMF tones, and DTMF tones in an audio stream and transcoding them to DTMF event packets.
Support for DTMF transcoding can be enabled in one of two ways:
-
Enabling the setting transcode_dtmf for a subscriber, peer, or domain. This is useful if the subscriber, peer, or domain requires support for DTMF event packets, but the calling entity might only support DTMF tones carried in-band in the audio stream.
-
Enabling the setting always_transcode for a subscriber, peer, or domain. This is useful for the reverse case: if the subscriber, peer, or domain might only support DTMF tones carried in-band in the audio stream, but the calling entity requires support for DTMF event packets.
Enabling DTMF transcoding for any call requires that all audio passes through the transcoding engine, as well as a DSP for detecting DTMF tones in one direction. This carries an additional performance impact with it, and so DTMF transcoding should only be enabled when really necessary.
DTMF conversion of INFO messages
Sipwise C5 supports the conversion of SIP INFO messages with application/dtmf-relay payload to DTMF event or PCM DTMF inband tone, depending on whether the destination participant supports the telephone-event RTP payload type or not. DTMF conversion of INFO messages works only in one way direction: DTMF events or PCM DTMF inband tones are not converted back to DTMF INFO messages.
The preference kamailio.proxy.allow_info_method has to be set to yes in config.yml in order to make the DTMF INFO message conversion working.
Enabling DTMF conversion of INFO messages for any call requires that all audio passes through the transcoding engine, as well as a DSP for detecting DTMF tones in one direction. This carries an additional performance impact with it, and so it should only be enabled when really necessary.
| At the moment this feature is for internal use only. External generated INFO messages will be not converted but passed through. |
Comfort Noise
RTP supports a special payload format for carrying comfort noise (CN) audio without having to encode it as actual audio. Support for CN is optional and negotiation is normally left up to the endpoints. If CN transcoding is enabled, Sipwise C5 can transcode CN payloads to audio noise and vice versa.
When active and when CN is supported by one endpoint but not the other, any received CN payloads are converted to audio noise and this noise is then inserted into the audio stream. In the reverse direction, Sipwise C5 can optionally detect silence audio frames and then convert these to predefined CN payloads.
To enable silence detection, the setting rtpengine.silence_detect in config.yml must be set to a non-zero value. This value denotes the silence detection threshold in percent and therefore must be between 0.0 and 100.0. Any audio samples that are lower than the configured threshold will be as silence, and if all audio samples in an audio frame are detected as silence, then that frame will be replaced by a CN frame. To only replace audio frames that contain complete silence with CN frames, a very low but non-zero value can be used here, such as 0.1%.
| Certain audio codecs always leave a residual DC offset in the audio samples, even when encoding complete silence. G.711 a-Law (PCMA) is one such example, for which the minimum silence detection threshold is 0.013%. |
When a silence audio frame is replaced by a CN frame, the generated CN payload is not based on the audio that is being replaced, but rather taken from the static and predefined setting rtpengine.cn_payload in config.yml. This is a list of comfort noise parameters according to RFC 3389. The first value in the list is mandatory and denotes the volume of the noise payload in negative dBov (meaning larger values result in quieter audio, with zero being the loudest), while all subsequent values are optional and denote spectral information about the noise. The default is the single value 32, which describes noise with a volume of -32 dBov without any spectral information.
T.38 transcoding
In addition to transcoding between audio codecs, Sipwise C5 supports transcoding between T.38 fax transmissions (over UDPTL transport) and T.30 fax data over regular audio channels. The audio codec commonly used to carry T.30 data is G.711, but any other audio codec that is supported for transcoding can also be used, provided it offers a high enough bitrate and audio quality.
Two settings to control T.38 transcoding are available for subscribers, peers, and domains:
-
The setting t38_decode instructs Sipwise C5 to accept an offered T.38 session towards the subscriber, peer, or domain, and translate it into a regular audio call carrying T.30 fax data. By default, G.711 (both µ-Law and a-Law) will be offered. If any other codecs are selected through the transcode_... options, then only those codecs will be offered and the G.711 default will be omitted. Non-T.38 offers are not affected by this settings.
-
The setting t38_force forces any audio call towards this subscriber, peer, or domain to be translated to a T.38 session, regardless of whether the audio media actually carries T.30 fax data or not. This is useful if it is known that the remote destination is a fax endpoint supporting T.38.
DTX jitter buffer
DTX is short for discontinuous transmission and describes an event during which a remote RTP client intermittently stops sending RTP. Some codecs explicitly support this as a feature (e.g. AMR and AMR-WB) while in other instances a sending RTP client may erroneously produce gaps in the RTP stream. If a receiving RTP client isn’t expecting such a behaviour, the resulting audio output may have unpleasant characteristics, such as stuttering or dropping the audio to complete silence.
By default the Sipwise C5 will not attempt to correct such a DTX behaviour and will simply pass through any DTX gaps untouched. However, for any call with active audio transcoding, the Sipwise C5 can be configured to enable a DTX jitter buffer in order to fill in DTX gaps with comfort noise to produce a steady output RTP stream.
Configuration
The master switch to enable the DTX jitter buffer is found in config.yml under the setting rtpengine.dtx_delay. This value denotes the processing delay in milliseconds (i.e. the length of the jitter buffer) and should be set to just slightly higher than the highest expected ingress jitter. The default value of zero disables the DTX buffer.
When a DTX event is detected, the gap will be filled in using an RFC 3389 compliant comfort noise generator. The parameters for this generator are set under rtpengine.dtx_cn_params. The default is just a single value of 35, specifying white noise at -35 dBov. Higher numbers lead to quieter noise. Subsequent numbers (i.e. from the second number onward) are optional spectral parameters.
The maximum duration for which comfort noise should be generated can be set using rtpengine.max_dtx in seconds. The default is unlimited (zero).
If an incoming RTP stream experiences a timer drift (i.e. the RTP clock runs slower or faster than expected), then the timer handling the DTX buffer will be shifted forward or backward by rtpengine.dtx_shift milliseconds (default 5). Timer drifts can lead to DTX buffer overflows, which are detected if more than rtpengine.dtx_buffer packets with an RTP delay of more than rtpengine.dtx_lag milliseconds are held in the buffer (defaults 10 and 100, respectively).
AMR and AMR-WB explicitly support DTX and provide their own comfort noise format (called SID) to fill in DTX gaps. If rtpengine.amr_dtx is set to native (the default) then the native AMR SID/CN generator will be used to produce the noise to fill in DTX gaps. If this setting is set to CN then the generic CN generator (which is used for other codecs) is used instead.
Announcement Before Call Setup
This feature allows a callee to play a custom announcement to the caller every time it receives a call. The announcement is played in early media mode, therefore it can be used as a simple business welcome message or to inform the caller about a different cost of the call before it will be actually charged.
The configuration of the announcement is similar to the activation of Pre-Recording Announcement and it requires few simple steps.
First create a system sound set for the feature. In Settings → Sound Sets either use your already existing Sound Set or create a new Sound Set and then assign it to your domain or subscribers. In the Sound Set there is an announcement early_media → announce_before_call_setup for that purpose.
Once the Sound Set is created the subscriber’s preference play_announce_before_call_setup must be enabled under Subscriber → Preferences → Applications menu. The same parameter can be set in the Domain’s or Customer’s preferences to enable this feature for all its subscribers.
| The announcement will be played to caller before the call is routed to the callee. |
| Differently from Pre-Recording Announcement, in all Call Forward cases with Announcement Before Call Setup feature enabled on both the forwarder and the final callee, only the announcement of the forwarder will be played to caller. |
This feature and Pre-Recording Announcement can be activated at the same time. In this case the Announcement Before Call Setup will be played as first.
Emulated Ringback Tone
An usual problem linked to the activation of pre-call announcements, like for example Announcement Before Call Setup, Pre-Recording Announcement, Announcement Before Call Forward, is the impossibility of the caller device or provider to generate again the ringback tones after the early media announcement is terminated. This usually happens even if a new '180 Ringing' message is sent back to the caller.
To overcome this problem the Sipwise C5 makes it possible to play a pre-recorded ringback tone to the caller party in early media mode. This feature can be activated on the caller Subscriber or Peer where the tone has to be played. The emulated ringback is played in a loop and it is stopped if one of the following conditions happens:
-
a '183 Progress' message is sent back by the callee, this because the callee most likely would like to play an announcement in early media mode
-
a '200 OK' message is sent back by the callee
-
the call fails
The configuration of the announcement is similar to the activation of Pre-Recording Announcement and it requires few simple steps.
First create a system sound set for the feature. In Settings → Sound Sets either use your already existing Sound Set or create a new Sound Set and then assign it to your domain or subscriber. In the Sound Set there is an announcement early_media → ringback_tone for that purpose.
Once the Sound Set is created the caller subscriber’s preference play_emulated_ringback_tone must be enabled under Subscriber → Preferences → Applications menu. The same parameter can be set in the Domain’s or Customer’s preferences to enable this feature for all its subscribers. It can also be enabled on Peer’s preferences to activate the feature when the call is coming from the peer.
By default the callee’s soundset is used to generate the emulated ringback tone. If you prefer to use the ringback tone uploaded in the caller soundset you have to set config.yml preference kamailio.proxy.play_ringback_tone_of_caller to 'yes'.
The same feature can be used to play back to the caller a music on hold or other announcements while the callee endpoint is ringing. To do that just upload the media you prefer instead of a ringback tone.
| The callee has to send a '180 Ringing' message to trigger the emulated ring back tone to start. |
| The generation of the emulated ringback tone is currently limited to two specific scenarios: in the one specified above after a pre-call announcement and in a TPCC initiated call where the caller is already in conversation. |
Store Recent Calls and Redial
Sipwise C5 allows to store the number of the last incoming and outgoing calls of each subscriber. To enable the feature edit config.yml and enable there kamailio: store_recentcalls: yes. Only the very last incoming and outgoing call is stored.
Each subscriber can interact with his own personal stored records using Vertical Service Codes (see VSC). In particular a subscriber can:
-
redial last dialed number (this feature has to be enabled for the each subscriber/domain using preference last_number_redial)
-
hear a voice announcement of the last caller’s number, then press the key defined in sems→vsc→callback_last_caller_confirmation_key preference of /etc/ngcp-config/config.yml to return the call
-
return the call to the last caller’s number without hearing the number announcement
-
delete the personal stored records of any recent calls to and from him
| it is not possible return a call if the caller’s number is unavailable (e.g. anonymous calls). |
Configuring Recent Calls Sound Sets
Sound Sets can be defined in Settings→Sound Sets. To create a new Sound Set, click Create Sound Set. Then click the Files button.
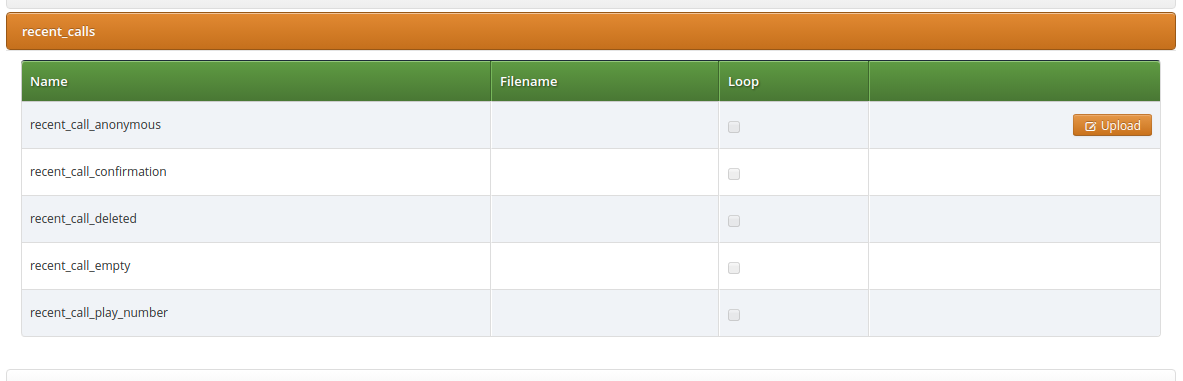
Upload the following files:
| Handle | Message played |
|---|---|
recent_call_play_number |
The last call you received was from …. |
recent_call_confirmation |
To call back this number press key …. |
recent_call_anonymous |
The last caller didn’t share his number, you can not return the call to this person. |
recent_call_empty |
Your recent call history is empty. |
recent_call_deleted |
Your recent call history has been successfully deleted. |
| You may use 8 or 16 bit mono WAV audio files. |
Then set the preference sound_set on the Domain or Subscriber level in order to assign the Sound Set (as usual the subscriber preference overrides the domain one).
Advanced configuration
By default the expiration time for the most recent incoming and outgoing call per subscriber are 3600 seconds (1 hour) and 86400 seconds (1 day) respectively. If you wish to prolong or shorten the expiration time open constants.yml and set there recentcalls: expire: 3600 and recentcalls: out_expire: 86400 to a new value, then issue ngcpcfg apply "recentcalls expire modification" afterwards.
Time sets management
Time sets specifications and data description
The Sipwise C5 provides administrative WEB and API interface to manage time sets.
Not all iCalendar and EVENT properties are supported, but those that are used for time points and periods definition or stated mandatory by specification:
-
CALENDAR supported properties:
-
NAME
-
-
EVENT supported properties:
-
SUMMARY
-
DTSTART
-
DTEND
-
RRULE
-
Important to mention that current implementation does not support these EVENT properties:
-
DTSTAMP ( UID is used in generated calendar ics file, both UID and DTSTAMP are ignored during uploading calendar file );
-
DURATION ( DTEND is used );
-
RDATE
-
EXDATE
-
PRIORITY
Main EVENT property, that is used for time points and periods definition is RRULE. Current time sets implementation supports all properties described in the RRULE specification except WKST.
Default value for week start is MO (Monday).
Web interface for the time sets
Time sets management section is provided in two variants. One is main time sets management section and other is a chapter on reseller details page. Variants have minor differences. Functionality will be explained using time sets dedicated interface. Differences will be explained below.
Time set can be created using creation form. On time sets management interface press button "Create Time Set Entry":
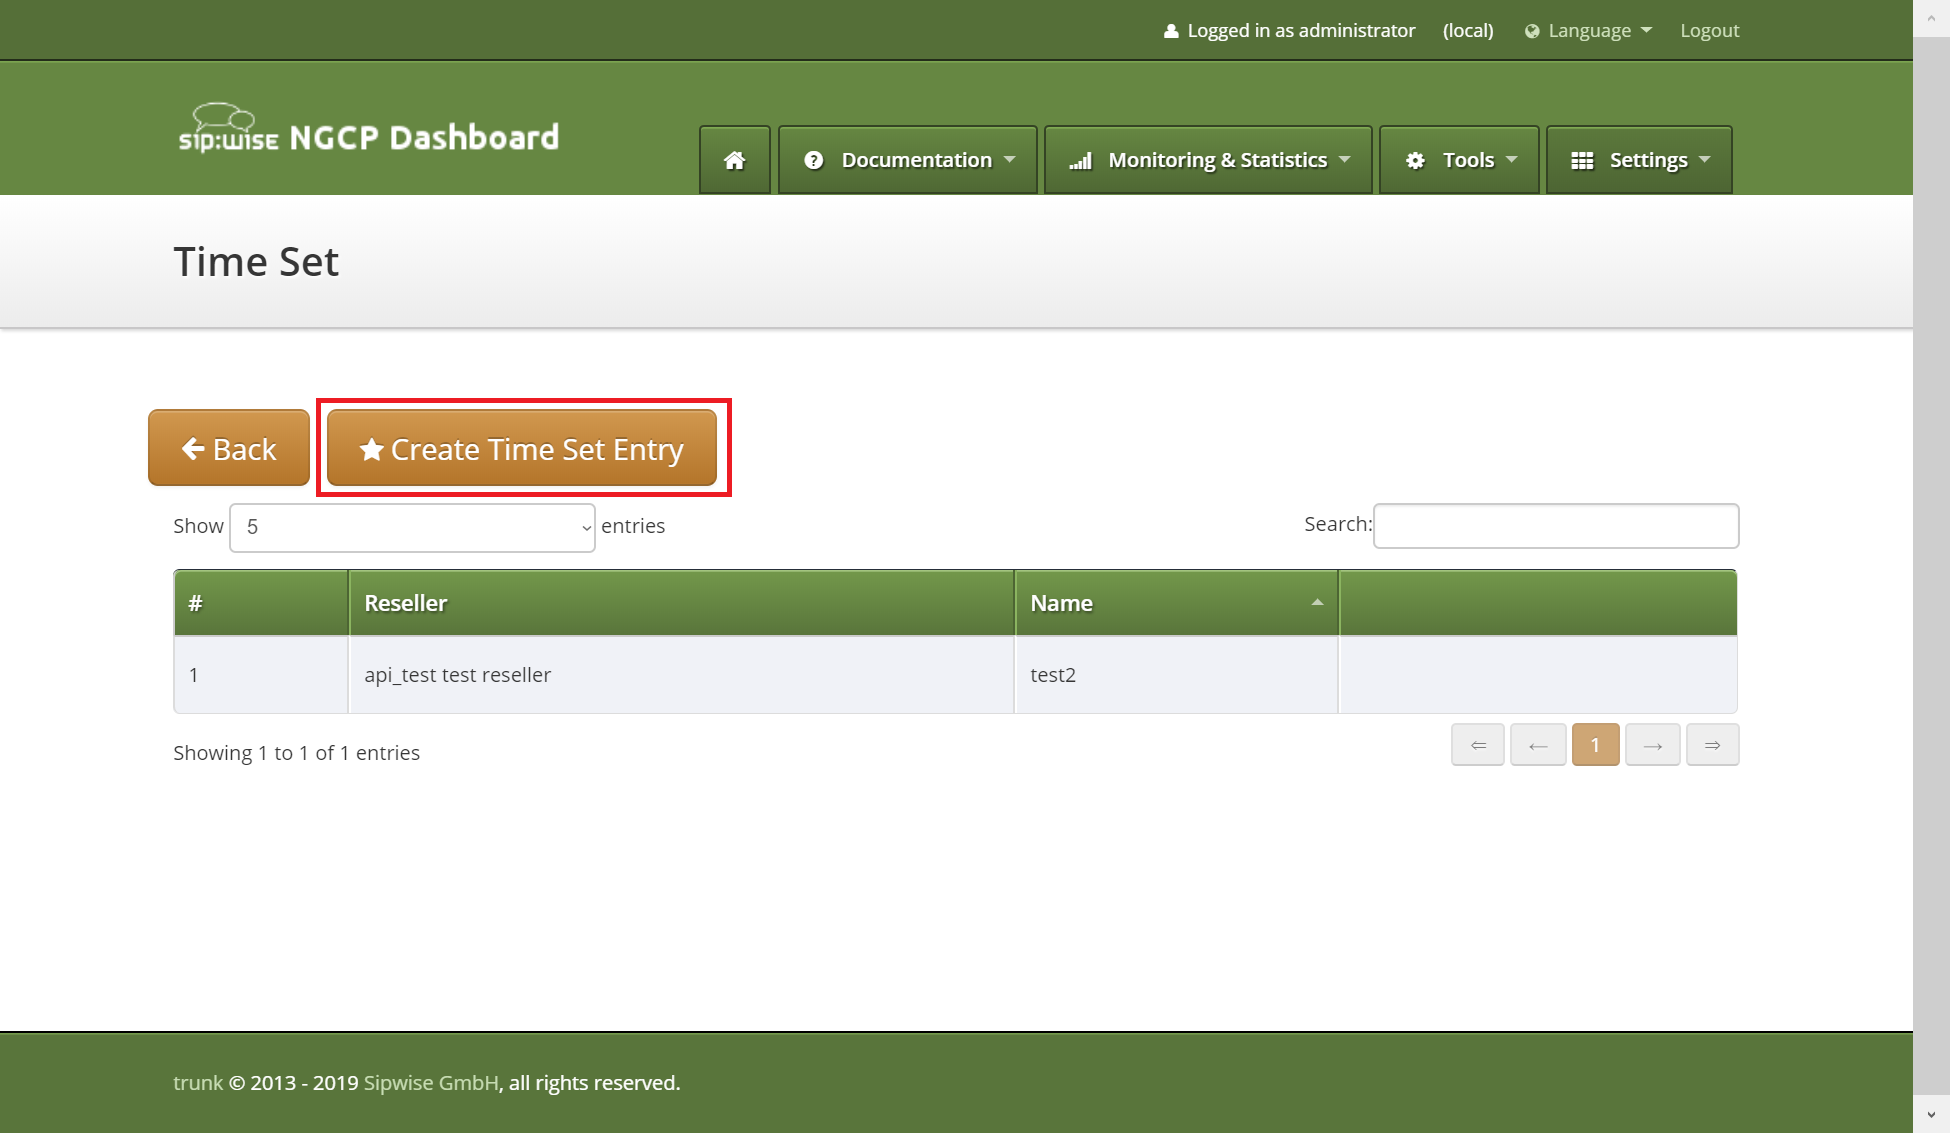
"Reseller" field is mandatory.
"Name" field should be defined, if iCalendar (ics) file is not going to be uploaded or file doesn’t have NAME property for the CALENDAR entry.
If both NAME in the uploaded iCalendar (ics) file and form field "Name" aren’t empty then value from the form field will be taken.
Created time set can be modified:

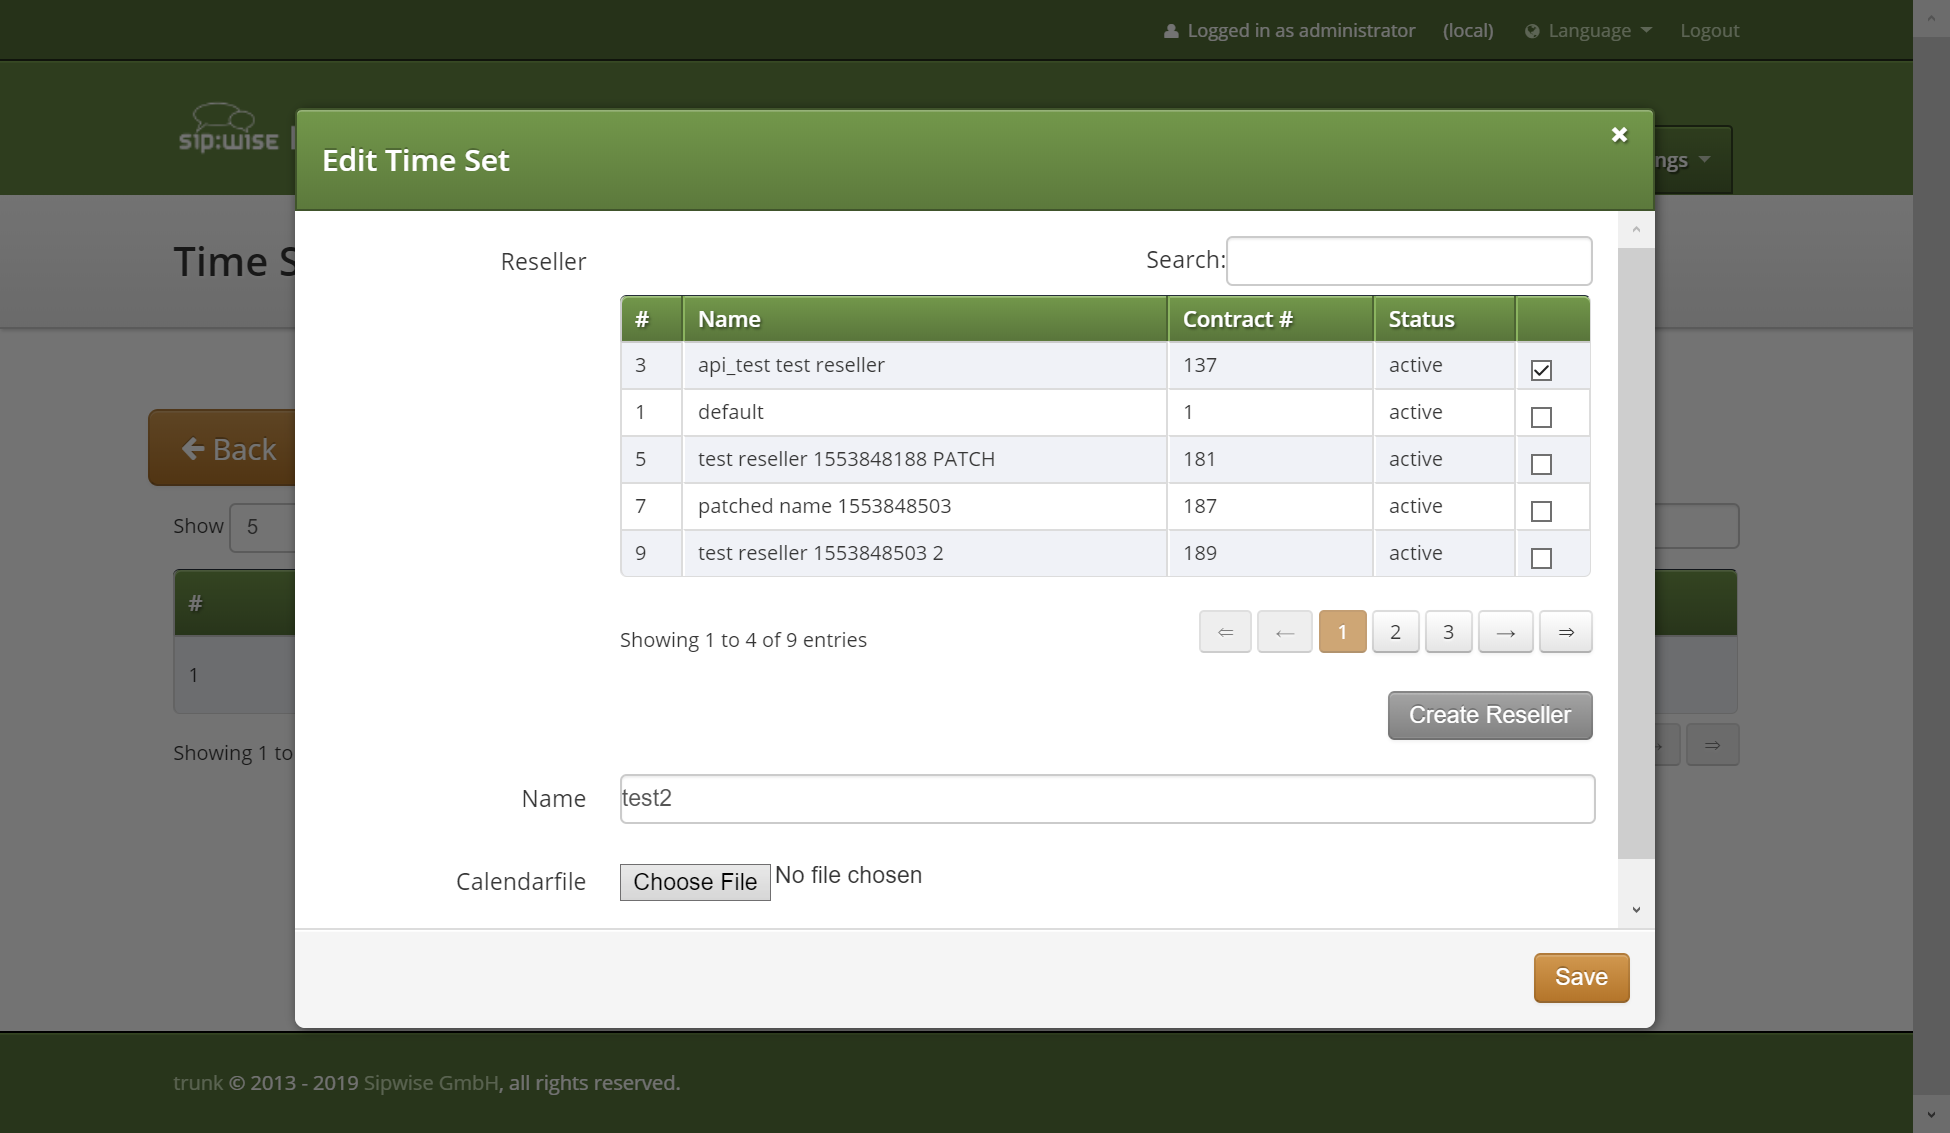
or deleted:
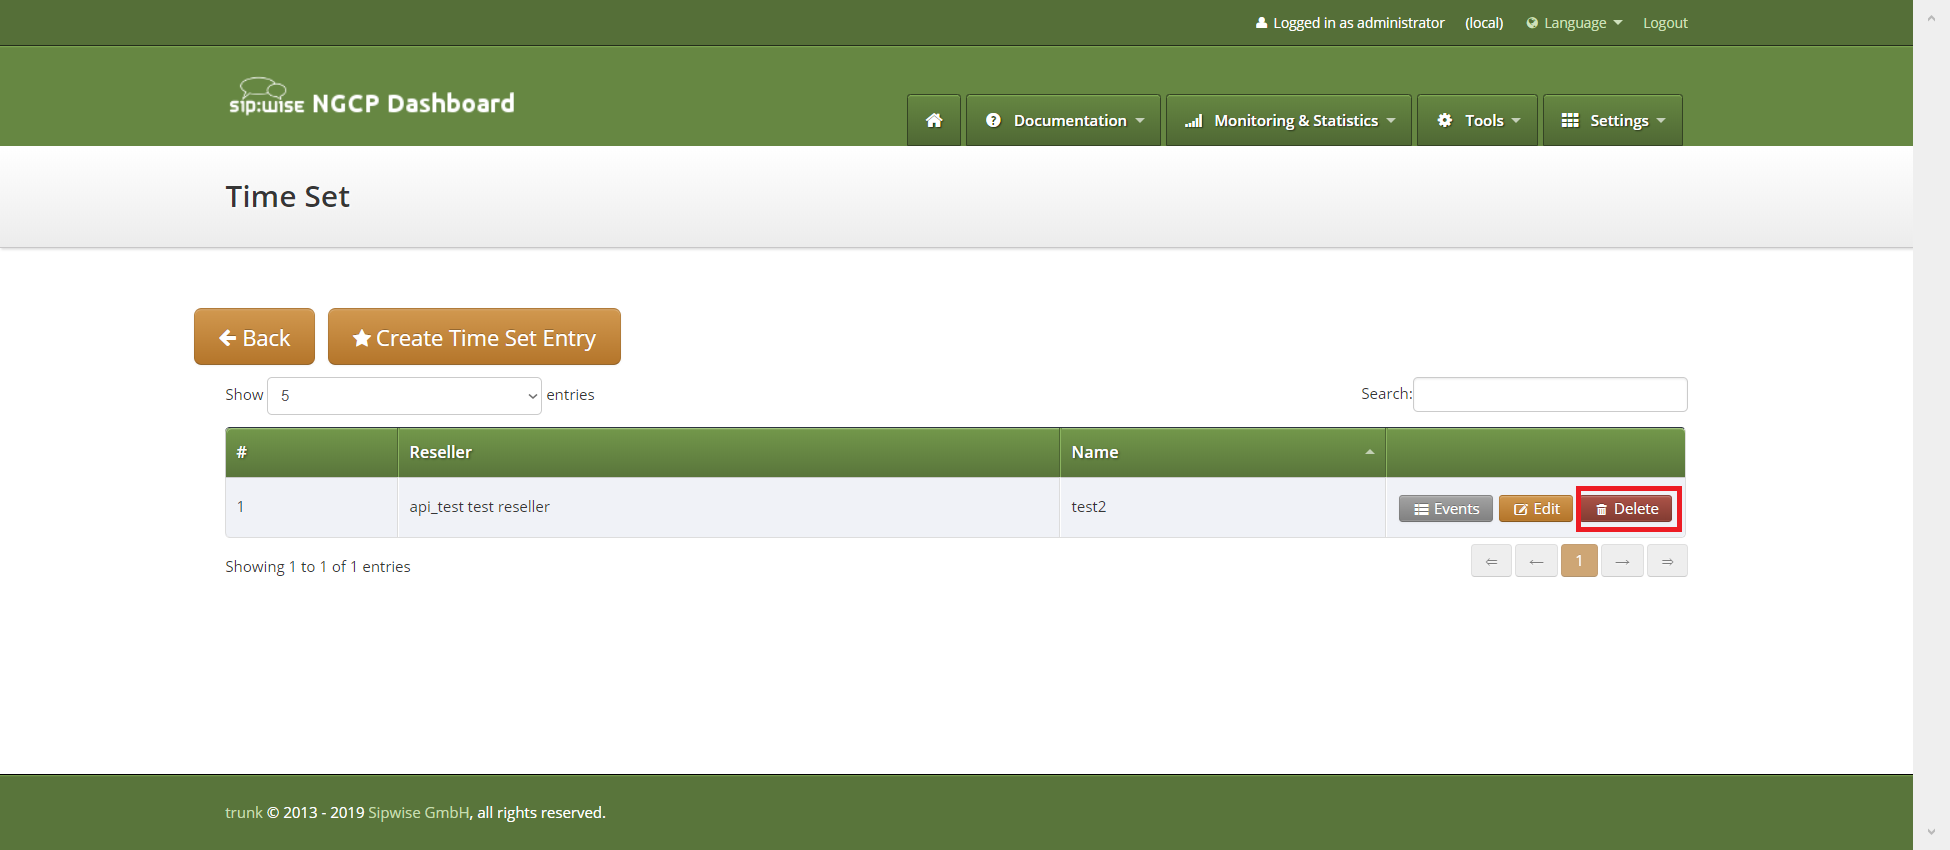
| If calendar ics file will be uploaded to edit time set, all presented events will be deleted and events from the uploaded file will be added after it. |
Web interface for the time set events
Time set can contain set of events. Each time set event will be used to generate CALENDAR EVENT entry in the generated iCalendar file. So all fields in the time set event forms represent properties of the iCalendar EVENT component.
To manage time set events press "Events" button against proper time set.
Events management section will appear:
To create event press "Create Event" button.
Form to create event will be shown:

Time set event form fields explanation
"Start" field reflects DTSTART property of the EVENT. "Start" is mandatory and by default is set to the start of the current day. "Start" value format is datetime.
"Stop" field reflects DTEND property of the EVENT. For the events within recurrence "Stop" will define duration of each iteration.
To specify "Stop" datetime, press button "Set".
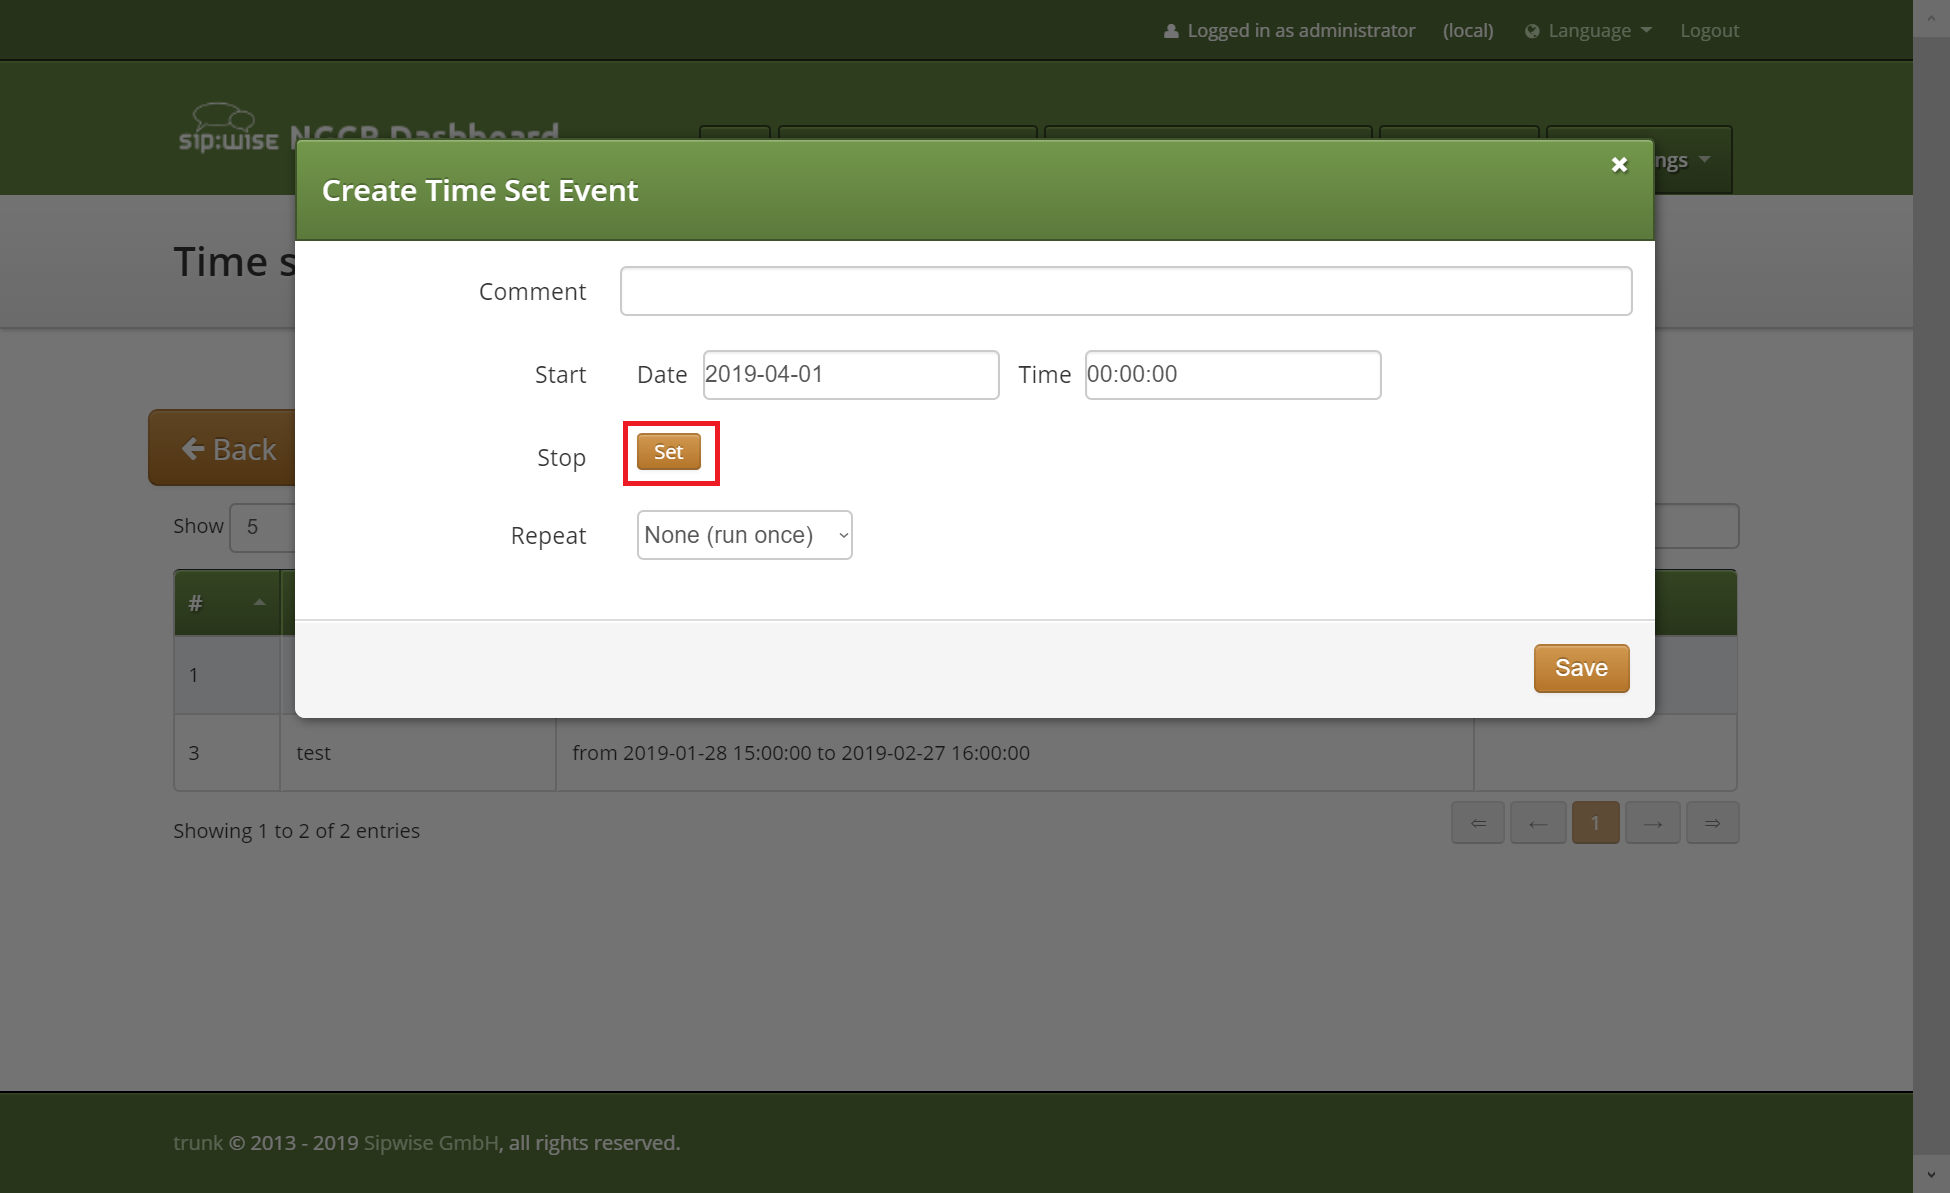
Fields to enter DTEND date and time will appear:

To return "Stop" field to the empty value press button "None". Value in the form fields will be preserved, but newly created EVENT will have empty DTEND property.
Other fields in the form are optional. Most of them aren’t visible by default and will be shown if requested by user or required by data into other fields.
RRULE property of the EVENT is a recurrence rule and defines set of the iterations for the EVENT.
To customize recurrence rule for the EVENT select proper repetition unit for the "Repeat" form field. Input field for the recurrence interval will appear left to the frequency select.
According to the selected unit, FREQ property of the EVENT RRULE will be set to one of the: SECONDLY, MINUTELY, HOURLY, DAYLY, WEEKLY, MONTHLY, YEARLY.

To specify end of the EVENT iterations, select "Series stop" value. For the "at date" option will be shown input for the date and time that will define UNTIL property of the EVENT RRULE.
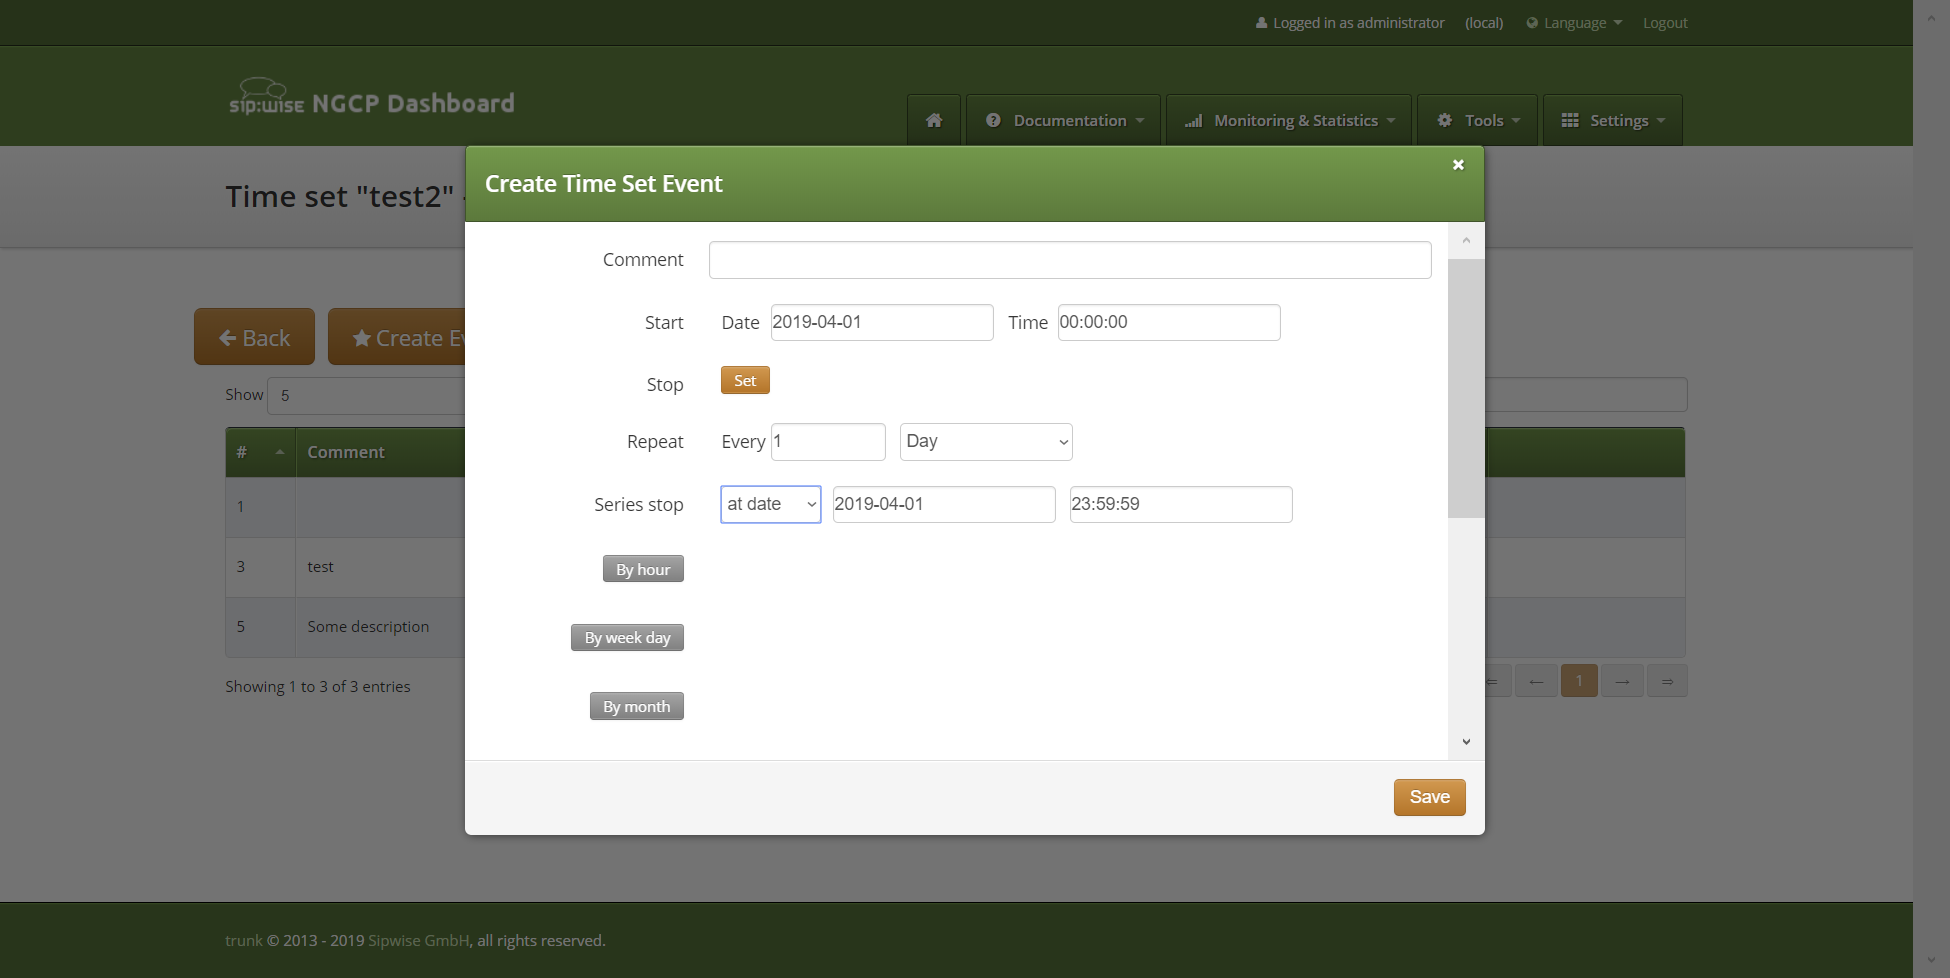
"after" option, respectively, will put entered value to the COUNT property of the EVENT RRULE.
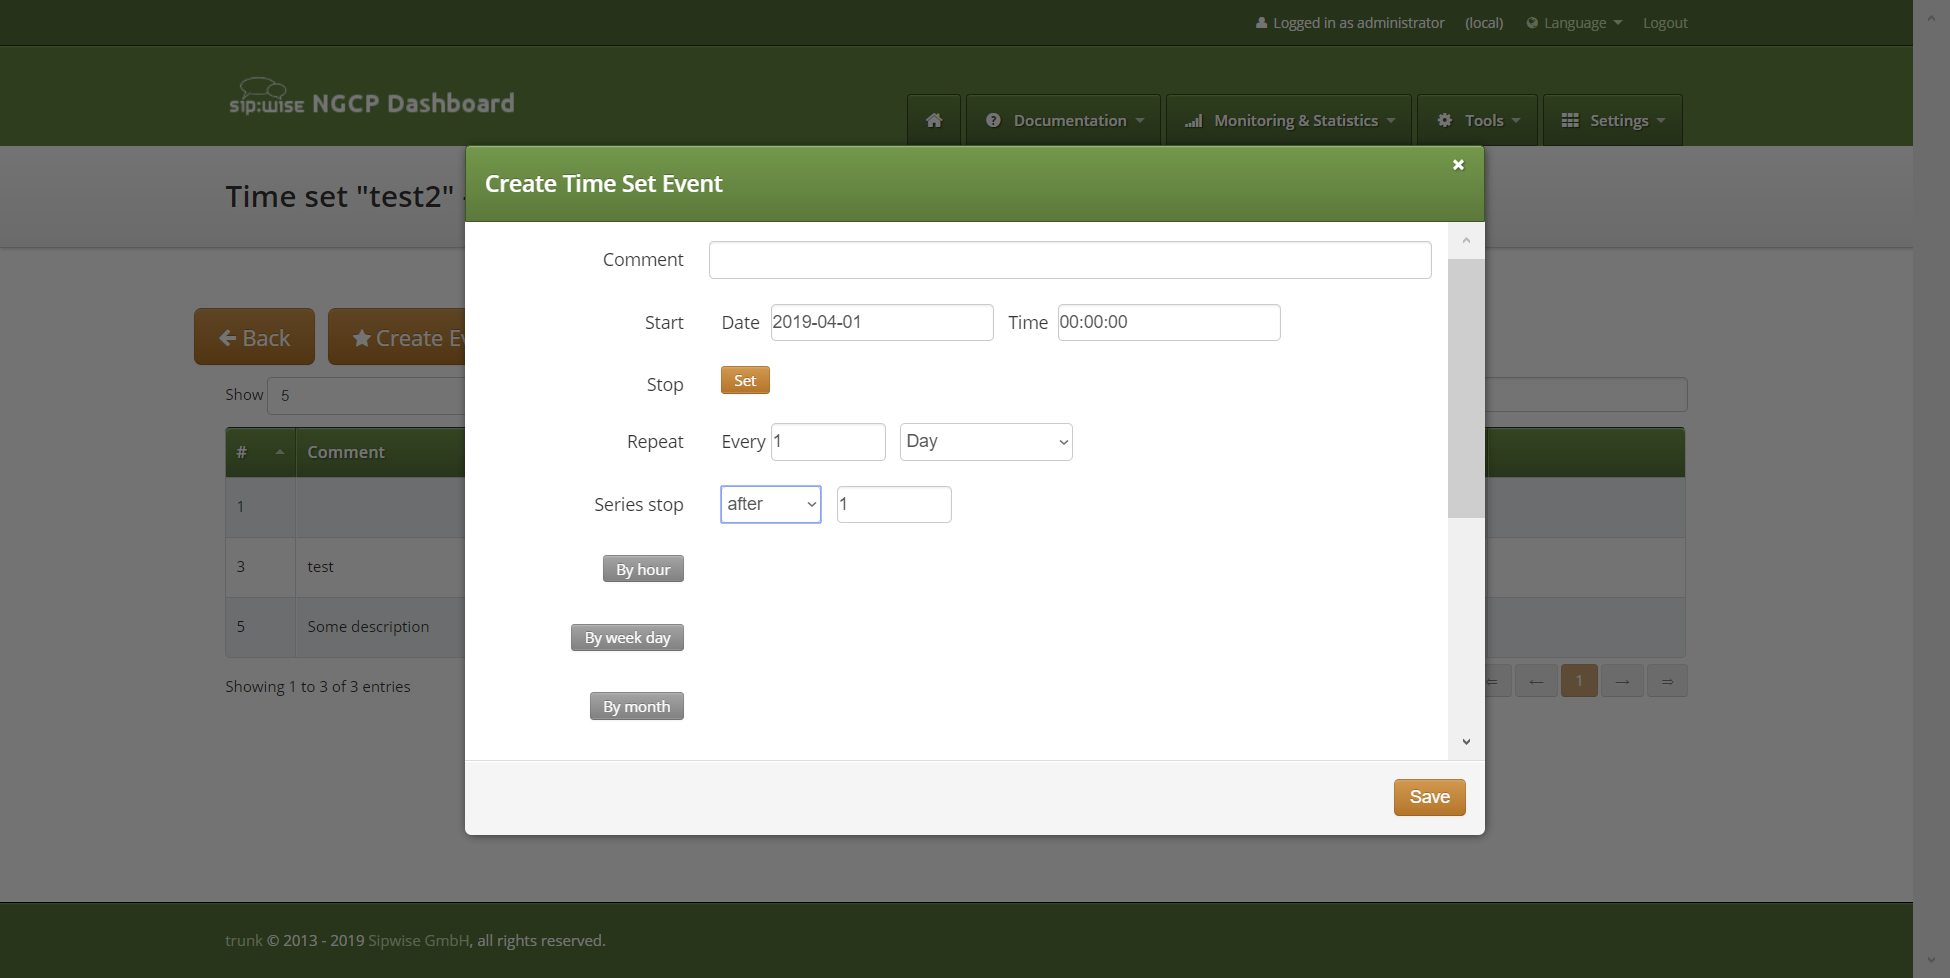
Form fields "By hour", "By week day", "By month", "By month day", "By set position", "By week number", "By year day", "By second" and "By minute" aren’t shown by default. To enter value to any of these fields press according button on the left. Button with field name is grayed off when corresponding EVENT property is empty.
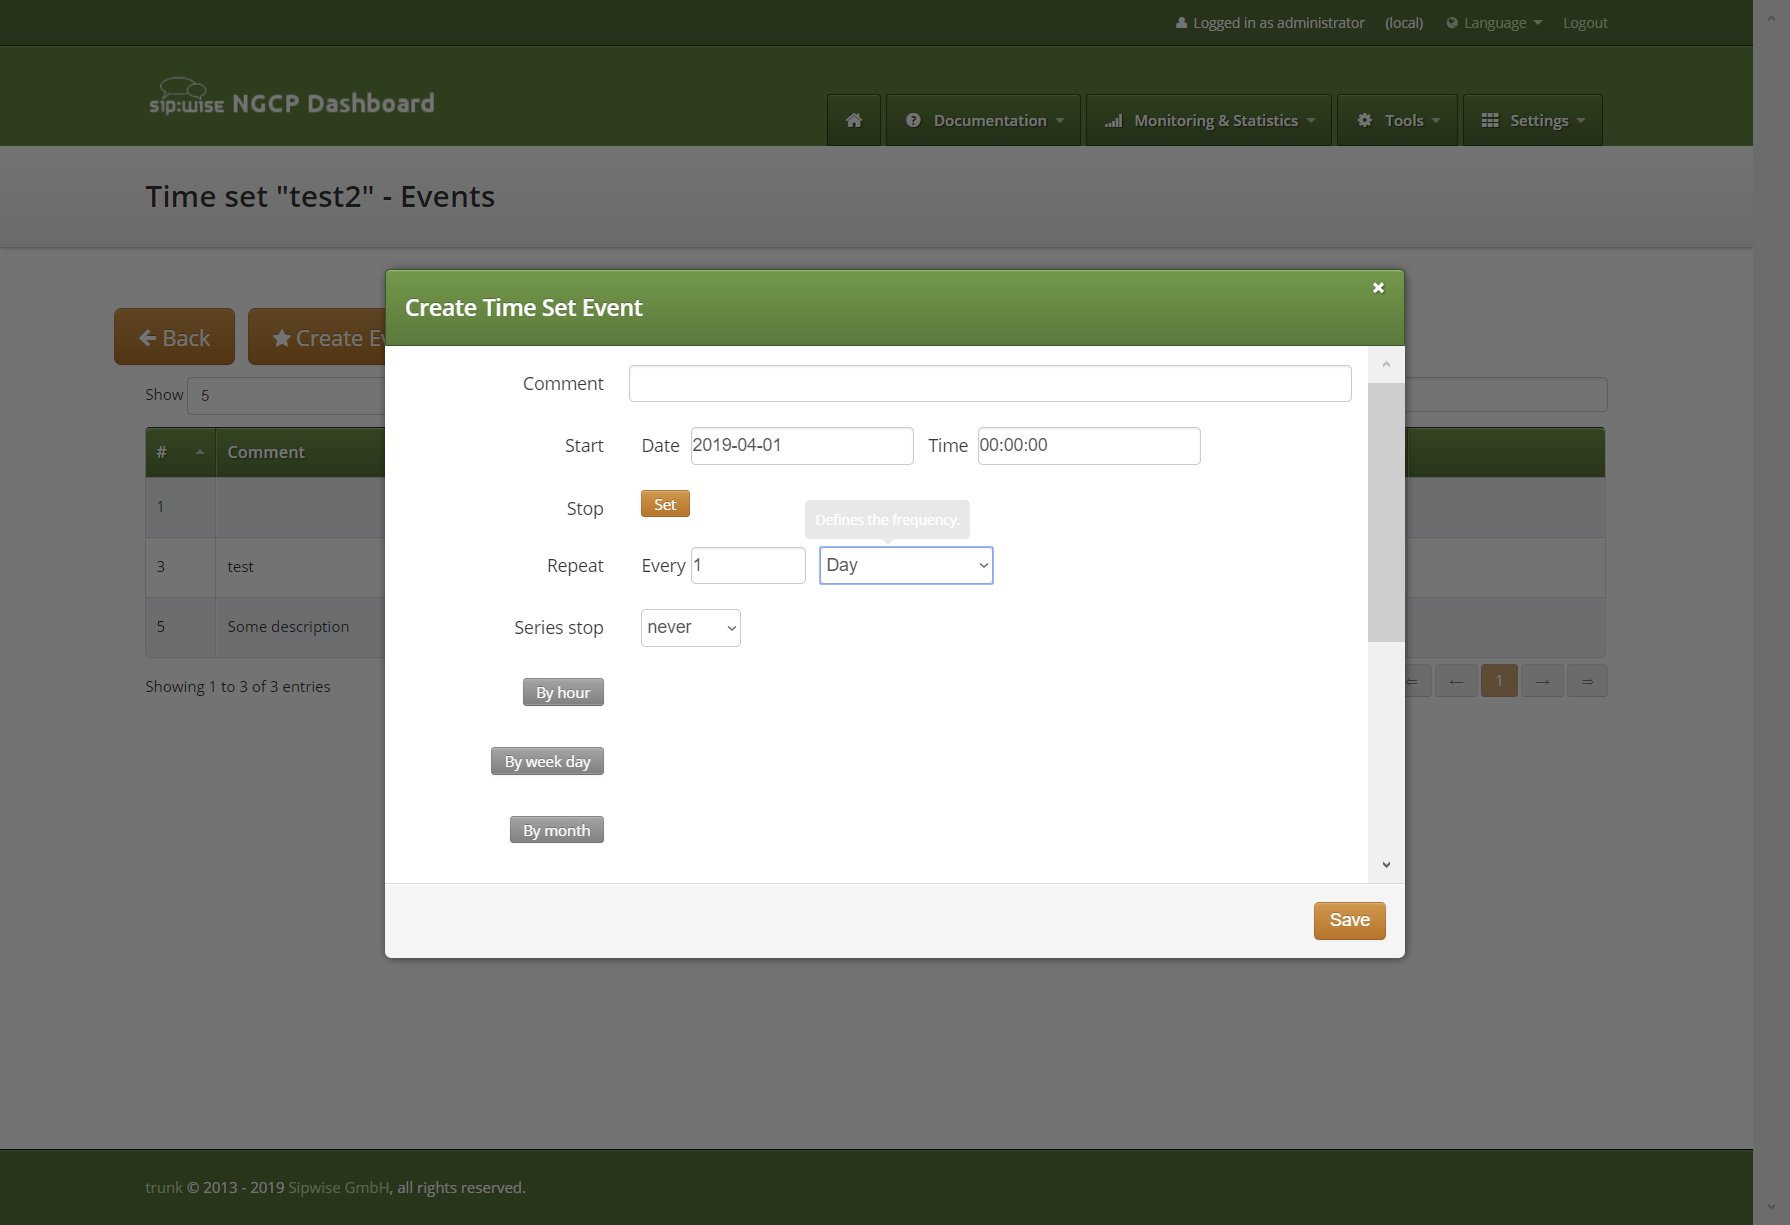
When gray button with field name is pressed, field input control appears on the right. In the same time button with field name becomes orange, indicating that field value will be saved for the EVENT.
Fields with checkboxes controls have auxiliary button "Invert selection". When button "Invert selection" is pressed currently empty checkboxes become selected and currently selected checkboxes become empty.
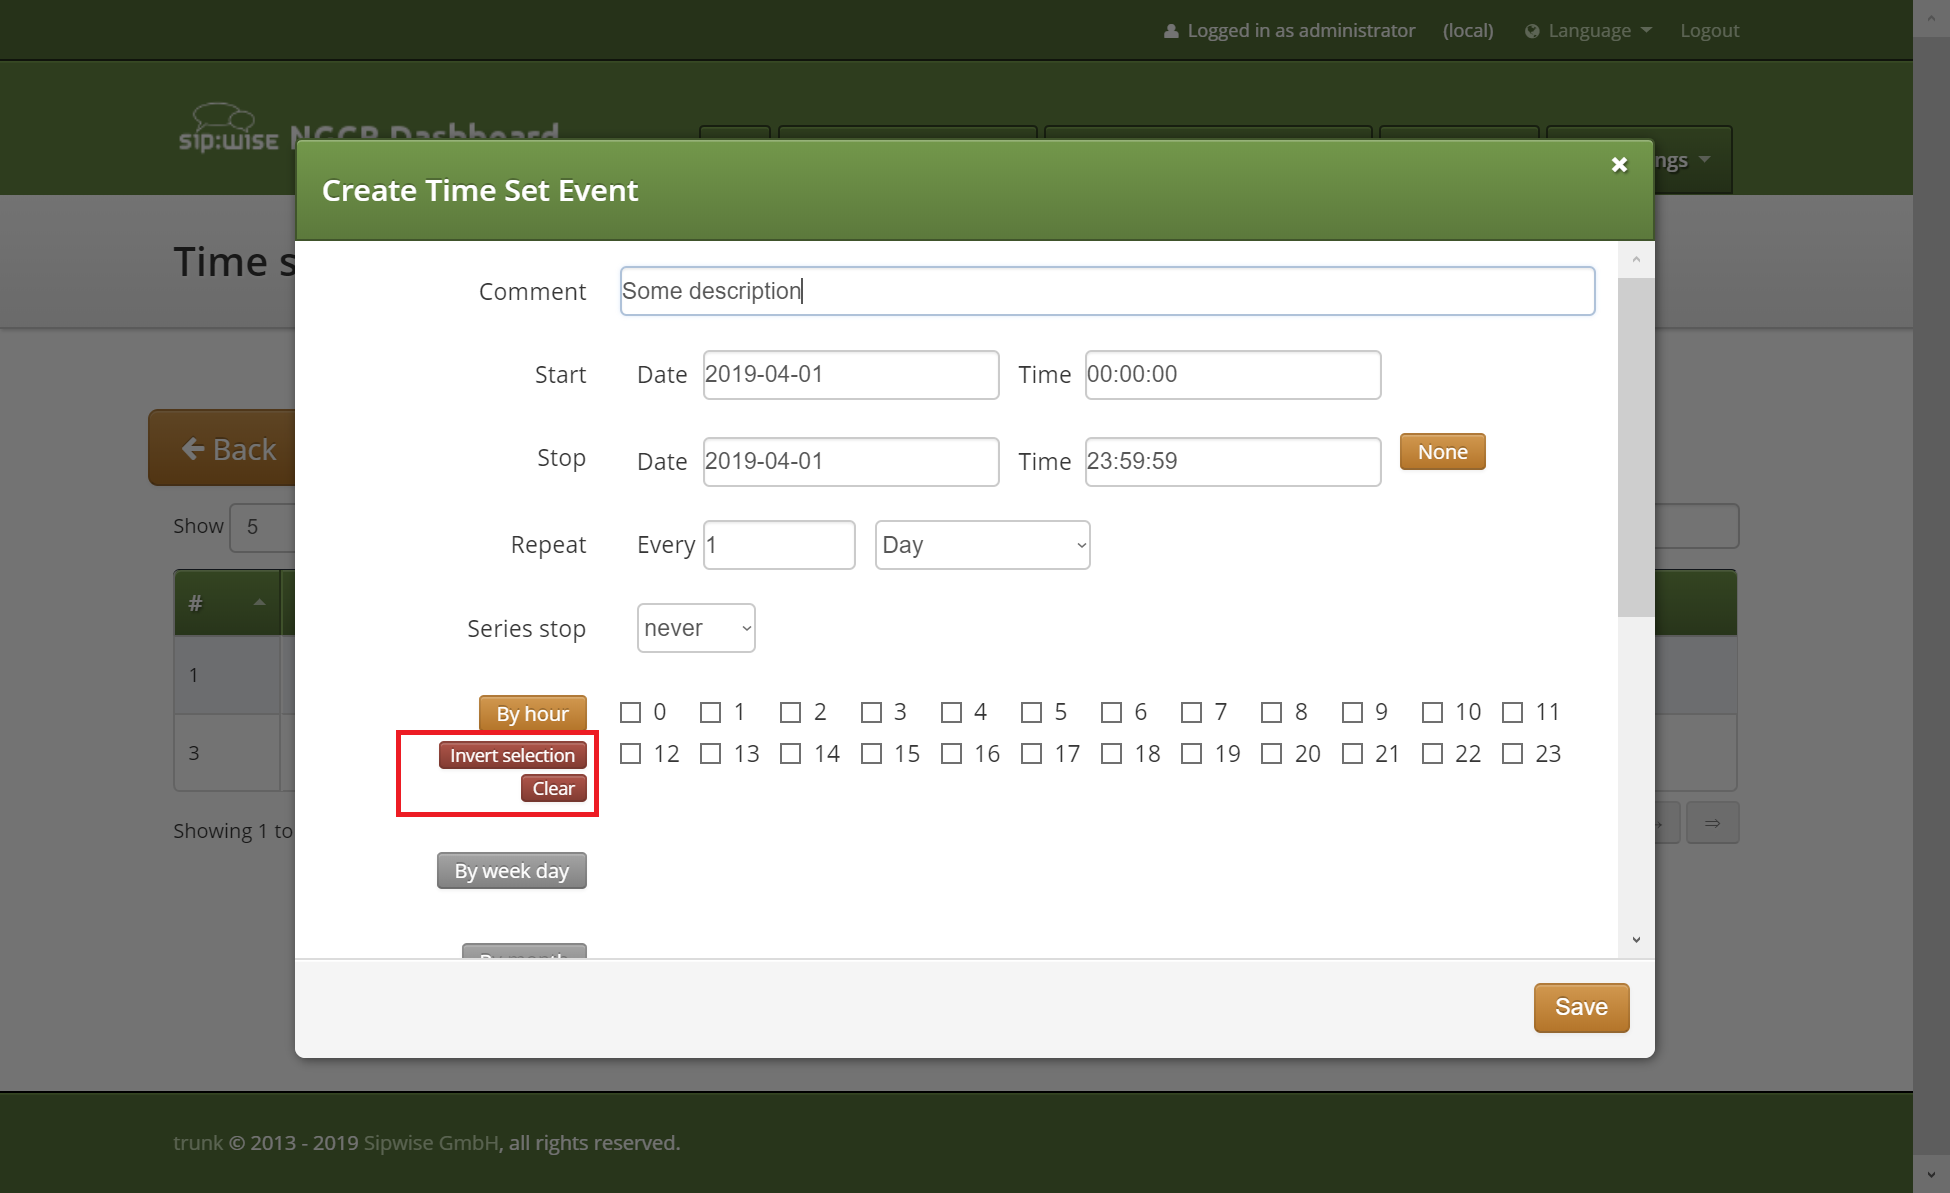
When form data will be saved, checkboxes values will be saved as coma separated numbers.
BYxxx RRULE properties expand or limit behavior of the FREQ according to the table in the RRULE specification.
Field "By week day" has two variants of the input: checkbox for each week day and text input. Text input can be used, if "By week day" value is more complex than list of week days, separated by coma, for example for FREQ MONTHLY value "2TH,-3FR" in the "By week day" will mean second Thursday from the month start and third Friday from the month end in every month. Such value can’t be presented as checkboxes selection.
Fields "By set position" and "By year day" are text inputs. Value format for these fields is set of the [+/-]NUMBER values, separated by comma.
For the "By year day" minus sign in front of year day number means that this day should be taken by number from the end of the year.
For the "By set position" minus sign in front of the position of the iteration means that the iteration should be taken by number from the end of the generated iterations sequence.
After new event created, event will appear in time set event list. It will have column with rrule text description, buttons to request event edit form or event deletion.
In events list section all events can be redefined uploading ics iCalendar file:
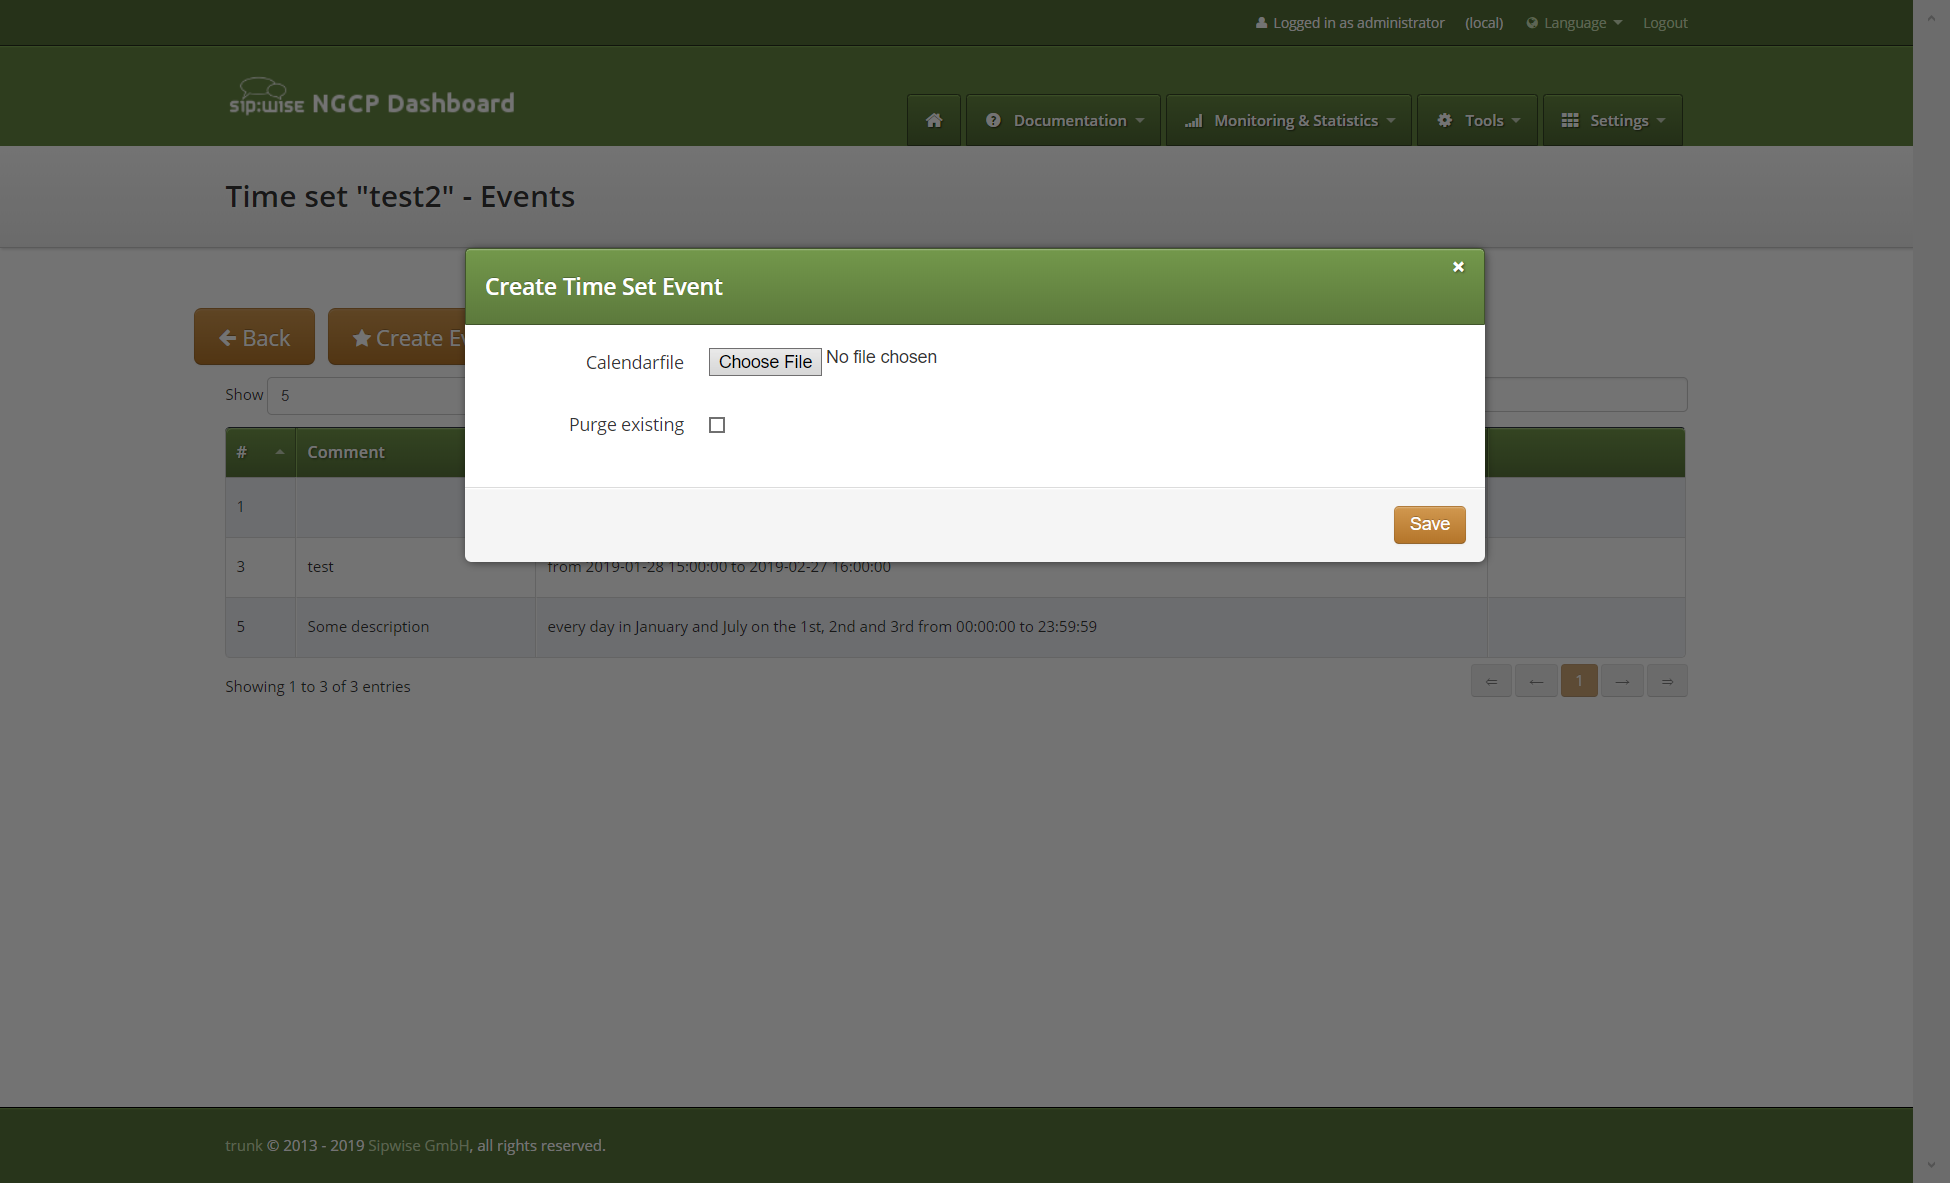
If "Purge existing" option is selected, all existing time set events will be removed before creation of the events from the uploaded file.
To download iCalendar ics file of the time set, press "Download iCalendar".
Web interface for time set related to reseller
Reseller details page provides list of the time sets connected to the reseller and allows create, edit, delete and download time set and has link to the time set events section:
In difference to the main time set interface, iCalendar ics file for the time set can be downloaded from the time set list pressing "Download" button.
Creation form doesn’t have "Reseller" field and is processed in context of the current reseller.
REST API
Time sets management is possible using API REST entry point /api/timesets/.
Time sets API has possibility to get and return information both as "application/json" data and as "text/calendar" file.
To create time set with events full specification of the all fields in json format can be used:
curl --request POST --user administrator:administrator --header 'Prefer: return=representation' --header 'Content-Type: application/json' 'https://127.0.0.1:1443/api/timesets/' --data '{"reseller_id":"3", "name":"api_test_timeset_name1","times":[{"start":"1971-01-01 00:00:01","until":"1997-01-01 23:59:59","end":"2020-12-31 23:59:59"}]}'
Also time set and events can be uploaded as ics iCalendar file:
curl --request POST --user administrator:administrator --header 'Prefer: return=representation' --header 'Content-Type: multipart/form-data' 'https://127.0.0.1:1443/api/timesets/' --form 'json={"reseller_id":3,"name":"unique_name"}' --form 'calendarfile=@/path/to/calendar.ics'
Output of the GET request to the time set item can be text/calendar:
curl --request GET --user administrator:administrator --header 'Accept: text/calendar' 'https://127.0.0.1:1443/api/timesets/12' \> /path/to/download/calendar.ics
or application/json:
curl --request GET --user administrator:administrator --header 'Accept: application/json' 'https://127.0.0.1:1443/api/timesets/12'
By default API will send response in text/calendar format.
Output will be generated iCalendar including time set events:
curl --request GET --user administrator:administrator 'https://127.0.0.1:1443/api/timesets/12'
BEGIN:VCALENDAR
PRODID:-//Mozilla.org/NONSGML Mozilla Calendar V1.1//EN
NAME:api_test_timeset_name2
VERSION:2.0

BEGIN:VEVENT
UID:sipwise19@sipwise15
SUMMARY:unique_name event 19
DTSTART:19710101T000001
DTEND:20201231T235959
END:VEVENT
END:VCALENDAR+
Subscriber Location Mappings
Overview
Subscriber Location Mappings enables a possibility for incoming calls on a subscriber to be also routed and handled on additional "locations".
A location can represent:
-
A SIP-URI of an NGCP subscriber, which may have one or more endpoints registered to it.
-
Remote peering destinations.
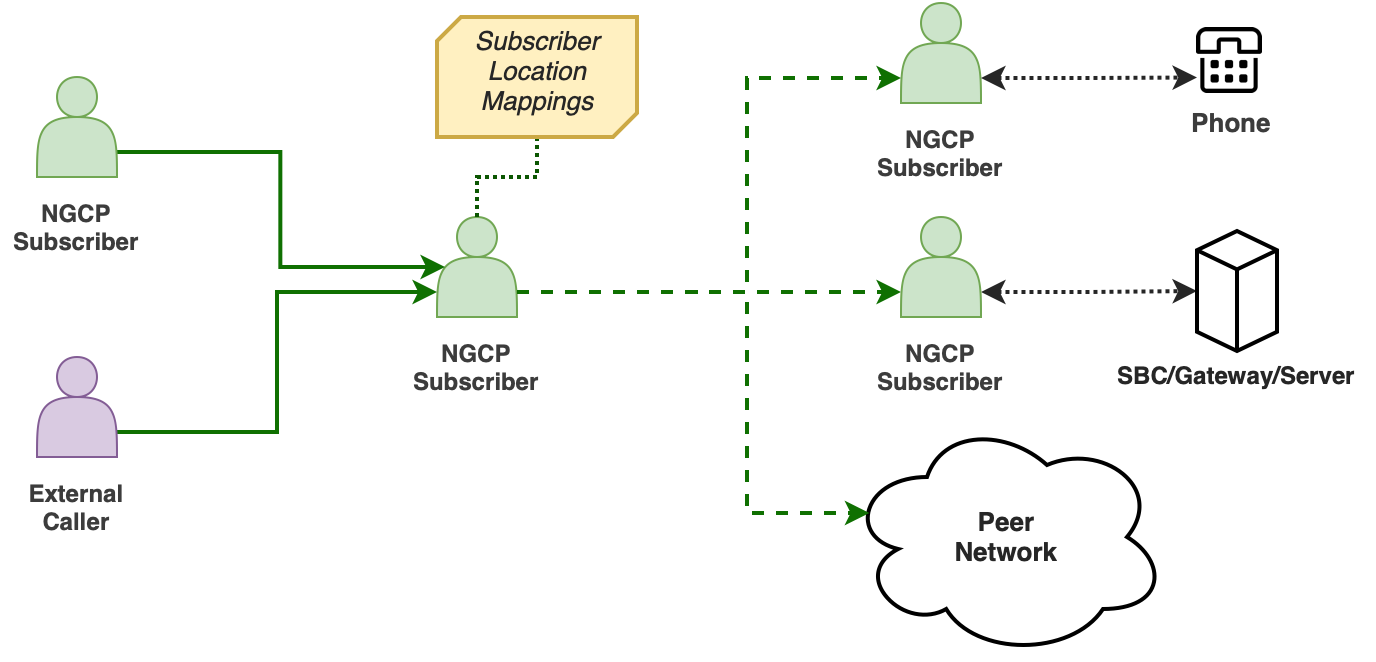
The feature can be set within subscriber preferences, via Admin Panel or REST API.
Its main advantages are as follows:
(a) Definition of Several Call Branches.
By the definition of one ore more location entries on a subscriber, it is possible to generate separate call branches for each destination when an incoming call is received on that subscriber.
(b) Set Triggering Conditions and Mode for Each Call Branch.
In order to trigger a call branch, conditions can be defined for both caller and callee numbers via regular expressions, as well as the definition of the call branch behavior to be applied.
(c) Number Manipulations.
Number manipulations can be applied on the username part of the
Request-URI (RURI) or the To field in a SIP INVITE message.
Example Scenarios
There may be different scenarios in which the feature can be considered. Some examples, as follows:
| Scenario | Description |
|---|---|
NGCP Subscriber |
|
External Gateway |
|
Remote Peer |
|
The following sections will provide more details about the feature.
Fields
Location mappings fields are summarized in the following table.
| Field | Description | ||||||||
|---|---|---|---|---|---|---|---|---|---|
Location SIP-URI |
This field has two possible value options:
|
||||||||
Caller Pattern |
A regular expression pattern to match the |
||||||||
Callee Pattern |
A regular expression pattern to match the |
||||||||
Mode |
Defines the behavior of the matched entry during the call termination:
“Mode” field is mandatory. |
||||||||
RURI/To Username |
Replaces the username part of the |
||||||||
External ID |
An arbitrary string name (e.g. an identifier of a 3rd party provisioning/billing system). This is an optional attribute, which can be kept as empty. |
||||||||
Enabled |
Enable/Disable the entry. |
About The ‘Forward’ Mode
The location mappings “Forward” mode works differently when compared to the others:
-
This mode does not require the Location SIP-URI field, since it applies outbound peering logic to select the correct peer and automatically calculates the final destination.
-
It creates a new parallel branch meant for peers only and it will behave like a Call Forward Unconditional (CFU). (NOTE: If you need to generate an internal call to local subscribers, use the
Addmode instead.) -
The remote peer will receive the original caller as the source of the call (NOTE: User Provided Redirecting Number is intentionally disabled for this particular mode). Also, two different Call Detail Records (CDR) will be created: the first one from ‘A’ to ‘B’ (in which the CDR
call_typefield equals to 'call'), and the second one from the original callee subscriber to the peer (withcall_type= 'cfu'). -
To prevent the call to be looped back, the new parallel branch is terminated if the inbound peer belongs to the same peer group of the outbound peer. However, it is possible to disable this check by activating the
allow_lm_forward_looppeer preference (“Internals” section) of the outgoing peer.
Provisioning via Admin Panel
Subscriber Location Mappings can be accessed at Subscriber Preferences → Location Mappings section. The interface will offer the option to create a new entry, or edit any of the existing ones.

For creation, press on the “Create” button, which will pop-up a new window.
As shown in the example below, data can be entered and saved to create the new entry.
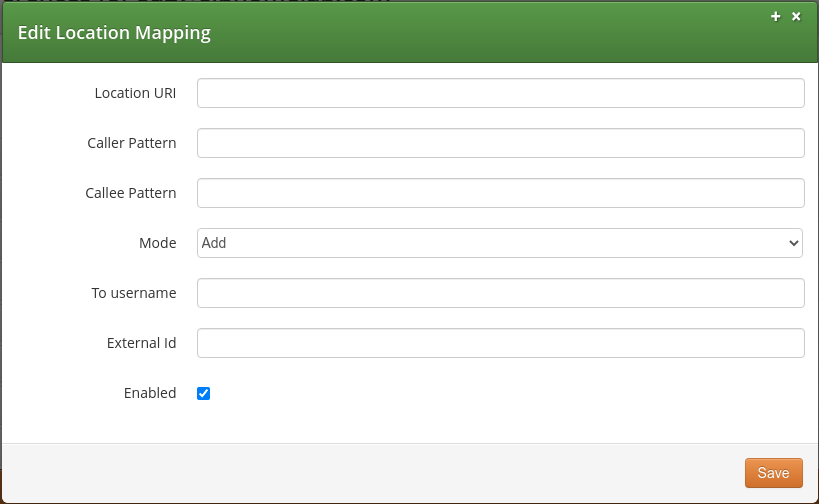
Parameters are the ones described on the "Fields" section.
Practical Example
Let us assume that an administrator will use Admin Panel to provision some location mappings on a selected subscriber. The following Subscriber Details are considered:
Field |
Value |
|
sip:su1@siphomelab.com |
|
4312521523 |
|
4312521523001 4312521523002 |
Then, on Subscriber Preferences, within the Location Mappings section, the following entries are defined:
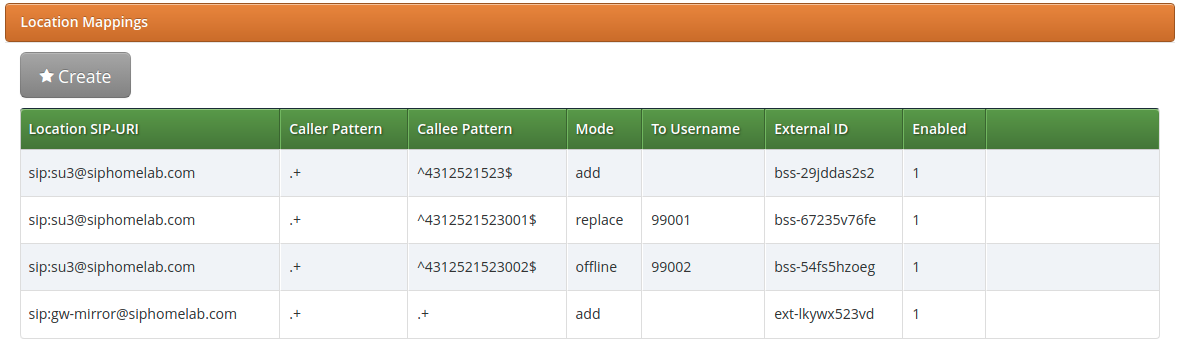
In the provided example, the logic is as following:
| Logic | Result |
|---|---|
|
|
|
|
|
|
|
|
STIR/SHAKEN
Overview
What does STIR/SHAKEN stand for?
STIR - Secure Telephony Identity Revisited (RFC8224, RFC8225 and RFC8226)
SHAKEN - Secure Handling of Asserted Information using tokens (RFC8588)
This technology gives an opportunity to make sure that the calling side (caller’s number) is not spoofed, hence can help during the common work/inter-cooperation between ITSPs, in terms of call spoofing detection. Therefore when it is massively used by ITSPs, it decreases the amount of robo-calls.
| ITSP - Internet Telephony Service Provider. Is a general abbreviation for VoIP service providers, which can use IP-based technologies/protocols such as SIP protocol or H.323 stack of protocols to provide telephony services. |
The Sipwise C5 is currently compliant with the list of general RFC standards:
-
RFC8224 - Authenticated Identity Management in the Session Initiation Protocol (SIP) (this RFC obsoletes RFC 4474) ;
-
RFC8588 - Personal Assertion Token (PaSSporT) Extension for signature-based handling of Asserted information using toKENs (SHAKEN) ;
Why do you need STIR/SHAKEN?
The fact of the matter is that as the VoIP world is growing and extending proposed technologies, new security mechanisms come into play, which can give you a good protection level on different layers of VoIP. STIR/SHAKEN is one of them and it works as a superstructure over the VoIP system. It can be considered as the Application layer of TCP/IP stack (in common with SIP).
This standard has been developed by IETF, in order to propose a new way to detect spoofed calls and to help ITSPs to protect their customers. Hence decrease the amount of fraud events/bot calls. The strong side of this technology is that it not only works within the scope of your VoIP system, but it is also dependent on other intermediary/termination ITSPs. Therefore it can bring a good quality improvement for a protection from undesired calls (bot-calling).
| The SIP header declared for this purpose is called literally “Identity:” . |
| The “Identity-Info:” header is deprecated by RFC 8224 and now is stored as the ";info=" parameter within the "Identity:" header. |
The work of this mechanism
First of all, it’s worth to mention that essentially, all logical parts of STIR/SHAKEN fall into these sub-categories:
-
Originating service provider - a system which performs an authentication (IP based, digest over MD5 etc.) of the calling party (SIP). It has to support all the needed RFC regulations to add/manipulate the Identity header. This entity does all the work to prepare the "Identity" header before sending a call out ;
-
Terminating service provider - a remote VoIP system (call termination ITSP), which verifies if the call is compliant with the STIR/SHAKEN technology, then verifies it before to accept and send to the edge subscriber. As well as with the Originating service provider, it has to support all the needed functionality to manipulate the Identity header. This entity does all the work on the Identity header of the received request, such as: decryption of the JWT token stored inside the "Identity" header and an attestation level verification ;
-
Authentication service - is a superstructure/standalone authority used by the originating ITSP to obtain certificates/keys needed to encrypt the "Identity" header’s value (JWT token). It is only used for work with certificates and keys ;
-
Verification service - is a superstructure/standalone authority used by a terminating ITSP to obtain certificates/keys needed to decrypt the "Identity" header’s value (JWT token). The same as with the Authentication service, it’s only used for work with certificates and keys ;
The Sipwise C5 system role will be:
-
Originating service provider - when Sipwise C5 sends a call out to PSTN networks
-
Terminating service provider - when Sipwise C5 is a recipient of the call coming from PSTN networks
| This technology assumes that there is some centralized authority or a list of them, which will be used both by the originating and the terminating service providers. |
How does this mechanism work? First glance on that
-
Firstly a SIP call is originated and obtained by certain ITSP (let’s call it ITSP A) ;
-
ITSP A verifies the call source and its number, in order to define how to confirm validity (full, partial or gateway attestation) ;
-
ITSP A creates a SIP Identity header that contains the information on the calling number, called number, attestation level and call origination, along with the certificate (important). All information in the Identity header gets encrypted into the JWT token, with the following list of parameters ;
-
The call (INVITE request) is sent out with the SIP Identity header (which has a reference to the certificate) to certain destination ITSP (let’s call it ITSP B) ;
-
ITSP B verifies the identity of the header and the certificate itself ;
-
ITSP B makes sure the attestation level is complaint with local security standards (A, B or C) ;
-
ITSP B sends a call to the edge subscriber (with possibly added parameters to the PAI header - verstat) ;
To sum up, essentially this technology gives a way for the destination user/service provider to verify that the original caller (calling side) is the one that it pretends to be.
Possible attestation levels:
-
Full attestation ( A ) - SP authenticates the calling party and confirms it is authorized to use this particular number. An example - SIP registration (we say that originating ITSP recognizes the entire phone number as being registered with the originating subscriber) ;
-
Partial attestation ( B ) - SP verifies the call origin, but cannot fully confirm that the source of the call is authorized to use this number. An instance - a calling party (number) from behind a remote PBX (you give a block of numbers to the customer and trust this customer entirely, but you cannot verify directly individuals that use those numbers) ;
-
Gateway attestation ( C ) - SP authenticates the call’s origin, but there is no way to verify the source. An instance - a call received from an international gateway (you have a legal interconnection, but you don’t know who is sitting behind and using source numbers, which you let to pass through your network) ;
| In most case scenarios, the attestation level which will appear in calls involving Sipwise C5 - will be “A”. Unless you don’t use a subscriber preference "trusted source" or/and a domain preference "unauth_inbound_calls". |
Identity header constitution
-
a JSON Web token - JWT, that in addition consists of the following parts (divided by the dot symbol '.'):
-
header - stores: an encryption algorithm, used extension (usually 'shaken'), token type (usually 'passport'), location of the cert used to sign the token
-
payload - stores: an attestation level, calling/called number, a timestamp when token was created (epoch), an origination identifier (most likely UUID)
-
signature - some encoded string (binary data) in Base64 URL
-
-
three parameters (at least for now only three of them are supported):
-
';info=' - is a substitution of the deprecated Identity-Info header (will usually have a reference to a public key, which will be used to decrypt then a signature encrypted previously with a private key)
-
';alg=' - specifies the use of a cryptographic algorithm for the signature part of the JWS (for e.g. 'ES256')
-
';ppt=' - can extend the payload of PASSporT with additional JWT claims (requires that a relying party supports a particular extended claim, for e.g. 'shaken')
-
| Signature - is some encoded string (binary data) in Base64 URL, where its syntax is: Base64URL( ES256 (Base64URL(JWT header).Base64URL(JWT payload)) ) Firstly the Base64 URL is built, then also the signature with the private key is built, and a URL to the public key certificate corresponding to that key is added (as a value in the “;info=“ parameter). |
| The Receiving party will have to download the certificate and perform a signature verification. In case the check passes, it will trust the value stored in the attestation level parameter. And of course the value of caller/callee ( “orig“ / “dest”) has to match the actual data (in SIP headers) to be sure it’s not an attack and is not a call which reuses a value from another INVITE not related to the current one. |
Implementation of STIR/SHAKEN in Sipwise C5
Currently the Sipwise C5 is using the Kamailio project’s Secsipid.so module to provide all, or almost all required STIR/SHAKEN related features.
| The secsipid module relies on libsecsipid from the Secsipidx project. Link to the SecSIPIDx project at Github: https://github.com/asipto/secsipidx |
Secsipid - is a first implementation of STIR/SHAKEN IETF extensions (RFC8224, RFC8588) for asserting caller identity in Kamailio. The module is being developed further, and is reliable enough to be included in the Sipwise C5.
The configuration of the STIR/SHAKEN is done with /etc/ngcp-config/config.yml (at least in the current implementation of Sipwise C5), with the section: kamailio.proxy.stir . To see how it’s being configured, please take a look at appendices-main:appendices-main.adoc#config_yml_kamailio (Appendix "Configuration Overview" → "config.yml Overview").
Domain preferences:
-
'stir_pub_url' - Public key HTTP URL
-
'stir_pub_url' - Enable STIR Identity validation
A quick start with STIR/SHAKEN:
-
Make sure which authorities you would like to get in contact with, in order to grab the needed certificates/keys ;
-
Your certificates should be prepared for work with a needed domain (your SIP domain), then you upload the given private key(s) to your Sipwise C5 system ;
-
Basically a general parameter (in the config.yml) you need to take care of is 'domains', and of course the given keys to it. The rest can be left untouched, unless you have some preferences for your domain(s) ;
-
Don’t forget to define the related domain preferences (via the web panel) 'stir_pub_url' and 'stir_check' to enable SHAKEN for your domain(s);
-
After you’re done with the configuration part, you need to apply changes with: ngcpcfg apply "added stir-shaken support" ;
| Applying the changes will imply a restart of the Proxy service, therefore it’s strongly recommended to apply the changes outside of business hours. |
| Remember that the kamailio user needs read permissions on the private-key files, otherwise it will not be able to consume them. |
| The CA authority which provides you the needed certificates, should be something well known and widely used by other operators in your area. |
| Keep in mind that you can have multiple domains and hence keys for them stored in the Sipwise C5. This depends on the amount of SIP domains you actually have, which use STIR/SHAKEN. |
| The fact that you enabled support for STIR/SHAKEN on your platform, does not mean all of the present domains will have to use it. Checks/manipulations will be only enabled for those domains that are defined in kamailio.proxy.stir.domains of /etc/ngcp-config/config.yml |
Outbound calls and STIR/SHAKEN
For now the Sipwise C5 supports 'A' and 'B' attestation levels when sending outbound calls:
-
'A' - corresponds to a normally registered subscriber at the Sipwise C5 platform ;
-
'B' - will be set in case the subscriber uses the preference "trusted source" and/or is affected by the domain preference "unauth_inbound_calls" ;
Inbound calls and STIR/SHAKEN
As soon as you enable STIR/SHAKEN for a certain domain served by the Sipwise C5 system, calls coming to this domain will be challenged according to RFC standards dedicated to processing of the Identity header.
For now the Sipwise C5 supports the following list of 4XX response codes:
-
428 - indicates an absence of the Identity header or wrong extension added into the ';ppt=' parameter ;
-
436 - indicates an inability to acquire the credentials needed by the verification service for validating the signature in an Identity header field ;
-
438 - indicates that no Identity header field with a valid and supported PASSporT object has been received ;
Normally, in case of the incoming call to a SIP domain with enabled STIR/SHAKEN, the "Identity" header’s content will be decrypted, verified and the call will be sent further according to the logic of the Sipwise C5 system setup.
Fileshare
Overview
Fileshare is a REST API endpoint, /api/fileshare, that provides NGCP users with a way to share data among other NGCP users or external users.
This feature is primarily used by the NGCP SIP::App and comes as a replacement for the ComX based fileshare component which is no longer supported by NGCP.
This feature can be provided to clients directly or integrated into own applicaton services.
Example Scenarios

Configuration
Fileshare is disabled by default and requires basic configuration in the config.yml
config.yml

fileshare:
  enable: no
  limits:
    quota: 10737418240
    upload_size: 10485760
    user_files: 10
    user_quota: 20971520
  public_links: no
ttl: 86400-
fileshare.enable: disabled by default, when enabled, rest_api.enable is required to be on as /api/fileshare uses API v2.
-
fileshare.limits.quota: allowed database quota threshold in bytes, when the table size reaches the quota threshold all subsequent file uploads are denied.
-
fileshare.limits.upload_size: single file upload size in bytes.
-
fileshare.limits.user_files: amount of uploaded files per user (subscriber).
-
fileshare.limits.user_quota: per subscriber uploaded files quota in bytes, calculated by the exact size of all uploaded files per user (subscriber)
-
fileshare.public_links: defines whether uploaded files can be downloaded by anybody without authentication (the exact URL must be provided to the end user).
-
fileshare.ttl: uploaded file expiration time in seconds, default is 86400 (1 day) client, e.g: /api/fileshare/58f417bb-4d28-47cf-9673-0a9453b79cc5), access to the uploaded files collection via /api/fileshare always requires authentication.
Approach
File Upload
To upload a file the client must use POST and the file attached into the form named "file"
An example of file upload using 'curl':
curl -X POST -F 'file=@/tmp/sample_image.png' https://ngcp-api/api/fileshare| one of the available authorization methods is required for the file upload (Basic Authentication or JWT) |
There is an optional upload body parameter 'ttl', that can be provided to override the default ttl for the uploaded file.
An example of file upload with ttl using 'curl':
curl -X POST -F 'file=@/tmp/sample_image.png' -F ttl=3600 https://ngcp-api/api/fileshareOnce a file is successfully uploaded a JSON response is returned with the following data:
{
  "id": "b994894d-882b-4672-a152-ff1e68ab7ee0",
  "name": "sample_image.png",
  "mime_type": "image/png",
  "ttl": "3600",
  "created_at": "2021-12-14T20:58:13.483Z",
  "expires_at": "2021-12-14T21:58:13.483Z",
  "size": 198791,
  "_links": {
    "self": {
      "href": "/api/fileshare/b994894d-882b-4672-a152-ff1e68ab7ee0"
    },
    "collection": {
      "href": "/api/fileshare"
    }
  }
}-
The upload name is taken from the provided filename.
-
The mime type is automatically determinted by the server.
File Download
To download a file a full URL must be provided, e.g.:
curl -X GET https://ngcp-api/api/fileshare/b994894d-882b-4672-a152-ff1e68ab7ee0If fileshare.public_links is enabled in the config.yml, then there is no authorization required for the link to work, otherwise an authorization is required for the link to be used (any authenticated NGCP subscriber (or admin) user can use the link).
The response is a data stream.
Files Collection
As a subscriber (or an admin) you can retrieve all your uploaded files list as:
curl -X GET https://ngcp-api/api/fileshare/The response is a JSON HAL collection.
{
  "_links": {
    "self": {
      "href": "/api/fileshare?page=1&rows=10"
    },
    "ngcp:fileshare": [
      {
        "href": "/api/fileshare/1ec51a35-92e7-46be-aa98-db69f11483a7"
      },
      {
        "href": "/api/fileshare/58f417bb-4d28-47cf-9673-0a9453b79cc5"
      }
    ],
    "collection": {
      "href": "/api/fileshare"
    }
  },
  "total_count": 2,
  "_embedded": {
    "ngcp:fileshare": [
      {
        "id": "1ec51a35-92e7-46be-aa98-db69f11483a7",
        "name": "doc.pdf",
        "mime_type": "application/pdf",
        "ttl": 86400,
        "created_at": "2021-12-11T11:46:39.000Z",
        "expires_at": "2021-12-12T11:46:39.000Z",
        "size": 10
      },
      {
        "id": "58f417bb-4d28-47cf-9673-0a9453b79cc5",
        "name": "sample_text.txt",
        "mime_type": "text/plain",
        "ttl": 3600,
        "created_at": "2021-12-14T18:17:15.000Z",
        "expires_at": "2021-12-14T19:17:15.000Z",
        "size": 10
      }
    ]
}| It is also possible to receive the response in the OpenAPI format by providing an additional header, Accept: application/json |
{
  "id": "1ec51a35-92e7-46be-aa98-db69f11483a7",
  "name": "doc.pdf",
  "mime_type": "application/pdf",
  "ttl": 86400,
  "created_at": "2021-12-11T11:46:39.000Z",
  "expires_at": "2021-12-12T11:46:39.000Z",
  "size": 10
},
{
  "id": "58f417bb-4d28-47cf-9673-0a9453b79cc5",
  "name": "sample_text.txt",
  "mime_type": "text/plain",
  "ttl": 3600,
  "created_at": "2021-12-14T18:17:15.000Z",
  "expires_at": "2021-12-14T19:17:15.000Z",
  "size": 10
}Batch Provisioning
Overview
Batch provisioning of subscribers can ensure that all details of the required subscriber settings are correctly stored in the database. For the easy and convenient operation, NGCP provides the possibility to enter or upload the necessary, variable subscriber data and execute the provisioning automatically. This can be achieved through the administrative web interface, command line interface, or also via REST API.
The advantages are as follows:
(a) Standardizing complex subscriber setup procedures.
Batch provisioning allows to define provisioning templates, in which specific subscriber settings can be set. A template allows to define different types of input fields, parameters for internal calculations, and the setting of subscriber-related parameters.
(b) Scripting languages.
Provisioning templates allows the definition of code snippets for parameter calculations. Code can be based on Javascript or Perl programming languages.
(c) Transactional processing (Rollback behavior).
Batch provisioning is based on transactional processing. If provisioning fails at a specific point, it will rollback what was created up to that point, in order to avoid residual data in the database.
(d) Processing speed.
Batch provisioning allows to process a large number of subscriber data with a considerable gain in processing speed.
The following sections will provide more details about these features.
Template Structure and Main Fields
Provisioning templates are commonly defined on the YAML language. The list of currently supported main keys are shown and described as follows.
fields:
  #Structure that contains several input fields.
contract_contact:
  #Structure that contains several provisioning fields
  #for the contact of the customer.
contract:
  #Structure that contains several provisioning fields
  #for the customer.
contract_preferences:
  #Structure that contains several provisioning fields
  #for customer preferences.
subscriber:
  #Structure that contains several provisioning fields
  #for subscriber details.
subscriber_preferences:
  #Structure that contains several provisioning fields
  #for subscriber preferences.
registrations:
  #Structure that contains several provisioning fields
  #for permanent registrations.
trusted_sources:
  #Structure that contains several provisioning fields
  #for trusted sources.
cf_mappings:
  #A structure that contains several provisioning fields
  #for call forward mappings.
The ‘fields’ key
The fields key allows to define input hierarchical structures by
providing additional key-value pair parameters. The supported attribute
names are the ones defined in the Comprehensive Perl Archive Network
(CPAN) HTML::FormHandler::Field Modules.
Parameters must contain a name and data type. For the latter, some basic
type values are: Integer, Float, Text, Boolean, Checkbox and
Select. Additional attributes can be appended as well.
The following example aims to show how to declare different parameters
within the fields key. Let us assume that an administrator wants to:
-
Declare a parameter named “my_field1”, which will be a mandatory input text labeled as “This is field 1 (Text)”.
-
Declare a parameter named “my_field2”, which will be an optional integer input labeled as “This is field 2 (Integer)”.
-
Declare a parameter named “my_field3”, which will be optional Boolean input labeled as “This is field 3 (Boolean)”.
-
Declare a parameter named “my_field4”, which will be a mandatory dropdown list labeled as “This is field 4 (Select)” with two sub-options labeled “optA-label”, “optB-label” with the static values “optA-value”, “optB-value”, respectively.
The resulting YAML declaration will be:
fields:
  - name: my_field1
    label: "This is Field 1 (Text)"
    type: Text
    required: 1
  - name: my_field2
    label: "This is Field 2 (Integer)"
    type: Integer
  - name: my_field3
    label: "This is Field 3 (Boolean)"
    type: Boolean
  - name: my_field4
    label: "This is Field 4 (Select)"
    type: Select
    options:
      - label: optA-label
        value: optA-value
      - label: optB-label
        value: optB-value
    required: 1
The resulting web form will be shown as the picture below.
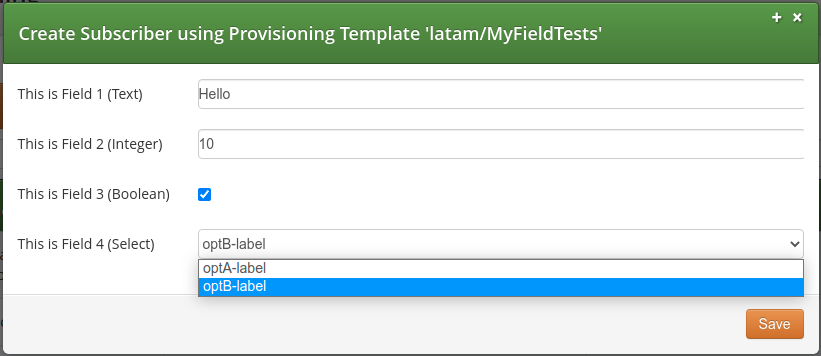
The ‘purge’ attribute name
The purge attribute name is a reserved word that can be declared within
the fields tag, as a Boolean type. When set to 1, and if there is an
existing subscriber with the same data to be provisioned (e.g. same
username, number or alias), then the existing subscriber will be
terminated before the new one is created. On the opposite, if set to 0,
that row will be skipped.
| The engine will not terminate anything other than a subscriber (Including its child items such as preferences, trusted sources, call forwards, etc.). Thus, the contract or contact is not terminated/deleted. |
The ‘calculated’ reserved parameter type
There is a special attribute type named calculated, which is not visible
on form elements. It is declared for internal use to: (a) Store static
values on attributes; (b) Store the output of computed operations coming
from code snippets. As defined in HTML::FormHandler, the former
requires declaring the value attribute name to store the data. The
latter requires declaring the value_code attribute in order to store the
data in the value attribute. Next sections will describe further details
about this.
Rest of Template Keys
The rest of the template keys can contain any of the NGCP settings, as detailed in the table below.
Field Name |
Sub-fields |
|
Available field names can be taken from the
|
|
Available field names can be taken from the |
|
Available field names can be taken from the
|
|
Available field names can be taken from the
|
|
Available field names can be taken from the
|
|
Available field names can be taken from the
|
|
Available field names can be taken from the
|
|
Available field names can be taken from the
|
The ‘identifier’ sub-field and data lookup
The identifier field is a comma-separated list composed by one or more
JSON/SQL properties. It can be specified within any of the template keys
of the table above. It is a string list that the batch processing engine
uses for data lookup in the database.
For instance, let us assume that the following declaration has been defined:
identifier Attribute.contract_contact:
identifier: "firstname, lastname, status"
reseller: default
firstname_code: "function() { return row.first_name; }"
lastname_code: "function() { return row.last_name; }"
status: "active"
contract:
identifier: contact_id
contact_id_code: "function() { return contract_contact.id; }"
product: "Basic SIP Account"
billing_profile: "Default Billing Profile"Firstly, a Contract refers to a customer (i.e. a PBX). When the engine
processes a CSV file (or a Web form), it will search for a contract
contact with the names specified in the firstname and lastname fields
(e.g. "John, Doe"), and with the status field equals to “active”.
If the contact entry does not yet exist, it will be created. At this stage, there are two situations:
(a) Contact does not yet exist: A new one is created, with some new
contact_id value.
(b) Contact already exists: It is looked up and returns some existing
contact_id value.
Regarding the contract tag, its identifier is the contact_id field.
Again, the engine will try to look up for a contract with the contact_id
previously obtained:
-
When the contract contact was just created (Case (a) above), then there will neither be an existing contract. Hence, the contract is also created.
-
In case (b), there is already a contact (e.g. “John Doe”, which is active), then possibly also already a contract linked to it. Hence, the engine will not create another contract, but it looks up the existing one.
-
Finally, the engine proceeds with creating subscribers and their corresponding settings.
Further sections will describe extra details on the template declaration.
Storing Data
When using internal attributes (i.e. defined by the calculated type), it
is possible to store static data or code-calculated data (i.e. obtained
from code snippets). Static data can be stored in any suitable attribute
name according the template section in which will be declared.
Notwithstanding, in order to store the output from a code snippet, that
attribute name MUST be declared along with the _code suffix
concatenated to it. Some examples:
-
Within the
fieldskey, thevalueattribute name needs to be used to store static data. Hence, thevalue_codeattribute name must be declared in the template if a code snippet is put in place to calculate such data. When the data is computed, it will be stored in thevalueattribute. -
Within the
contractkey,contact_idis one of the several available attributes for a customer that can be declared in that section. If the value of this attribute needs to be computed, then thecontact_id_codeattribute name needs to be declared, along with the corresponding code snippet. Then, when the data is computed, it will be stored in thecontact_idattribute.
Code Snippets
Code snippets allows to use programming logic to calculate attribute values. The supported programming languages are Javascript and Perl.
The following directives must be declared to use code snippets in templates, for both Javascript and Perl, respectively:
"function() {
  //Javascript code logic
  ...
  return ... ; //Output to be stored in a *_code attribute name.
}”
"sub {
#Perl code logic
...
return ... ; #Output to be stored in a *_code attribute name.
}”Native Javascript/Perl directives can be used as part of the code logic, such as string concatenations, number stripping, etc. Furthermore, there are reserved variable names and special functions that can be used in a code. These are detailed in the following sections.
Reserved Variable Names
Reserved variable names can be used in the definition of code snippets, summarized as follows.
Variable Name |
Type |
Description |
|
Class |
It represents the CSV file row (or the input form when
filling out via Admin Panel) according the |
|
Class |
Settings for the contact of the customer. It contains information such as the name, the postal and email addresses, among others. |
|
Class |
Settings for customer. It refers to the
|
|
Class |
Settings for customer preferences. |
|
Class |
Settings for subscriber details. |
|
Class |
Settings for subscriber preferences. |
|
Class |
Settings for permanent registrations. |
|
Class |
Settings for trusted sources. |
|
Class |
Settings for call forward mappings. |
|
String |
Reseller name. The entity name that represents a collection of settings to provide telecommunication services to subscribers on the NGCP. |
|
String |
Billing profile name. |
|
String |
Billing profile package name. |
|
String |
SIP domain name. Particularly, it refers to the record
for the |
|
String |
SIP domain name. Particularly, it refers
to the |
|
String |
The product type for the PBX customer. Either "Basic SIP Account" or "Cloud PBX Account". |
|
String |
It represents the transaction timestamp. |
Special Functions
Apart from using native Javascript/Perl functions, there are special utility functions available, summarized as follows.
Function Name |
Arguments |
Description |
|
String |
It can split a number (entered as a text) into
country code ( Where:
|
|
String |
It prints ‘debug’ log information in the
/var/log/ngcp/panel.log and /var/log/ngcp/panel-debug.log files when
used via Admin Panel, or in the output of the
|
|
String |
It prints ‘info’ log information in the
/var/log/ngcp/panel.log and /var/log/ngcp/panel-debug.log files when
used via Admin Panel, or in the output of the
|
|
String |
It prints ‘warning’ log information in the
/var/log/ngcp/panel.log and /var/log/ngcp/panel-debug.log files when
used via Admin Panel, or in the output of the
|
|
String |
It prints ‘error’ log information in the
/var/log/ngcp/panel.log and /var/log/ngcp/panel-debug.log files when
used via Admin Panel, or in the output of the
|
| For Perl, the following core functions are disabled to prevent harmful code injection: binmode(), close(), closedir(), dbmclose(), dbmopen(), eof(), fileno(), flock(), format(), getc(), read(), readdir(), rewinddir(), say(), seek(), seekdir(), select(), syscall(), sysread(), sysseek(), syswrite(), tell(), telldir(), truncate(), write(), print(), printf(), chdir(), chmod(), chown(), chroot(), fcntl(), glob(), ioctl(), link(), lstat(), mkdir(), open(), opendir(), readlink(), rename(), rmdir(), stat(), symlink(), sysopen(), umask(), unlink(), utime(), alarm(), exec(), fork(), getpgrp(), getppid(), getpriority(), kill(), pipe(), setpgrp(), setpriority(), sleep(), system(), times(), wait(), waitpid(), accept(), bind(), connect(), getpeername(), getsockname(), getsockopt(), listen(), recv(), send(), setsockopt(), shutdown(), socket(), socketpair(), msgctl(), msgget(), msgrcv(), msgsnd(), semctl(), semget(), semop(), shmctl(), shmget(), shmread(), shmwrite(), endgrent(), endhostent(), endnetent(), endpwent(), getgrent(), getgrgid(), getgrnam(), getlogin(), getpwent(), getpwnam(), getpwuid(), setgrent(), setpwent(), endprotoent(), endservent(), gethostbyaddr(), gethostbyname(), gethostent(), getnetbyaddr(), getnetbyname(), getnetent(), getprotobyname(), getprotobynumber(), getprotoent(), getservbyname(), getservbyport(), getservent(), sethostent(), setnetent(), setprotoent(), setservent(), exit(), goto(). |
Finally, let us consider the following template section example:
fields:
  - name: cc
    label: "Country Code:"
    type: Text
    required: 1
  - name: ac
    label: "Area Code:"
    type: Text
    required: 1
  - name: sn
    label: "Subscriber Number:"
    type: Text
    required: 1
  - name: sip_username
    type: calculated
    value_code: "function() {
                   return row.cc.concat(row.ac).concat(row.sn);
                }"
Here, the text input fields cc, ac and sn along with the internal field
sip_username are declared. It is required for this case that
sip_username must be a string concatenation of the cc, ac and sn fields,
respectively. Therefore, sip_username type is declared as calculated and its value
must be declared through the value_code attribute name. This attribute
shows a code snippet which contains a Javascript function that performs
the string concatenation. The row variable refers to the CSV file row,
or the form input when filling out the data through Admin Panel. Finally,
when the data is computed, it will be stored in the value attribute.
Batch Provisioning Via Admin Panel
Batch provisioning can be enabled as a global, system-wide configuration
in the main configuration file (config.yml) through the
www_admin.batch_provisioning_features property set to 1. The feature is
available for all administrative users of the platform, that covers
users with generic administrator role and users with “customer care”
role. These users will be referred as “admin users” later in this
document.
When set, the Batch Provisioning page can be accessed through the Tools → Batch Provisioning menu entry. The interface will offer the option to create a new provisioning template, or edit an existing one.
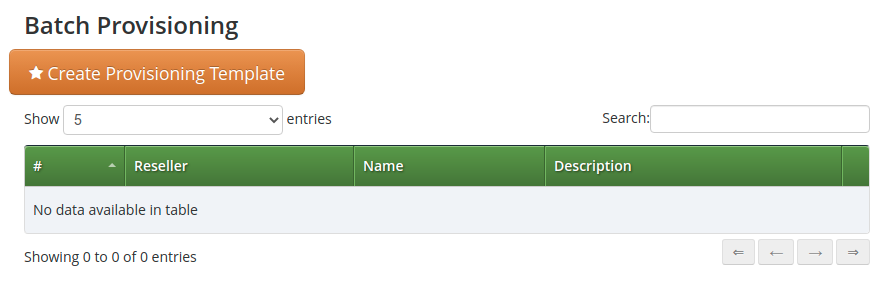
For creation, press on the 'Create Provisioning Template' button. This will pop-up a new window, as shown below.
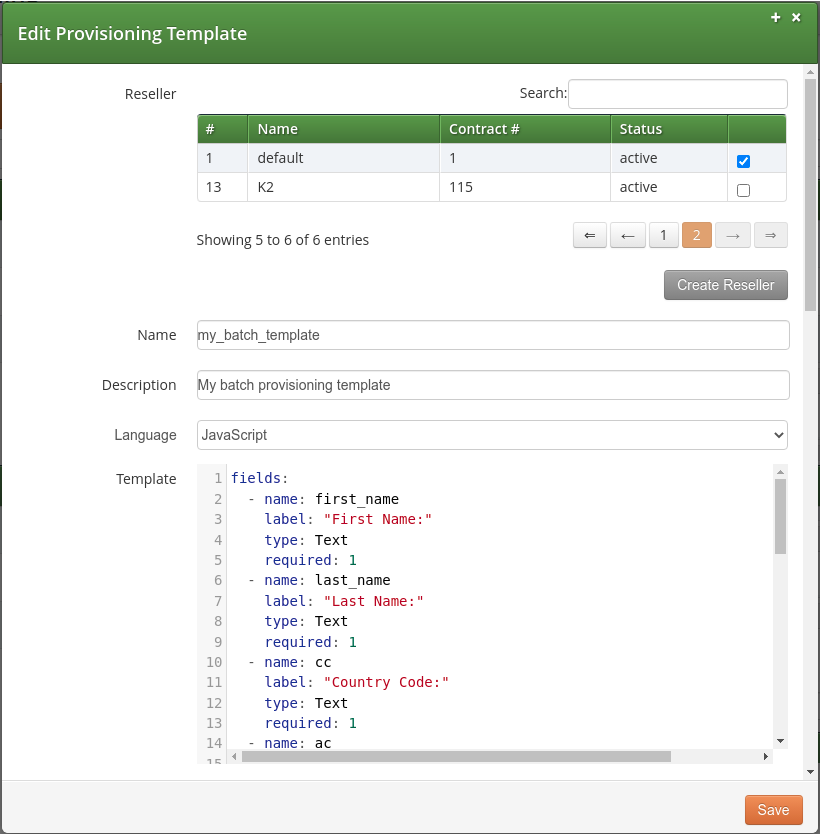
The parameters are as follows:
-
Reseller: The reseller this template belongs to.
-
Name: A free form string used to identify the provisioning template in the Admin Panel. This may be edited at any time.
-
Description: Information about the provisioning template.
-
Language: Scripting language used in the provisioning template for the ‘calculated’ fields. Either JavaScript (default) or Perl.
-
Template: The provisioning template to be used. By default, there is a built-in template that has been created to set basic options. Please, check appendix for further details.
Once a template has been defined, there are two options available for data input:

Manual Entry For A Single Subscriber
This option is available when clicking on the 'Open Form' button. A new window will be displayed to enter the variable data of the subscriber in several form fields:
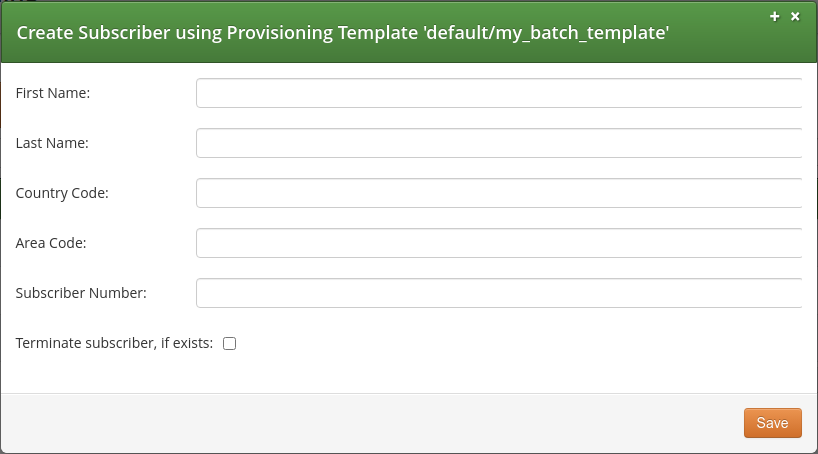
The fields displayed will depend of what is defined on the provisioning template. If the default built-in template is in use, then parameters are as follows:
-
First Name: The given name of the customer in which the subscriber will belong to.
-
Last Name: The surname of the customer in which the subscriber will belong to.
-
Country Code (CC): Country code of the subscriber telephone number.
-
Area Code (AC): Area code of the subscriber telephone number.
-
Subscriber Number (SN): Telephone number of the subscriber.
-
Terminate subscriber, if exists: If ticked, it will terminate any existing subscriber with that name.
Bulk Entry For More Subscribers
This option is available when clicking on the 'Upload CSV' button, which allows to upload a CSV file that contains a line of data for each subscriber. A new window will be displayed to enter the data:
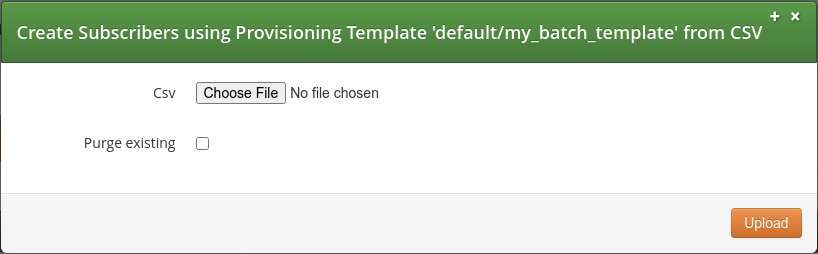
The parameters are as follows:
-
CSV: The CSV file to upload. The file has to follow the format defined in the template.
-
Purge Existing: If ticked, it will terminate any existing subscribers with that name. This checkbox is equivalent to specify the value 1 in each row of the CSV file.
Batch Provisioning via CLI
NGCP offers the ngcp-provisioning-template command line tool
for batch provisioning, which allows to run a 'provisioning template'
from database or from config.yml file. This will produce a subscriber
setup including required billing contact, contract, preferences, etc.
from an input form defined by that template.
Usage:
For templates defined in config.yml file:
ngcp-provisioning-template "provisioning-template-name" [options]For templates defined in database:
ngcp-provisioning-template "reseller-name/provisioning-template-name" [options]| For templates defined in database, different resellers could each have a provisioning template with the same name. |
The form fields can be passed as command line options, as described below.
| Option | Description |
|---|---|
|
Prints a brief help message and exits. |
|
The host of the ngcp database to connect to. If omitted, the database connection settings of ngcp-panel will be used. |
|
The port of the ngcp database to connect to.
Only relevant if |
|
The database user for the ngcp database to connect to.
Only relevant if |
|
The the database user password (if any) for
the ngcp database to connect to. Only relevant if |
|
Specify a CSV filename to process. Each row represents form values for one subscriber to create. |
|
Provide an input attribute
name and its value, as defined within the |
|
Terminate an existing subscriber with duplicate number/aliases first. |
|
Verbosity level of printed messages while processing
( |
By default, database connection parameters are read from the
/etc/ngcp-panel/provisioning.conf configuration file. For developing
and/or testing reasons, it is possible though to use different database
connection parameters, which can be specified with the --db-* arguments.
If no CSV file is specified with the --file option, each of the
non-internal input parameters defined in the template (within the fields
tag) can be provided as part of the command line options. For instance,
if first_name input variable is declared in the template, then such
option can be entered as --first_name (e.g. --first_name=John).
Batch provisioning is based on transactional processing. If provisioning fails at a specific point, it will rollback what was created up to that point, in order to avoid residual data in the database.
When developing a template, it is best to use the
ngcp-provisioning-template script with debug enabled, since it is
possible to check log messages directly on the command output.
|
Some examples for single subscriber use, and CSV-file use.
Single subscriber (Debug level on):
ngcp-provisioning-template "default/My Template" \
  --log-level=debug \
  --first_name=Peter \
  --last_name=White \
  --cc=43 \
  --ac=1 \
  --sn=2521523 \
  --purge
CSV File (Debug level on):
ngcp-provisioning-template "default/My Template" \
  --log-level=debug \
  --file=bulk.csv \
  --purge
Batch Provisioning Via API
Batch provisioning is also available in REST API through the
/api/provisioningtemplates/ path. Please, check API documentation for
details about available HTTP methods, properties and query parameters.
The following sub-sections aim to highlight common use cases. Let us assume the following template base data will be used.
Field |
Value |
Reseller |
default |
Reseller ID |
1 |
SIP Domain |
mydomain.com |
Product |
Basic SIP Account |
Template Name |
My API Provisioning Template |
Template Language |
js (Javascript) |
Template Content |
Same as Built-in Template |
API IP <Address:Port> |
127.0.0.1:1443 |
API Key File |
./apiclient.pem |
Template Creation
For template creation, the HTTP POST method is available. Template
metadata can be specified in JSON notation using the name, description,
reseller_id, and lang attributes. Template definition can be provided
in JSON notation within the template attribute, as shown below.
curl -ki --cert ./apiclient.pem -X POST \
  -H 'Connection: close' \
  -H 'Content-Type: application/json' \
  "https://127.0.0.1:1443/api/provisioningtemplates/" \
  --data-binary '{
    "description" : "My API-Created Template",
    "name" : "My API Provisioning Template",
    "reseller_id" : 1,
    "lang" : "js",
    "template" : {
      "fields" : [
        {
           "name" : "first_name",
           "label" : "First Name:",
           "type" : "Text",
           "required" : "1"
        },
        {
          "name" : "last_name",
          "label" : "Last Name:",
          "type" : "Text",
          "required" : "1"
        },
        {
          "label" : "Country Code:",
          "name" : "cc",
          "type" : "Text",
          "required" : "1"
        },
        {
          "name" : "ac",
          "label" : "Area Code:",
          "type" : "Text",
          "required" : "1"
        },
        {
          "name" : "sn",
          "label" : "Subscriber Number:",
          "type" : "Text",
          "required" : "1"
        },
        {
          "name" : "sip_username",
          "type" : "calculated",
          "value_code" : "function() { return row.cc.concat(row.ac).concat(row.sn); }"
        },
        {
          "name" : "purge",
          "label" : "Terminate subscriber, if exists:",
          "type" : "Boolean"
        }
      ],
      "contract_contact" : {
        "identifier" : "firstname, lastname, status",
        "reseller" : "default",
        "firstname_code" : "function() { return row.first_name; }",
        "lastname_code" : "function() { return row.last_name; }",
        "status" : "active"
      },
      "contract" : {
        "product" : "Basic SIP Account",
        "billing_profile" : "Default Billing Profile",
        "identifier" : "contact_id",
        "contact_id_code" : "function() { return contract_contact.id; }"
      },
      "subscriber" : {
        "domain" : "mydomain.com",
        "primary_number" : {
          "cc_code" : "function() { return row.cc; }",
          "ac_code" : "function() { return row.ac; }",
          "sn_code" : "function() { return row.sn; }"
        },
        "username_code" : "function() { return row.sip_username; }",
        "password_code" : "function() { return row.sip_password; }"
      },
      "subscriber_preferences" : {
        "gpp0" : "test"
      }
    }
  }'
Template Request
For template request, the HTTP GET method is available. A specific
template can be fetched according the id value of the template, which
corresponds to the concatenation of reseller name, the / symbol and the
template name. Based on the previous example creation, the corresponding
value is “default/My API Provisioning Template”.
curl -ki --cert ./apiclient.pem -X GET \
  -H 'Connection: close' \
  "https://127.0.0.1:1443/api/provisioningtemplates/default/My API Provisioning Template/"
On batch provisioning templates, the id parameter is a String
type (Rather than an Integer type, as commonly used on other API commands).
|
GET method will output the template definition within the template
attribute, which output format can be controlled by using the
?format=[value] directive. The available values are: yml, yaml or json.
Example:
curl -ki --cert ./apiclient.pem -X GET \
  -H 'Connection: close' \
  "https://127.0.0.1:1443/api/provisioningtemplates/default/My API Provisioning Template/?format=json"
Additionally, as templates can be stored on database or in config.yml
file, it is possible to use the Boolean editable parameter to list: (a)
Database-stored templates only (true); or (b) Templates defined on
config.yml file only (false). Example:
curl -ki --cert ./apiclient.pem -X GET \
  -H 'Connection: close' \
"https://127.0.0.1:1443/api/provisioningtemplates/?editable=false"| Templates defined on config.yml will be displayed on Admin Panel, but they cannot be edited. |
Template Update
For template update, the HTTP PUT and PATCH methods are available.
For PUT, it is possible to set the whole template at once only. Let us
assume that the gpp0 attribute (located within the subscriber_preferences tag)
will be modified to other value, meanwhile the rest of template properties
will remain the same.
curl -ki --cert ./apiclient.pem -X PUT \
  -H 'Connection: close' \
  -H 'Content-Type: application/json' \
  "https://127.0.0.1:1443/api/provisioningtemplates/default/My API Provisioning Template/" \
  --data-binary '{
    "description" : "My API-Created Template",
    "name" : "My API Provisioning Template",
    "reseller_id" : 1,
    "lang" : "js",
    "template" : {
      "fields" : [
        {
          "name" : "first_name",
          "label" : "First Name:",
          "type" : "Text",
          "required" : "1"
        },
        {
          "name" : "last_name",
          "label" : "Last Name:",
          "type" : "Text",
          "required" : "1"
        },
        {
          "label" : "Country Code:",
          "name" : "cc",
          "type" : "Text",
          "required" : "1"
        },
        {
          "name" : "ac",
          "label" : "Area Code:",
          "type" : "Text",
          "required" : "1"
        },
        {
          "name" : "sn",
          "label" : "Subscriber Number:",
          "type" : "Text",
          "required" : "1"
        },
        {
          "name" : "sip_username",
          "type" : "calculated",
          "value_code" : "function() { return row.cc.concat(row.ac).concat(row.sn); }"
        },
        {
          "name" : "purge",
          "label" : "Terminate subscriber, if exists:",
          "type" : "Boolean"
        }
      ],
      "contract_contact" : {
        "identifier" : "firstname, lastname, active",
        "reseller" : "default",
        "firstname_code" : "function() { return row.first_name; }",
        "lastname_code" : "function() { return row.last_name; }",
        "status" : "active"
      },
      "contract" : {
        "product" : "Basic SIP Account",
        "billing_profile" : "Default Billing Profile",
        "identifier" : "contact_id",
        "contact_id_code" : "function() { return contract_contact.id; }"
      },
      "subscriber" : {
        "domain" : "mydomain.com",
        "primary_number" : {
          "cc_code" : "function() { return row.cc; }",
          "ac_code" : "function() { return row.ac; }",
          "sn_code" : "function() { return row.sn; }"
        },
        "username_code" : "function() { return row.sip_username; }",
        "password_code" : "function() { return row.sip_password; }"
      },
      "subscriber_preferences" : {
        "gpp0" : "My new gpp0 value"
      }
    }
  }'
For PATCH, it is possible to modify main template attributes at once
only. Sub-attributes belonging to a section will need to be replaced as
a whole. Let us assume that the description attribute and the gpp0
attribute (located within the template.subscriber_preferences section) will
be updated to different values, respectively.
curl -ki --cert ./apiclient.pem -X PATCH \
  -H 'Connection: close' \
  -H 'Content-Type: application/json-patch+json' \
  "https://127.0.0.1:1443/api/provisioningtemplates/default/My API Provisioning Template/" \
  --data-binary '[
    { "op" : "replace", "path" : "/description", "value" : "My new description for API-Created Template" },
    { "op" : "replace", "path" : "/template", "value" : {
      "fields" : [
        {
          "name" : "first_name",
          "label" : "First Name:",
          "type" : "Text",
          "required" : "1"
        },
        {
          "name" : "last_name",
          "label" : "Last Name:",
          "type" : "Text",
          "required" : "1"
        },
        {
          "label" : "Country Code:",
          "name" : "cc",
          "type" : "Text",
          "required" : "1"
        },
        {
          "name" : "ac",
          "label" : "Area Code:",
          "type" : "Text",
          "required" : "1"
        },
        {
          "name" : "sn",
          "label" : "Subscriber Number:",
          "type" : "Text",
          "required" : "1"
        },
        {
          "name" : "sip_username",
          "type" : "calculated",
          "value_code" : "function() { return row.cc.concat(row.ac).concat(row.sn); }"
        },
        {
          "name" : "purge",
          "label" : "Terminate subscriber, if exists:",
          "type" : "Boolean"
        }
      ],
      "contract_contact" : {
        "identifier" : "firstname, lastname, status",
        "reseller" : "default",
        "firstname_code" : "function() { return row.first_name; }",
        "lastname_code" : "function() { return row.last_name; }",
        "status" : "active"
      },
      "contract" : {
        "product" : "Basic SIP Account",
        "billing_profile" : "Default Billing Profile",
        "identifier" : "contact_id",
        "contact_id_code" : "function() { return contract_contact.id; }"
      },
      "subscriber" : {
        "domain" : "mydomain.com",
        "primary_number" : {
          "cc_code" : "function() { return row.cc; }",
          "ac_code" : "function() { return row.ac; }",
          "sn_code" : "function() { return row.sn; }"
        },
        "username_code" : "function() { return row.sip_username; }",
        "password_code" : "function() { return row.sip_password; }"
      },
      "subscriber_preferences" : {
        "gpp0" : "My new gpp0 value"
      }
     }
    }
  ]'
Template Deletion
For template deletion, the HTTP DELETE method is available. It is
required to provide the id value (String) of the template. Based on
the examples, the value is “default/My API Provisioning Template”.
curl -ki --cert ./apiclient.pem -X DELETE \
  -H 'Connection: close' \
  "https://127.0.0.1:1443/api/provisioningtemplates/default/My API Provisioning Template/"
API Data Provisioning: Single Subscriber
A POST can be requested to provision a single subscriber by using JSON.
Let us assume that the following single subscriber data will be
provisioned:
Customer Contact Info |
Subscriber |
Purge? |
|||
First Name |
Surname |
CC |
AC |
SN |
|
Mark |
Brown |
56 |
2 |
33445511 |
yes |
Then, the corresponding API command will be:
curl -ki --cert ./apiclient.pem -X POST \
  -H 'Connection: close' \
  -H 'Content-Type: application/json' \
  "https://127.0.0.1:1443/api/provisioningtemplates/default/My API Provisioning Template/" \
  --data-binary '{
    "first_name" : "Mark" ,
    "last_name" : "Brown" ,
    "cc" : "56" ,
    "ac" : "2",
    "sn" : "33445511" ,
    "purge" : true
  }'
API Data Provisioning: Batch of Subscribers
To bulk-upload subscribers, it is required to specify the Content-Type
as text/csv and POST the CSV file in the request body. Let us assume
that the following subscriber data will be provisioned in the bulk.csv
file:
Customer Contact Info |
Subscriber(s) |
Purge? |
|||
First Name |
Surname |
CC |
AC |
SN |
|
James |
Smith |
56 |
2 |
33445511 |
yes |
Richard |
Stone |
56 |
2 |
33445522 |
yes |
John |
Doe |
43 |
123 |
1001 1002 1003 1004 1005 |
yes |
The CSV file will contain:
James, Smith, 56, 2, 33445511, 1
Richard, Stone, 56, 2, 33445522, 1
John, Doe, 43, 123, 1001, 1
John, Doe, 43, 123, 1002, 1
John, Doe, 43, 123, 1003, 1
John, Doe, 43, 123, 1004, 1
John, Doe, 43, 123, 1005, 1
Then, the corresponding API command will be:
curl -ki --cert ./apiclient.pem -X POST \
  -H 'Connection: close' \
  -H 'Content-Type: text/csv' \
  "https://127.0.0.1:1443/api/provisioningtemplates/default/My API Provisioning Template/" \
  --data-binary '@./bulk.csv'
Call List Suppressions
Overview
Call List Suppressions allows to filter specific numbers from Call History and Invoices. The feature aims to support country regulations such as gene violation or abuse of women, in which calls made to specific service numbers should not be made visible in any way to the aggressor.
The feature can be set via Admin Panel.
Its main advantages are as follows:
(a) Filter Calls.
Matched call numbers (against a regular expression) will not appear at all.
(b) Obfuscate Calls.
Matched call numbers (against a regular expression) will be replaced by a given label.
The following sections will provide more details about the feature.
Provisioning via Admin Panel
Call List Suppressions can be accessed at Settings → Call List Suppressions section. The interface will offer the option to create a new entry, edit any of the existing ones, or upload/download via CSV.
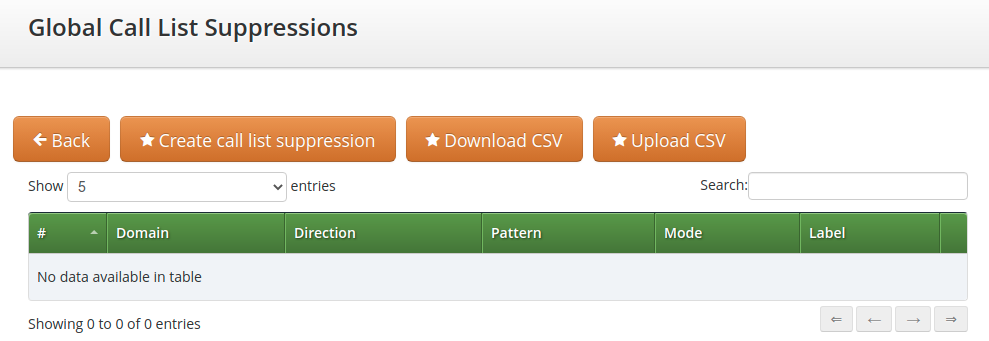
Single Entry
For creation, press on the "Create call list suppression" button, which will pop-up a new window, as shown below.
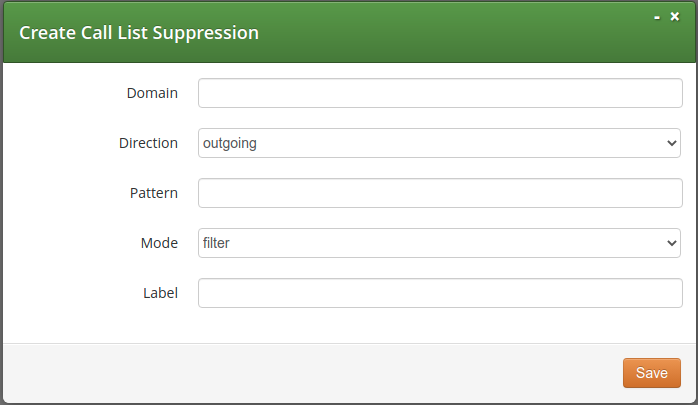
Parameters are as follows:
-
Domain: The domain of subscribers in which this call list suppression applies to. An empty domain means to apply it to subscribers of any domain.
-
Direction: The direction (
outgoingorincoming) of calls this call list suppression applies to. -
Pattern: A regular expression the dialed number (CDR
destination_user_infield) has to match in case ofoutgoingdirection, or the inbound number (CDRsource_clifield) in case of incoming direction. -
Mode: It defines the suppression mode. For subscriber and subscriber admins, The
filteroption means that matching calls will not appear at all, while theobfuscateoption means that the number is replaced by the given label. Also, the mode can be disabled by selecting thedisabledoption. -
Label: A string name to be defined for this list. Admin and reseller users see it for
filtermode suppressions. For theobfuscate mode, this label will be used as a replacement string.
Bulk Entry
This option is available when clicking on the "Upload CSV" button, which allows to upload a CSV file that contains a line of data for each list. A new window will be displayed to enter the data:
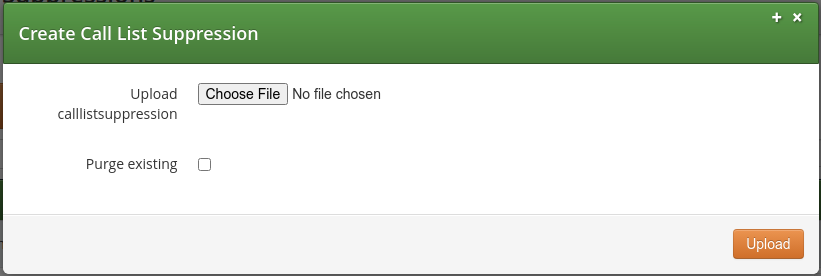
The parameters are as follows:
-
CSV: The CSV file to upload. The file has to follow the same order as defined for single entries.
-
Purge Existing: If ticked, it will delete any existing list before provisioning the new one.
Practical Example
Let us assume that an administrator will use Admin Panel to provision two call list suppression on a selected number. The following details are considered:
Domain |
Direction |
Pattern |
Mode |
Label |
voipdomain.com |
|
^571016$ |
|
cls-a |
voipdomain.com |
|
^571017$ |
|
cls-b |
In the provided example, the logic is as following:
| Logic | Result |
|---|---|
|
|
|
|
Message Body Filtering
In some cases it is required to filter out from message bodies some specific multipart/mixed body because not supported by the endpoints. This can be simply achieved using the config.yml option kamailio.lb.filter_content_type. The filter will be executed on:
-
all the INVITE requests that contains body
-
all the replies with return code 200 and 183 that contains body
To configure it, proceed following the next steps:
-
set the kamailio.lb.filter_content_type.enable option to 'yes'.
-
set the kamailio.lb.filter_content_type.action to 'filter' or 'drop'. If one of the listed content-type is found, the first option will strip out all the bodies expect for application/sdp from the message, the second one will simply drop the message.
-
list in kamailio.lb.filter_content_type.content_type_list the content_types and the direction (request, reply or all) where the action has to be applied.
-
apply the changes executing ngcpcfg apply 'enabled filter_content_type'.
| The action 'drop' works only for 'requests' and not for 'replies'. |
For example, to filter out from all the reply messages the 'application/isup' content-type and from all the messages the 'application/vnd.etsi.cug+xml', you have to configure the following:
kamailio:
  lb:
    filter_content_type:
      enable: yes
      action: filter (or drop)
      content_type_list:
      - content_type: application/isup
        direction: reply
      - content_type: application/vnd.etsi.cug+xml
direction: all| kamailio.lb.filter_content_type definition substitutes the already existing kamailio.lb.remove_isup_body_from_replies, extending its functionality to other content types. The migration from the previous setting to the new one is automatically done during the upgrade. |